SOLVED Me again...........Tayda EA Tremolo PCB not working

Jeff C

Active member
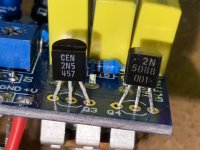
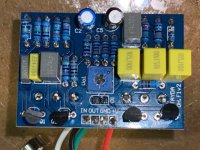
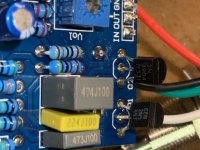
Hoping I don't set another record with this one, but I've just finished building an EA Tremolo from a PCB from Tayda. The Tayda forum is useless. No answers, no activity. So, I hope the patient and helpful folks on this forum who got me eventually across the Cobalt Drive finish line (which by the way sounds fantastic!), can figure out what my problem is. Once I finished it and plugged it in, I got audio but no effects. The LED stays lit up whether the switch is off or on. Volume trimmer potentiometer seems to work fine. I do have the input and output jacks wired correctly :)p), and am getting positive (not negative :rolleyes: ) 9 volts to the board. I've posted four pics below (figured out the magnifying bar on the mag-lite app -doh!). Given my transistor trauma of the Cobalt Drive build, I'm suspicious of mine on this one, so I took some close up pics of those. They Tayda build instructions were confusing. https://www.taydakits.com/instructions/ea-tremolo/pages/designators-and-components--43. For one, it lists a C4 cap, but there is no place for it on the PCB. It also says to use the N5457 and the SMD for Q1 and Q3. Tim (Fig) told me to use one or the other so I used the 2N5457, perhaps unwisely. They look pretty gnarly in the pics.
Here are some voltage readings from the transistors:
Q1: G: 9.3; S: 5.65; D: 4.46. Q2: E: 2.24; B: 2.8; C: 2.18; Q3: all 0's (hmmmmm); Q4: E: 0; B: 4.61; C: 2.55.
Also, C2 reads 4.4 on the negative pin and 5.6 on the positive one.

I tested with the audio probe and get a signal most everywhere but nada from any of the pot pins.....

Any suggestions on where to start would be appreciated! Tks.

Jeff
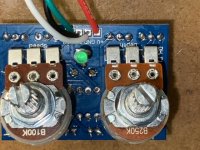
D01F7FA4-026A-4026-ACA3-600137BE4269.jpeg E3A09D66-D151-427A-BF18-897394B9F3C5.jpeg 480462DC-AE1B-49DF-BEB9-9A85F3CF16CF.jpeg 2A97B54C-6D90-479C-8A11-2C7A5DCF7FFE.jpeg
 
Was hoping for some advice re to where I might want to start resoldering based on the info I provided. I guess replacing the Q3 because that’s where the audio trail stops is not a useful strategy?
Not right away. You can jumper two of the pins to see if audio gets through. I would reflow everything, that fixes a lot. You can also check for shirts to ground in the audio path.
 
Jumper didn't do it. So, I have noob, history major, questions before I start re-flowing. Do I need to reflow a solder if my multimeter shows continuity between that point and those connected to it on the schematic? I understand I must have s short somewhere but unless I see solder or wire touching other solder or wire, or a loose solder, can I not conclude that those points with continuity don't need reflowing? Tks for your patience........clearly not an EE here......:rolleyes:
 
Jumper didn't do it. So, I have noob, history major, questions before I start re-flowing. Do I need to reflow a solder if my multimeter shows continuity between that point and those connected to it on the schematic? I understand I must have s short somewhere but unless I see solder or wire touching other solder or wire, or a loose solder, can I not conclude that those points with continuity don't need reflowing? Tks for your patience........clearly not an EE here......:rolleyes:
Yea, all of the solder joints. Believe it or not, we all do it, even seasoned veterans. I get cocky with my soldering sometimes, then I have to go back over them.
 
I checked all the resistors that the schematic shows directly connect to ground (using the legs on the resistors) and there is continuity on all. Checked the transistor legs to ground, also have continuity. I guess it’s on to reflowing……..I‘m so bad at it…….
 
I also get continuity between Q3 and Q4, but not between Q1 and Q2 or and not Q2 and Q3. Is that normal. I just don’t know how far continuity travels with the various caps and resistors in between, although it seems the Q3-Q4 connection is as “cluttered” as the others. And although I get continuity between Q3 and Q4, with the depth potvin between, I do not get continuity between Q4 and the depth pot. Seems weird. How can it pass through the pot but not pass between just the pot and Q4?
 
Messing up is just an opportunity to learn. Stick with it and in a build or two you'll be laugh about all the mistakes you made and how much you've learned.
And if I reflow them all and it miraculously works, how will I know where my mistake was? Sounds like a zen koan…..🤪
 
And if I reflow them all and it miraculously works, how will I know where my mistake was? Sounds like a zen koan…..🤪
If you reflow and it all works, you know your mistake is on the soldering technic. Knowing where you made this mistake is unlikely going to be significant to your learning. I personally don't see value in knowing where I made a bad solder, just the fact that I made one brings me to pay more attention to the quality of my soldering next time around.

Every time I build a board, I solder my components in limited group up to 5 max. After each soldering, I visually inspect my work on both side of the board before moving on to the next group of 5. If I see anything that I don't like, if not all the solder point are showing on both side of the board, if it's not all shiny, if it seems blobby... I redo it right now and then...

It's slows down the process, but save a lot of troubleshooting, awkward reflowing due to other components (pots for ex.) being in the way...
 
I usually solder a component in place and have a quick look using a magnifier

You want to heat the pad and component leg at the same time for around 4 seconds and apply your solder till you see a nice flow

Clean your iron tip frequently as you go

Any joints that look flat, dull, ball like or crumbly are potentially dry creating a poor connection
 
Sorry to assume but is this your 2nd build? My first try I totally destroyed 3 boards( I didn't know you could reuse components so I wasted money in those too), until I got it. After my 5th pedal build I had enough of trouble shooting, so I started to check every component and wire I could for continuity right after soldering it. It's tedious but it saves more time than troubleshooting it in the end. Again, I'm just assuming based on your two threads, I don't mean to sound like I know what I'm doing, I'm a big dumb-dumb
 
😂😂 Well, I first built a reverb pedal kit from BYOC. Worked first time out of the box, but then it was a kit and left little room for messing up. So, I got cocky and decided to build the Cobalt Drive (the PedalPCB forum thread for which now goes down in infamy for its length and my ineptitude). But in the end I got it to work (w/o reflowing everything......). Because I was also so inept at ordering parts from Tayda, I had to make repeat orders and cuz they want a 5 buck minimum, I thought what the heck, I'll get a couple more PCB's, the Tremolo and the BSIAB2 distortion pedal. Successfully finished the distortion pedal (after finding a bad solder on the switch jumper......) and love it, especially in combo with the Cobalt Drive. For my ignorant persistence with Cobalt Drive, PedalPCB rewarded me with a coupon so I ordered the Magnetron delay pedal. Finished it and it worked right away but when I jammed it into the enclosure it stopped working. Broke my heart. Once I figure out this tremolo disaster, I'll get back to the delay......and maybe will need help there too........I have a ways to go to catch up to you!
 
Re the Magetron, it's not the DC or in/out jacks. I may have damaged IC 1 during my wrestling match with the enclosure (no audio out from it), so I ordered a replacement and will wait for its arrival.

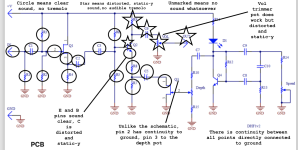
Now, re the tremolo pedal, I re-flowed a lot (not everything) and even replaced one transistor, but still no luck. Here's a graphic of where I am. Totally stuck.
Screen Shot 2022-07-20 at 2.34.40 PM.png
 
Back
Top