Fingolfen
Well-known member
Unless you only buy enough components to build one project at a time, building effects pedals eventually leads to collecting a large number of active, passive, and other components. Keeping all of these small parts organized in some meaningful way is, at best, a challenge. I use multi-drawer organizers for diodes, transistors, and ICs, but unfortunately I never had a great place to hang those organizers. They therefore tended to sit on the floor along with the bins for my resistors and capacitors. Given I have multiple hobbies, desk space is at a premium, and since I have also some larger electronics projects I want to work on, I needed something to give me additional work space and storage space for all of my bits. I settled on some sort of cart, and immediately went shopping. Unfortunately the closest thing I could find was a cart at Ikea which, like just about every useful piece of furniture there, was out of stock. I therefore figured since I'm already working on some insane woodworking projects with a friend, I may as well add a bespoke electronics cart to the list.

I had a few goals with this project. First, I wanted to get it done in a reasonable amount of time. My gaming table project has been running on 2+ years at this point, and though that project is in the home stretch, I really needed the cart to be done in weeks, not months. I also didn't want to spend a lot of money on wood, which if you've priced wood lately is a challenge in of itself! I ended up picking up a nice piece of birch veneer plywood at the local lumber and hardware store for about $80 - which is about twice what it would have been pre-COVID. Yikes! With the generous donation of some scrap wood from my friend (wood he rescued from a burn pile... which turned out to be red and white oak...) we managed to get the cart together.
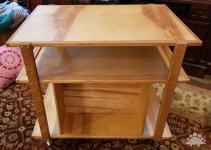
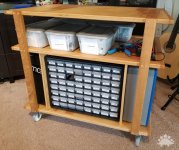
The three shelves are all birch plywood with red or white oak edging. The middle shelf is flipped relative to the top and bottom shelves to provide a lip for the plastic storage bins. All of the edges have been rounded over with a roll-over bit on the router table. Each shelf was notched with a router and the legs were screwed into the shelves. The screws were all recessed and a facing wood plug was added (which I carved back with a chisel and then sanded). The entire shebang is finished with Danish oil as it is easy, cheap, and I really didn't have the time or inclination to do a full varnish finish... on a cart...

Now I have not only a place to hold all of the parts to build my pedals, but an additional work surface, and the whole thing ended up costing $80 in wood, $10 in finishing supplies and screws. The casters were from a piece of Ikea furniture we repurposed. Of course, I'm not counting the 15-20 hours of work that actually went into the build...
If you want the full gory details of the build (of which there are many) you can see them on the blog:
Part 1 and Part 2

I had a few goals with this project. First, I wanted to get it done in a reasonable amount of time. My gaming table project has been running on 2+ years at this point, and though that project is in the home stretch, I really needed the cart to be done in weeks, not months. I also didn't want to spend a lot of money on wood, which if you've priced wood lately is a challenge in of itself! I ended up picking up a nice piece of birch veneer plywood at the local lumber and hardware store for about $80 - which is about twice what it would have been pre-COVID. Yikes! With the generous donation of some scrap wood from my friend (wood he rescued from a burn pile... which turned out to be red and white oak...) we managed to get the cart together.
The three shelves are all birch plywood with red or white oak edging. The middle shelf is flipped relative to the top and bottom shelves to provide a lip for the plastic storage bins. All of the edges have been rounded over with a roll-over bit on the router table. Each shelf was notched with a router and the legs were screwed into the shelves. The screws were all recessed and a facing wood plug was added (which I carved back with a chisel and then sanded). The entire shebang is finished with Danish oil as it is easy, cheap, and I really didn't have the time or inclination to do a full varnish finish... on a cart...

Now I have not only a place to hold all of the parts to build my pedals, but an additional work surface, and the whole thing ended up costing $80 in wood, $10 in finishing supplies and screws. The casters were from a piece of Ikea furniture we repurposed. Of course, I'm not counting the 15-20 hours of work that actually went into the build...
If you want the full gory details of the build (of which there are many) you can see them on the blog:
Part 1 and Part 2

