A simple Relay Bypass

What are the pros/cons/differences between this and the PPCB circuit? Both are past my understanding of circuits, so other than the lack of a need of a regulator, I'm not sure of the differences.

The PPCB board is good if you want to power the relay controller with something higher than +9V.

The upside to my design is increased margin on the relay drive current by
a) Powering the 555 from +9V which gives it more current drive capability,
b) Using the DISCHARGE pin to drive the relay because it has a greater current capability than the OUT pin,
c) Powering the relay coil from +9V and using a series dropping resistor to guarantee that we always get the desired coil current in a 5V coil.

We get the added bonus that the circuit is easily tweaked to drive a 4.5V, 5V, 6V or 9V relay coil simply by changing the dropping resistor.

The downside to my design is that you cannot power the pedal with +18V because anything over +16V will overstress the 555. Not really a big deal because pedals that need +18V or higher internally usually contain a charge pump to make the higher voltage from +9V.

Aren’t you describing most of the pedal industry there? 😂

Touché
 
so other than the lack of a need of a regulator, I'm not sure of the differences.

The purpose of the regulator in the PedalPCB version is so the circuit can be safely powered above 9V. Otherwise you can omit / jumper the regulator.

It's a bit of a kludge using a 9V regulator in a circuit powered at 9V (since in most cases the regulator will be running undervoltage and not regulating at all), but it works perfectly fine and protects the 555 when your brother-in-law inevitably plugs the pedal into his laptop charger. :ROFLMAO:

The other minimal difference is that the PedalPCB version pulls the SW pad low, lighting the LED on the main effect PCB.
 
Last edited:
So, either 1206 or use a heatsink? :D

That's a good call, I am tempted using an assembly option. It may be better to have through-hole for R4 since I'd have to solder the relay in any case.

One more thing. It may be tempting to make the circuit in SMD, but you have to remember that R4 is a workhorse here, it can get warm.
I am not sure that R4 in 0805 (125mW) is sufficient.
 
The coil current is 5V / 178Ω = 28.1mA
The dissipation in R4 is 28.1mA^2 * 150Ω = 118mW which is just under 1/8W.
I don't like running resistors close to their rated power, so 1/4W is appropriate.

If we use a lower current relay, such as NAIS TF2-5V, then the coil current is 5V / 312.5Ω = 16mA. R4 would be 240Ω and R4's dissipation would be 61mW. Then a single 0805 would be sufficient.
The other minimal difference is that the PedalPCB version pulls the SW pad low, lighting the LED on the main effect PCB.

My relay controller also pulls the LED cathode low when the relay is in the Engage state, so it too can drive the SW pin on a PPCB board. Just connect the LED cathode pad to SW. RLED can be omitted from the relay control in that case since the LED ballast resistor is on the PPCB board.
 
Thanks so much for sharing this circuit, Chuck!
I got this guy to work, however my LED is working backward (on when "bypassed"). Do you have an idea of where to start debugging that? I can't figure it out. I'm using an ICM7555.
 
When you first power up the relay circuit, is the LED on or off? What is the voltage across the relay coil?

You're using a momentary switch, right?

Cycle the switch until the LED turns on. What is the voltage across the relay coil?

The pinout on the NA-5W-K is different from the relay I used.
 
When you first power up the relay circuit, is the LED on or off? What is the voltage across the relay coil?

You're using a momentary switch, right?

Cycle the switch until the LED turns on. What is the voltage across the relay coil?

The pinout on the NA-5W-K is different from the relay I used.
Yep, I definitely had those relay switches backward, the relay gets voltage in the "bypass" position. I must have gotten my eyes crossed when debugging this thing. Thanks so much!
 
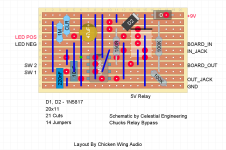
Heres my attempt at laying out a vero board for this. Have not verified yet! Looking complicated much?

This uses the Kemet EA2-5SNJ found here at the store.


Chucks Relay Bypass.png
 
Last edited:
I suck at Vero: building it, laying it out, fathoming it... So I basically avoid it and I should be the last one to suggest the following:

@steviejr92, if you enjoy such masochism then I encourage you to lay it out again with a goal towards less cuts and jumpers.
Mind, doing so might mean it's not as compact.

I found the less cuts and jumpers in a vero layout, the less frustration I had building it.
 
Thank you yah i know its very complicated im using a different relay than Chuck is using. I think im going to turn the 555 "upside down" So pins match up better with the relay.
 
The goal is to minimize cuts, jumpers and area. Pins 5 & 6 on the relay are n/c, so you don't need cuts at G11 & G15. It's fair game to make caps as long as you need to reach the desired strips.

Here's a scoring gauge I just made up:
1 point for each cut.
1 point for each jumper.
1 point for each unused hole. A hole is considered used if it is cut, covered by a component or jumper or used for an external connection.
It's like golf: lower score is better, it can be very Zen and it goes well with alcohol (not too much though).

My score:
12+8+10 = 30
That includes the jumpers on the solder side that join adjacent strips.
 
Back
Top