Pedal assembly jig

giovanni

Well-known member
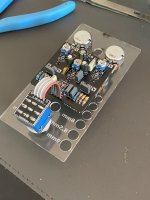
Today I laser cut a very handy jig to assemble PedalPCB boards (per other thread, huge credit to @Robert for standardizing pot placement) and I find it very very useful. I’m happy to share the svg if you’re interested. Here’s a pic:
IMG_2286.jpeg

Besides following the drill template for all PPCB enclosure types, I also made holes of various sizes to test things like LED bezels and what not. I don’t know that I’ll ever need it but I thought it would be good to have.
 
Does it have the layouts for different number of pots? I'm eyeing up the 125b drill template in the shop. Maybe a pic of the board itself can answer my question.
 
This would be great to mount the pots to solder rather than in and out of the enclosure all the time. Especially if you want to test before you have drilled the enclosure.
 
Alright I finished putting together my SoB so I was able to take a good picture:

IMG_2291.jpeg

Edit: the burn marks are due to the fact that I removed the protective plastic layer (engraving works better without IME). Also maybe the laser power was too high for cuts since some of the edges melted a bit. I didn’t need it to be pretty though, just functional.
 
Last edited:
Alright I finished putting together my SoB so I was able to take a good picture:

View attachment 48777

Edit: the burn makes are due to the fact that I removed the protective plastic layer (engraving works better without IME). Also maybe the laser power was too high for cuts since some of the edges melted a bit. I didn’t need it to be pretty though, just functional.
Pro tip: we tended to use cell cast for almost everything, which (from the brands we bought) come with paper masking. But whenever we need to do scoring, or other operations that involve removing the mask, if smoke was a potential issue, we’d remask with paper (PSA on back) masking. It’s an extra step, but is a lot less time consuming than getting rid of the smoke damage. This was especially the case if lasercutting veneers, or trimming laminated pieces that had prints on them. The melting is largely due to using extruded acrylic, but yes, temp. settings (or pulse timing) can be set to help with that. I started laser cutting plastics in the early 80s…
 
Pro tip: we tended to use cell cast for almost everything, which (from the brands we bought) come with paper masking. But whenever we need to do scoring, or other operations that involve removing the mask, if smoke was a potential issue, we’d remask with paper (PSA on back) masking. It’s an extra step, but is a lot less time consuming than getting rid of the smoke damage. This was especially the case if lasercutting veneers, or trimming laminated pieces that had prints on them. The melting is largely due to using extruded acrylic, but yes, temp. settings (or pulse timing) can be set to help with that. I started laser cutting plastics in the early 80s…
Good to know! What kind of paper? Would painter tape do the job?
 
Good to know! What kind of paper? Would painter tape do the job?
Yup, I usually mask with painter tape. I find it easier to remove than the original masking so I remove the masking all at once when I get a new sheet and tape as necessary when a job comes up.

I will mention that I agree cast/extruded acrylic makes a big difference for cleanliness though. I use extruded for some stuff because it's cheap and I can get it at the local hardware store, but when I do something important I order cast acrylic online.
 
Good to know! What kind of paper? Would painter tape do the job?
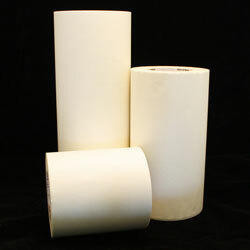
This is what we use:


We usually keep it in widths from 6 inches to 24 inches. It is low tack, so it's not a struggle pulling it off. If you are careful applying it, is also works very well (after laser scoring) as a pattern masking for spraying finishes, (not super pedal applicable, but I do this sometimes). Masking tape will work, obviously a nice wide roll is easier to deal with. The basic caveat—do a test run with whatever you're planning to use, just to make sure there are no "surprises."

Yeah, big cost difference between extruded and cel cast. There's some "in-between" type, called "continuous casted" that really is closer to extruded. Besides cost, the other advantage extruded has is that it is closer tolerances thickness. Cell cast is all over the place, which if you're building with it can be a real problem. But there are so many issues working with extruded, that it just wasn't cost effective for the processes that we use mostly (machining, laser cutting, heat forming).
 
I freehand solder my pots and switches without an enclosure
Same. I just drill my holes with a step-up bit and it gives me a little bit of wiggle room. I install pots by holding my thumb on the component side of the PCB, pinkie on the front of the pot and use my index and middle to guide my solder to attach the center leg. Once all are attached "good enough" via the center leg, I'll look them over and adjust any twist or odd angle, then solder them on in 100%
 
Back
Top