Cybercow
Well-known member
I get asked about enclosure finishing a lot in DMs from people I don't even know. So I thought to write up a tutorial/journal of waterslide decal creation and application to share for those new to waterslides for their pedals.
Waterslide decals are just one of several ways to apply artwork to an enclosure. When I started doing waterslides, I did a bit searching thru Google to see what others before me had to say on the matter. The first link I found was to this YouTube demonstration of how to do waterslides with an inkjet printer: https://www.youtube.com/watch?v=e2X_HL-4F90
There are several other such demonstrative tutorials on YouTube. A little searching there using "waterslide decals for guitar pedals" will get you more.
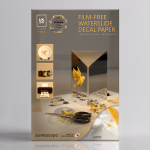
Note that waterslide stock comes in four (4) flavors: InkJet Clear BG, InkJet White BG, Laser Clear BG and Laser White BG
There is no white ink. Period. At least not for inkjet printers and other consumer grade printers. There are some laser jet printers that can receive a white toner cartridge. However, those white toner cartridges are more expensive than the printer. But with white-background waterslide decals stock, one can compensate for the lack of white ink when using a dark colored enclosure; but then matching a graphic's background to the enclosure color adds an interesting challenge.
The YouTube video link above was enough for me to get started. He covers a lot of the bases and in his case uses InkScape (a graphics application) to create his artwork. Personally, I like and use Photoshop. I recommend it for newcomers to waterslide decals.
I like to do a test print or two on regular cheap plain white paper in just black ink (so as not to use up too much colored ink), then cut the plain-paper print to size, place on the enclosure, re-measure all the hardware drill points and compensate for knob sizes. Then go back to the graphics software and move any design elements accordingly. That procedure lets me pinpoint where the LED and other small bits of hardware will be on the final waterslide decal stock printout.
Once I have the enclosure drilled and fit-tested the guts (circuit board and other hardware (pots & toggles), I can then make any adjustments to the artwork before committing the more expensive waterslide stock. After ALL the artwork adjustments and test-fitting the guts, I’ll print the artwork onto the waterslide stock. When I first started with waterslides, I had an inkjet printer. I learned rather quickly that inkjet waterslide printouts need at least 24 to completely dry before clear-coating the artwork. An important point to note is that the printed artwork on the waterslide MUST be clear-coated BEFORE cutting it size. Otherwise, the clear-coat will seal the edges and the waterslide will NOT release from the backing paper when soaked. A note on clear-coating: It takes some practice and trial & error. You need enough to seal and protect the artwork, but not too thick. I always print two decals in case I screw up. And don’t use cheap rattle-can clear coat. I like to use an automotive clear-coat brand like Dupli-Color. It’s more expensive than Krylon and some other brands, but you get what you pay for.
So with the clear-coated artwork on the slide prepped and ready to apply, I use warm (not hot) water with one or two drops of Dawn dish soap. The Dawn acts as a bit of surficant to improve the adhesion of the decal to the enclosure.
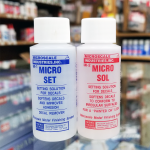
I also prefer to use an actual surficant like MicroScale “Micro Sol” and/or “Micro Set”. The Micro Set is for smooth surfaces to soften & improve adhesion, and the Micro Sol is for non-smooth, rougher surfaces and softened the decal a bit more to conform to irregular surfaces. I just use a small artist paint brush to apply either of these solutions directly to the surface of the enclosure. A little really goes a long way. Don’t over do it.
After soaking the decal and applying to the enclosure surface, there are a precious few moments to move it around to the correct position. There may or may not be air bubbles. If there are don’t worry. Just have an old credit card or other bit of stiff plastic with a straight edge to gently (can’t emphasize “gently” enough here) work any bubbles or wrinkles from the center, outwards. There have been instance where I really FUBAR’d the application of the decal and had corners fold underneath. Even then, don’t worry. Just use a toothpick to unfold the folded portion and get it back in place.
With the surficant solutions I often noticed how the decal would wrinkle and/or “bubble” in places AFTER I’d already worked out all the real bubbles when first applying. This really freaked me out.
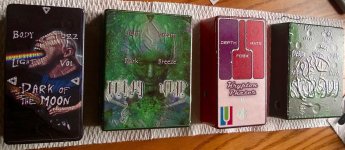
LEAVE THEM! When the decal fully dries, it will contract slightly, pulling everything down flat to the enclosure. Just let it fully dry. And if it doesn’t lay flat when fully dry, don’t sweat it. Just remove the poorly adhered decal and start over. Remember, it’s a process and takes time, patience and some trial & error. I’ve made many mistakes and ruined many decals. It’s part of the game.
As you can see in this photo, the decals settled right down, laid perfect flat and are ready for the final protective finish.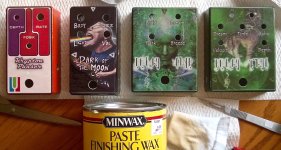
Eventually, my inkjet printer died and I upgraded to a color laser jet. The benefit of a laser jet with waterslides is that there is no wait time for drying. It can be clear-coated almost immediately after coming out of the printer. Some people don’t bother with clear-coating laser jet waterslides. But I prefer to still add a couple light coats of clear before proceeding to the application stage.
Once the decal is applied and dried nicely on the enclosure, there are a few different ways to more protection to the artwork. Some people like to add several more clear-coats. Others will use a good clear epoxy to cover the artwork. In the video link above, he uses (and I like this method too) MinWax Natural (Clear) furniture paste - about a dozen thin coats. It makes a good finish and allows for fingerprints and small scratches to easily be buffed out. You can choose which process you want for final finishing.
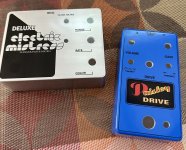
These were all done with the MinWax finishing process:
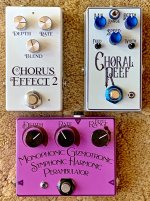

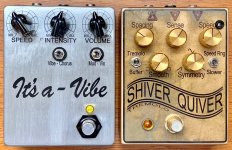
Once the enclosure drilling, artwork decal and clear covering is finished, stuff that puppy with your circuit & other hardware and test your build.
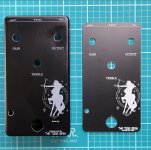
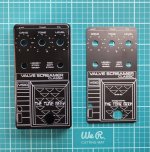
And TBH, recently, I’ve taken to having my enclosures professionally drilled and UV painted by AmplifyFun. I was using Tayda for a while, but I never got the hang of vector graphics or their strict graphics policies. So I’m not doing much with waterslides lately. So I hope this short dissertation of my personal waterslide journey/tutorial can help anyone who is looking to get started with waterslide application for their pedal enclosures.
Thanks for reading. Happy building!
Waterslide decals are just one of several ways to apply artwork to an enclosure. When I started doing waterslides, I did a bit searching thru Google to see what others before me had to say on the matter. The first link I found was to this YouTube demonstration of how to do waterslides with an inkjet printer: https://www.youtube.com/watch?v=e2X_HL-4F90
There are several other such demonstrative tutorials on YouTube. A little searching there using "waterslide decals for guitar pedals" will get you more.
Note that waterslide stock comes in four (4) flavors: InkJet Clear BG, InkJet White BG, Laser Clear BG and Laser White BG
There is no white ink. Period. At least not for inkjet printers and other consumer grade printers. There are some laser jet printers that can receive a white toner cartridge. However, those white toner cartridges are more expensive than the printer. But with white-background waterslide decals stock, one can compensate for the lack of white ink when using a dark colored enclosure; but then matching a graphic's background to the enclosure color adds an interesting challenge.
The YouTube video link above was enough for me to get started. He covers a lot of the bases and in his case uses InkScape (a graphics application) to create his artwork. Personally, I like and use Photoshop. I recommend it for newcomers to waterslide decals.
I like to do a test print or two on regular cheap plain white paper in just black ink (so as not to use up too much colored ink), then cut the plain-paper print to size, place on the enclosure, re-measure all the hardware drill points and compensate for knob sizes. Then go back to the graphics software and move any design elements accordingly. That procedure lets me pinpoint where the LED and other small bits of hardware will be on the final waterslide decal stock printout.
Once I have the enclosure drilled and fit-tested the guts (circuit board and other hardware (pots & toggles), I can then make any adjustments to the artwork before committing the more expensive waterslide stock. After ALL the artwork adjustments and test-fitting the guts, I’ll print the artwork onto the waterslide stock. When I first started with waterslides, I had an inkjet printer. I learned rather quickly that inkjet waterslide printouts need at least 24 to completely dry before clear-coating the artwork. An important point to note is that the printed artwork on the waterslide MUST be clear-coated BEFORE cutting it size. Otherwise, the clear-coat will seal the edges and the waterslide will NOT release from the backing paper when soaked. A note on clear-coating: It takes some practice and trial & error. You need enough to seal and protect the artwork, but not too thick. I always print two decals in case I screw up. And don’t use cheap rattle-can clear coat. I like to use an automotive clear-coat brand like Dupli-Color. It’s more expensive than Krylon and some other brands, but you get what you pay for.
So with the clear-coated artwork on the slide prepped and ready to apply, I use warm (not hot) water with one or two drops of Dawn dish soap. The Dawn acts as a bit of surficant to improve the adhesion of the decal to the enclosure.

After soaking the decal and applying to the enclosure surface, there are a precious few moments to move it around to the correct position. There may or may not be air bubbles. If there are don’t worry. Just have an old credit card or other bit of stiff plastic with a straight edge to gently (can’t emphasize “gently” enough here) work any bubbles or wrinkles from the center, outwards. There have been instance where I really FUBAR’d the application of the decal and had corners fold underneath. Even then, don’t worry. Just use a toothpick to unfold the folded portion and get it back in place.
With the surficant solutions I often noticed how the decal would wrinkle and/or “bubble” in places AFTER I’d already worked out all the real bubbles when first applying. This really freaked me out.

As you can see in this photo, the decals settled right down, laid perfect flat and are ready for the final protective finish.

Eventually, my inkjet printer died and I upgraded to a color laser jet. The benefit of a laser jet with waterslides is that there is no wait time for drying. It can be clear-coated almost immediately after coming out of the printer. Some people don’t bother with clear-coating laser jet waterslides. But I prefer to still add a couple light coats of clear before proceeding to the application stage.
Once the decal is applied and dried nicely on the enclosure, there are a few different ways to more protection to the artwork. Some people like to add several more clear-coats. Others will use a good clear epoxy to cover the artwork. In the video link above, he uses (and I like this method too) MinWax Natural (Clear) furniture paste - about a dozen thin coats. It makes a good finish and allows for fingerprints and small scratches to easily be buffed out. You can choose which process you want for final finishing.
These were all done with the MinWax finishing process:


Once the enclosure drilling, artwork decal and clear covering is finished, stuff that puppy with your circuit & other hardware and test your build.
And TBH, recently, I’ve taken to having my enclosures professionally drilled and UV painted by AmplifyFun. I was using Tayda for a while, but I never got the hang of vector graphics or their strict graphics policies. So I’m not doing much with waterslides lately. So I hope this short dissertation of my personal waterslide journey/tutorial can help anyone who is looking to get started with waterslide application for their pedal enclosures.
Thanks for reading. Happy building!
Last edited:


