1590b Wonder Drive

dlazzarini

Well-known member
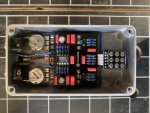
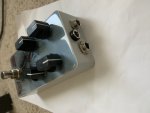
Haven’t posted in a while. Finished up The Wonder Drive today. I’ve developed a love affair with the 1590b. I think it’s more about loving a challenge though more than the actual box. It actually wasn’t as bad as I thought fitting it all in there. Just measure twice drill once. This is my favorite pedal so far. Pairs great with my amp. C07FD586-3442-49A4-B878-95641680F24E.jpeg 991E27F8-C9F0-49DD-80AD-A7657D6BA6D1.jpeg D7C6582D-0092-447A-BADE-FD96AAF086D3.jpeg C07FD586-3442-49A4-B878-95641680F24E.jpeg D7C6582D-0092-447A-BADE-FD96AAF086D3.jpeg
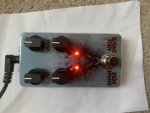
 
Very nice inside out and lovely finish! Is that clear coat rattle can or envirotex or...?
 
I’m positive I’m not the first to try fitting all of this in a 1590, but one note I’ll make here if someone else wants to try this. I’ve become pretty confident with my builds to the point where I just box and rock. Haven’t had to troubleshoot for a long time, (I know that’s about to change now, lol). I didn’t do that here and wouldn’t suggest it. It’s not too bad to make it work but you want to be really sure of your measurements and you definitely don’t want to try and remove it once it’s boxed. It would suck.
 
I’m positive I’m not the first to try fitting all of this in a 1590, but one note I’ll make here if someone else wants to try this. I’ve become pretty confident with my builds to the point where I just box and rock. Haven’t had to troubleshoot for a long time, (I know that’s about to change now, lol). I didn’t do that here and wouldn’t suggest it. It’s not too bad to make it work but you want to be really sure of your measurements and you definitely don’t want to try and remove it once it’s boxed. It would suck.
I could imagine that for sure. Did you work from a template or just measure/mark the enclosure before drilling?

EDIT: You can definitely test before with a simple breadboard arrangement. I’d recommend doing that before committing to a hardware layout that makes disassembly rather unpleasant.
 
I could imagine that for sure. Did you work from a template or just measure/mark the enclosure before drilling?

EDIT: You can definitely test before with a simple breadboard arrangement. I’d recommend doing that before committing to a hardware layout that makes disassembly rather unpleasant.
I measured again and again. Tried turning jacks different directions. That’s when I noticed that those lumburg style jacks don’t always sit at the same height. It depends on which way you have them turned. When I felt pretty confident I made a sheet metal mockup box and dry fit everything.
 
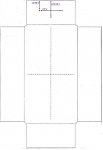
That looks great! Really dig the signal wiring to the jacks. Would you mind sharing the top drill template?
Id be happy to share. I’m getting ready to try another one in a couple days. I’d like to verify my template first before I share it. Once I do that I’ll shoot it to you. On this one I ended up closer to the pots than I figured so I dremeled out the top of the holes a bit and then built up some solder on that side of the jack threads to keep it from wandering back down. Let me get one verified and I’ll share.
 
Id be happy to share. I’m getting ready to try another one in a couple days. I’d like to verify my template first before I share it. Once I do that I’ll shoot it to you. On this one I ended up closer to the pots than I figured so I dremeled out the top of the holes a bit and then built up some solder on that side of the jack threads to keep it from wandering back down. Let me get one verified and I’ll share.
Cheers! Sounds good.
 
A couple of things I left out on the rattle can process that I realized while doing another today. The very first thing I do is level the powder coat and get rid of the orange peel. I use 2000 grit and a small wood block and CAREFULLY wet sand the top level. Be extra careful at the corners. The powder coat is thin there and you’ll blow through to metal in a heartbeat. I use the corner of the block of wood to meter how far I am from the corners and stay back. Then I apply the decal. Then the rest is like I stated above. Then I sit in my chair watching the tube and do a final buff on my pant leg. Denim works pretty good
 
Cheers! Sounds good.
2EFEFA5F-9298-493D-BAD8-F3241986062A.jpeg
Here’s what I’ve got so far. I’m still stumbling my way through photoshop so I put measurements on there just in case this doesn’t print out the right size. The file is a jpg. I also have it in .psd form but it won’t allow me to post it. Use at your own risk. I’m gonna try it out tomorrow with the adjustment in jack height that I made. I’ll let you know. The only jacks I’ve tried this with is the lumberg style and the mini DC’s. If you know how I can upload the actual .psd file for photoshop let me know. Also I would print it out in black and white. I used pencil and in color it doesn’t show up well. One more thing, this measurements were taken with the bottom lid off, so from the edge of the open end. Good luck
 
Here’s what I’ve got so far. I’m still stumbling my way through photoshop so I put measurements on there just in case this doesn’t print out the right size. The file is a jpg. I also have it in .psd form but it won’t allow me to post it. Use at your own risk. I’m gonna try it out tomorrow with the adjustment in jack height that I made. I’ll let you know. The only jacks I’ve tried this with is the lumberg style and the mini DC’s. If you know how I can upload the actual .psd file for photoshop let me know. Also I would print it out in black and white. I used pencil and in color it doesn’t show up well. One more thing, this measurements were taken with the bottom lid off, so from the edge of the open end. Good luck
Great! Thanks so much! Looking forward to your report back too. The best way I can think of for posting a psd would be to share it on google drive (or similar) and post the permalink. Thanks again!
 
Back
Top