Anatomy of a breadboard

fig

Village Idiot
Seems logical to have a look under the hood of these since this is a forum dedicated to the little beasties.

They come in various sizes and rail design, but most if not all are based on the same simple design, so let's have a peek!


Here is the underside with the backing removed and the spring-clips exposed, and one pulled out of a column.
You might also notice this thing is still sticky underneath and doubles as a lint brush...Ewwww!

tfcbBGA.jpg


Here's a closeup of the clip. Nothing really fancy, just creates a conductive plane for connections.

IW1KfBg.jpg


Here's the power rail; just a thin bridge connecting the clips together.


XcV5gGJ.jpg


Most of the boards I've used have dovetail connectors so you can customize your playing field. The rails on some (like this one) are also removable and therefore configurable.

Yes, as a matter of fact I did pull this from the trash JUST for you!

UMROumr.jpg


Here is a spring-clip with a potentiometer leg shoved in it. You might be thinking, that's not so bad, it will spring back.

5KmLJ2l.jpg


It's the plastic around the clip that suffers the most damage, allowing component legs. to wiggle, and also allowing more room for wear on the spring clip. The good news is, they are fairly inexpensive. Dedicate one for pots, or come up with a more elaborate solution like I've seen in other posts.

v38yg2I.jpg


Thanks for reading!
 
Last edited:
I'd argue that first pic is of a spring clip pulled from not a column, but rather a row (at least as far as the breadboard is oriented in that pic).
🤪 Just talkin' trash, or trash-talkin', depending on one's perspective (leave two's perspective out of it, and three is always perspective-undecided, so ignore 'm).


Thanks, Fig, for the breadboard breakdown! I'd never thought to bother looking under the hood of one of my breadboards, but now I know its undercarriage and it helps hammer home what's really going on when you start pluggin' in the components. :dmm:
 
  • Like
Reactions: fig
Newbie tip: make sure you take care when sticking your breadboard to a platform. Say, the Micro protoboard. I didn't get it square enough, and a "correction" resulted in the entire adhesive layer getting ruined. Fortunately I don't think I destroyed the spring clips themselves, so I think I will try to mix up some epoxy (G Flex) and see if that can replace the adhesive.
 
I’m just repeating this tip found elsewhere on the forum:
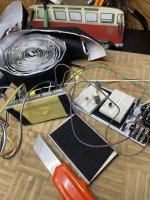
Stick hook-velcro on your breadboard and loop-velcro on your protoboard (or vice versa if you’re a non-conformist)…

A59A6E01-53CF-499C-AFD8-39523A3476DF.jpeg
A little or a lot…

As you see, I have a couple of the breadboards and can swap them out on the Mini-Protoboard interface while still leaving the build-layout on each board Just like swapping pedals out on your gig-board, but maybe even easier.

Great for when you’re juggling projects or waiting for parts delivery…

Also, the clear boards look cool, but are more difficult to see what’s going on. I’ve got various coloured boards, which can be great for organising multiple builds or sections of a single build etc, but plain white is the easiest on the eyes to build on, IMO.
 
Last edited:
I’m just repeating this tip found elsewhere on the forum:
Stick hook-velcro on your breadboard and loop-velcro on your protoboard (or vice versa if you’re a non-conformist)…
That's a great tip, and needs no sharpening. I will say take your time when separating them again. They may not want to let go and might possibly pull some clips through the bottom in the process. I know this because.....
 
That's a great tip, and needs no sharpening. I will say take your time when separating them again. They may not want to let go and might possibly pull some clips through the bottom in the process. I know this because.....

Velcro works great…until you outgrow your protoboard…
 

Attachments

  • 22AE3AFB-6765-449B-BCD4-F0B879F994D6.jpeg
    22AE3AFB-6765-449B-BCD4-F0B879F994D6.jpeg
    127.4 KB · Views: 9
That's a great tip, and needs no sharpening. I will say take your time when separating them again. They may not want to let go and might possibly pull some clips through the bottom in the process. I know this because.....
Bicycle tire levers (green) or
Car-interior thinger (orange)[see pic below]
will pry the velcro apart without damage.

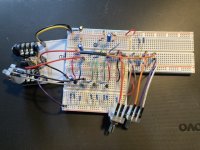
@Coda, The large breadboard gets hooked up to the MiniProtoboard; I’m thinking of putting velcro on the bottom of the MP and top of my large breadboard to mate them. However, as you can see they’ve had no problem mating in captivity without such velcro force and produced two small albino cub-breadboards.

I need to transfer February’s Muff to one of the smaller Mama breadboards. Luckily they’re polygamous and the bull can have many mates.

A1EE28DF-B9D9-457E-888E-6880D878A359.jpeg
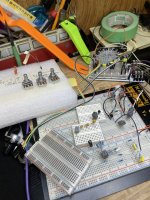
The green painter’s tape is sitting on a pale yellow plastic tray that once separated frozen foods, I forget what, but save those food trays, chocolate bob-bon boxes etc for organising your parts on the bench — there’s some thread cross-pollinisation for you, those tips threads.
Just the (1) tip, I promise.
🎶Just one tip, that’s all it took…🎵

Okay I lied, off to the left is a foam block taped and labelled to organise the parts for the Quarantine/Raincoat before those bits migrated to the breadboard.

Ok, I’ll make like a Canada Goose and flock off now.

PS: the VW bus is a pencil-holder organiser, but I hang the clippers, needle-nise pliers, tweezers and other pedal-building accoutrements in the little cubbies.
Really gone now…
 
Last edited:
Back
Top