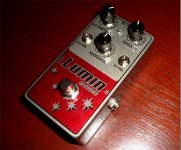
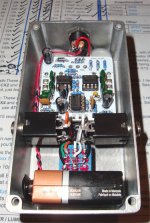
Ca-ca-ca-catch the wave! Max Headroom Meridian (Aion FX)

peccary

Well-known member
I decided to branch out from PedalPCB and have had an onslaught of PCBs arriving at my house this past month or so. The first one I decided to tackle was the Meridian from Aion FX, based on the Gyuatone/Nady PS-021. I built the bass version (PS-020).

I wasn't able to find out much about the bass version of this pedal online - either the Aion clone of the original units. But it being a bass effect from the 80's got my attention and I had to build one.

I boxed this one up, tried it out, and it didn't work - it wasn't passing signal at all. I pulled it out of the enclosure and tested it for continuity with the DMM and it was working, so I plugged it in outside of the enclosure and it was working fine, so I put it back in the enclosure and it's good to go. Not sure what I was shorting out on but I can't complain now.

I haven't had much time with it and I think it is going to take some time to dial in. I can say that the "Exciter" control is very subtle and seems to be influenced by the "Color" knob. You can go from big, fat woof to lo-fi with this thing. I did find out that it plays *very* well with the Mercurial Boost, and that was when I was having the most fun with it and getting sounds out of it that I liked. I bet it will be fine on it's own, but the Mercurial Boost just seems to liven up everything it touches and has become my favorite pedal in short order. I found that when I was getting the heft I wanted from Max I was missing some drive and grind, and Freddie just brought it right back in.

This was the first time I built a PCB from another builder and it was a different experience. I appreciate PedalPCB's way of handling off-board wiring. It was my first time with Aion but it took me a lot longer to do the wiring than it does with PedalPCB. I'm glad I am branching out to other builders - the more of these I do from different people the more I'll learn.
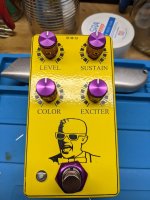
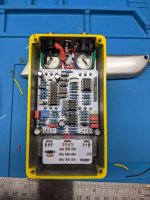
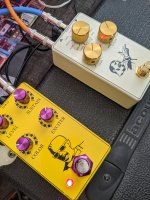
max.jpg max guts.jpg Max and Freddie.jpg
 
You nailed the no film dude
Thanks. I actually did this one at the same time I did the Mercurial boost. I had a super clean decal without any ghosting or anything, and I got too greedy and tried to move it a smidge after it was already kind of set and ended up causing a mess. You can actually see a piece of that first decal stuck to the bottom rim in the gut shot. This decal had a few little smudges on it but it still came out pretty good and I'm happy with it (except for the bottom left corner. I need to learn to leave well enough alone. Almost all of those breaks are from me trying to get it perfect when it's 98% already).

I also have to give a shout out to @dmnCrawler for all of the artwork they created and graciously shared, allowing me to have rad looking indicators around the knobs.
 
You nailed the no film dude
agreed! - if I hadn't seen this comment and then went back to look more closely I would've still thought it was uv printing from tayda for sure. love the max headroom graphic. awesome build!

I'm still waiting on the enclosure its going in but I finished aion's boss ds-1 legacy board recently and the entire time populating and soldering it I couldn't help but think about how much cleaner and more organized the the board layouts are from pedalpcb 😆

The Aion pads are larger and I thought that I would like that more than the bitty ones on the PedalPCB boards, but the larger pads actually seemed to not take the solder as well (maybe they just took longer to heat up?). I also didn't like having to solder three ground points to the sleeve of the input jack.

I took a big risk on the wiring here and just eyeballed the length of the wires knowing I wanted to run them under the board to hide them. I had it all wired up and then popped it in the enclosure and I think had I cut any of those wires another 1/8'' or so it wouldn't have worked out. Luckily it did, that would have been a pretty big bummer.
 
The knobs on both pedals are amazing. I really like the premium aluminum knobs. I know they’re more than double the price of others but it just adds something more to the pedals imo.
 
Love the Build, my OCD would be to get that Nut parallel near his Bowtiie! :)
You see that gouge in the black right above the bow tie? That's from me trying to get that right multiple times :ROFLMAO:

I'll try a few more times, but it was a good time for me to stop when I did :)
 
The knobs on both pedals are amazing. I really like the premium aluminum knobs. I know they’re more than double the price of others but it just adds something more to the pedals imo.
Yeah, it stings a bit for sure, but I agree that they do look great.
 
  • Like
Reactions: fig
I also hated the wiring on my first aion project I finished recently. That being said, his build docs are hands down the best I've ever read. I read his build docs for projects I don't even plan on doing
I really appreciate the time he puts in to explaining the circuit, some history, the changes made, (if any) and what everything does. I agree, his build docs are great.
 
Thanks. I actually did this one at the same time I did the Mercurial boost. I had a super clean decal without any ghosting or anything, and I got too greedy and tried to move it a smidge after it was already kind of set and ended up causing a mess. You can actually see a piece of that first decal stuck to the bottom rim in the gut shot. This decal had a few little smudges on it but it still came out pretty good and I'm happy with it (except for the bottom left corner. I need to learn to leave well enough alone. Almost all of those breaks are from me trying to get it perfect when it's 98% already).

I also have to give a shout out to @dmnCrawler for all of the artwork they created and graciously shared, allowing me to have rad looking indicators around the knobs.
They look great.
 
My enclosure for my DS-1 came yesterday and I was struggling with how to go about this before realizing the ppcb dc breakout board is perfect for the task. Still haven't done it yet but should satisfy my need for (semi) neatness
I have some of those and considered using one, but I had to choose between the breakout board and being able to have the DC jack be removable. Considering I had to pull it out of the enclosure I feel like I made the right choice, but it would clean it up quite a bit.
 
I have some of those and considered using one, but I had to choose between the breakout board and being able to have the DC jack be removable. Considering I had to pull it out of the enclosure I feel like I made the right choice, but it would clean it up quite a bit.

I went down to solder this a few hours after that post and realized that lol. Still not sure what I'm gonna do.

[sarcastically] How the insides look is even more important than how the outside looks!
 
Back
Top