SOLVED Faulty Blue Breaker

Idroj

Active member
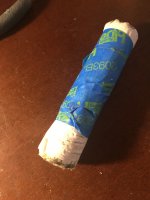
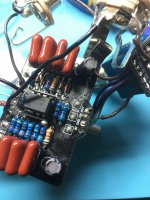
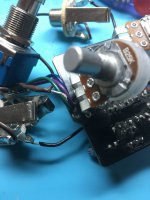
Hi, I built this Blue Breaker and I have been trying to troubleshoot it with no luck. One time, only one time, I somehow got it to work for a moment and I enjoyed the hell out of it for 3-4 minutes only, sadly.

As you will see, I probably ordered wrong types of caps, please don't laugh, lol...

LED lights up upon switching on but no sound. When I bypass, LED still lights up but only faintly. Sound goes through bypass just fine.

I learned that I should clean the back of pcbs with IPA today on a previous post, maybe I should start right there?

Any help would be appreciated, thanks.

IMG_7716.jpg IMG_7717.jpg

IMG_7715.jpg IMG_7718.jpg IMG_7720.jpg
 
Ok you have a quite a few cold solder joints. This happens from the solder iron not being hot enough or taking the iron away from the joint to soon. A lot of people pull the iron early, afraid they may damage board. You have more time than you think, 6secs is max, try to stay 3 or 4 secs and your good.
So first thing is to reflow the joints. Clean your iron good, a wet sponge is great, also fold a paper towel in half and roll it up, may need 2 or 3 towels, you want it an inch or more thick, once it’s rolled, use tape to keep it rolled. Leave the ends clear of tape. So once iron is hot, wipe it good on sponge, then clean it with towel roll. Your tip should be real shiny and will start to dull from heat. Now just barley touch the tip with solder leaving a small amount on tip. Touch the joint you need to reflow and wait for it to flow. Once it flows count to 4 and remove iron, should be a good joint after. You shouldn’t have to add any solder except on the pots. Do as many as you can since you have a few, it’s hard to point them out. After clean the board and check it. Keep us updated.
 
Thanks for the info about soldering technique! Reflowed all the joints but there is one that is giving me trouble. I tried applying flux, cleaning the area, holding the iron for 6 seconds, cleaned the iron to shiny, but I think I must have destroyed this pad.. Solder will not stick no matter what I do. I can't even see the metal anymore.. I need to connect that IN wire somehow.., is there a way around this?
 

Attachments

  • IMG_7725.jpg
    IMG_7725.jpg
    445.8 KB · Views: 13
  • IMG_7726.jpg
    IMG_7726.jpg
    306.7 KB · Views: 13
Avoid flux. That's s bad idea on small boards. Follow the trace from the destroyed pad and tack the connection there. If it goes 2 directions, you'll have to add a jumper to bypass the lifted trace. Sorry I didn't download the image to provide more concise help, but tI think you can get this.

I've lifted traces before and I've cut right through them by letting the tip of my my extremely sharp flush cutters scrape the board while trimming up.
 
I was responding when Mr. PedalPCB posted the diagram above with exactly what I was fixing to say. Thanks @PedalPCB !

That joint was one of the ones I thought was an issue, the solder was a blob and real grainy, that's the easy sign of a cold joint.
 
Thanks! I will give it a try. Should I desolder R1 and try to pass the IN wire through that pad whole along with the leg of R1 or just "sit" on top of the current blob?

Yes, when I built this one, my iron was a "toy" with only 25w. Since then bought another one 60w and solders much easier.
 
Ok, I was able to solder the IN wire on R1, then one of the ground wires broke, so I resoldered it, and also replaced TL072 for a new one. Plugged everything, strummed the guitar and I got 1 second of beautiful overdrive, then nothing again, it disappeared. Works on bypass, nothing when on. LED is bright on ON and faint light on bypass. I know some of the wire soldering looks very messy, when I built this pedal I had a "toy" of a soldering iron. After heating up so many times those pads attempting to clean or fix the job, I'm afraid to destroy more of them...

IMG_7727.jpg IMG_7728.jpg IMG_7729.jpg IMG_7730.jpg IMG_7731.jpg
 
By the way, getting the Muffin Fuzz to work yesterday with your help, was a huge injection of hope and inspiration. I had a lot of fun building my first 3 pedals, but after that, I had 3 faulty builds on a row. I almost quit. Thought about putting everything in a box and forget about it. I really appreciate the help. Thinking about putting in another order today! Learned a lot in just 2 days! Thanks.
 
Can you tell me what is going on here? That is a lot of solder. I see that you tacked on to R1 from the bottom of the board. Do you have a multimeter?

1606758867120.png

All of the solder joints here look suspect, I would reflow each one. And the board definitely needs to be cleaned, some of the solder joints appear to be cold.

1606759062091.png
 
Can you tell me what is going on here? That is a lot of solder. I see that you tacked on to R1 from the bottom of the board. Do you have a multimeter?

View attachment 8087

All of the solder joints here look suspect, I would reflow each one. And the board definitely needs to be cleaned, some of the solder joints appear to be cold.

View attachment 8088
That is the ground wire that broke. I tacked it instead of passing it through because I was having trouble pulling the piece that was left on the hole and didn't want to destroy another pad. I reflowed all of them but I'll reflow them again. How many times can you reflow before the components and/or pads get damaged? I'll keep cleaning with IPA. I do have a multimeter.
 
That is the ground wire that broke. I tacked it instead of passing it through because I was having trouble pulling the piece that was left on the hole and didn't want to destroy another pad. I reflowed all of them but I'll reflow them again. How many times can you reflow before the components and/or pads get damaged? I'll keep cleaning with IPA. I do have a multimeter.

You can reflow a few times if you limit the time the iron is on the pad and you let the pad cool completely before trying it again. This takes practice and the pad can’t be compromised beforehand.
 
That is the ground wire that broke. I tacked it instead of passing it through because I was having trouble pulling the piece that was left on the hole and didn't want to destroy another pad. I reflowed all of them but I'll reflow them again. How many times can you reflow before the components and/or pads get damaged? I'll keep cleaning with IPA. I do have a multimeter.

Get yourself a cheap toothbrush and use it with the IPA. You may have to do a few passes but it also helps to see if there are bad solder joints.
 
Back
Top