First build success! Distortion 250

coldchain

Member
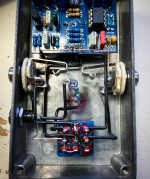
This would have been done last week but I had an issue with the parts I ordered (because components are confusing). Everything's now together and working quite nicely! I do enjoy this particular pedal as well, never played one. I come across one thing I'm not 100% satisfied with in the taper of the gain pot where you get a very gradual increase over the first 80% of the pot then the last 20% is SUPER GAIN SPIKE.

It seems like the B1M gain pot noted for this build isn't actually what should be used on a 250? Seen a lot of people recommend C500k or B500k for a smoother, more usable gain range. I do like the way it sounds overall but it would definitely be nice to have a little more room to dial in it. Not sure if I'll swap it out on this build or just do another one, I'm pretty sure I duped most of the components I ordered aside from the hardware and PCB. We will see, it was overall a fun process aside from a few moments of frustration.

The hookup wiring really flummoxed me a few times and I felt like the wire I got was really working against me, though I bought what I saw recommended in a few places... or so I thought? I'm using this but I feel something like this would be a heck of a lot easier to work with as far as slotting into the PCB holes and such.

Either way, I think I definitely have a new hobby! Occasional frustrations aside, it was a lot of fun and sounds really good.
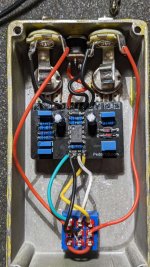
PXL_20230214_184117870.PORTRAIT.jpg PXL_20230214_083958480.PORTRAIT2.jpg
 
Fantastic job. Definitely doesn't look like a first build, I don't see any blood stains...
You should see the wall next to my work desk...

Thanks though :D I have done a lot of guitar wiring over the years and a few PCB repairs here and there.
 
I finally gave up on stocking multiple colors of wire and just use this. I personally prefer 24 gauge wire. That said, I'v not tried a lot of different wires. Just found this and stuck with it.

I had to go with the newbie kitsch :LOL: You like the stranded wire though? That's what was giving me the most problems. Probably need to get a burner board and just practice that part a little bit. Everything else was pretty smooth.
 
This would have been done last week but I had an issue with the parts I ordered (because components are confusing). Everything's now together and working quite nicely! I do enjoy this particular pedal as well, never played one. I come across one thing I'm not 100% satisfied with in the taper of the gain pot where you get a very gradual increase over the first 80% of the pot then the last 20% is SUPER GAIN SPIKE.

It seems like the B1M gain pot noted for this build isn't actually what should be used on a 250? Seen a lot of people recommend C500k or B500k for a smoother, more usable gain range. I do like the way it sounds overall but it would definitely be nice to have a little more room to dial in it. Not sure if I'll swap it out on this build or just do another one, I'm pretty sure I duped most of the components I ordered aside from the hardware and PCB. We will see, it was overall a fun process aside from a few moments of frustration.

The hookup wiring really flummoxed me a few times and I felt like the wire I got was really working against me, though I bought what I saw recommended in a few places... or so I thought? I'm using this but I feel something like this would be a heck of a lot easier to work with as far as slotting into the PCB holes and such.

Either way, I think I definitely have a new hobby! Occasional frustrations aside, it was a lot of fun and sounds really good.

View attachment 42044View attachment 42045
Put a 1M resistor across lugs one and three, that will bring the value down to 500k. I forget what I stuck in mine.
 
Put a 1M resistor across lugs one and three, that will bring the value down to 500k. I forget what I stuck in mine.
I believe I might have an extra one of those laying around, I'll give it a try! As much as I am not a math or numbers-brained person in the least, learning about this kind of stuff is pretty interesting.
 
I had to go with the newbie kitsch :LOL: You like the stranded wire though? That's what was giving me the most problems. Probably need to get a burner board and just practice that part a little bit. Everything else was pretty smooth.

I do like stranded wire, but you've gotta pre-tin everything....

That said, I have been messing with crazy solid wiring fun lately.

1676404954975.png
 
A DOD250 kit from BYOC was my first ever pedal build. I printed a photo of a mushroom cloud on cardstock and mod podge'd it to the top of the enclosure. Then I played it through a solid state Fender Rumble bass amp (which was serving as my guitar amp at the time) and thought it sounded godawful.

That one's probably on me. :p Welcome and enjoy!!
 
I finally gave up on stocking multiple colors of wire and just use this. I personally prefer 24 gauge wire. That said, I'v not tried a lot of different wires. Just found this and stuck with it.

Oh man that’s a good price for silicone tinned wire. Idk if I could handle only one color though. This silicone can you strip with your finger nail? One of my favorite things about silicone
 
A DOD250 kit from BYOC was my first ever pedal build. I printed a photo of a mushroom cloud on cardstock and mod podge'd it to the top of the enclosure. Then I played it through a solid state Fender Rumble bass amp (which was serving as my guitar amp at the time) and thought it sounded godawful.

That one's probably on me. :p Welcome and enjoy!!
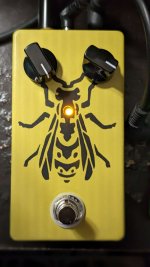
Gotta start somewhere! I used spray paint and a stencil :geek:
 
Awesome first build. I recommend C500K pots for this circuit--that's what I've used and no complaints about the range.

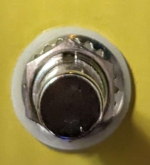
Here's a tip: you don't need that lock nut on the outside. I typically use it on the inside of the pedal, right up against the aluminum.


View attachment 42054
I think it actually got put there on accident
I do like stranded wire, but you've gotta pre-tin everything....

That said, I have been messing with crazy solid wiring fun lately.

View attachment 42049
That look good and from what I read of the soild wiring the main complaint was easy breakage. I figure I did most of the wiring on this with the parts already mounted so that wouldn't be much of an issue.
 
Oh man that’s a good price for silicone tinned wire. Idk if I could handle only one color though. This silicone can you strip with your finger nail? One of my favorite things about silicone
I had never tried but I just tested and YES, you can easily strip it with fingernails... That is going to come in handy...
 
I think it actually got put there on accident

That look good and from what I read of the soild wiring the main complaint was easy breakage. I figure I did most of the wiring on this with the parts already mounted so that wouldn't be much of an issue.
You are correct, if everything is in place, solid wiring is fine..

But the first time you have to disassemble everything to replace a capacitor in the middle of the board you will begin to understand why it is not popular with folks who like to tweak things.
 
I believe I might have an extra one of those laying around, I'll give it a try! As much as I am not a math or numbers-brained person in the least, learning about this kind of stuff is pretty interesting.
I use an iPhone app called e tools pro. I paid for it, worth every penny.
 
I use an iPhone app called e tools pro. I paid for it, worth every penny.
I don't think that app is available any longer.

I use Electronic Toolbox Pro in iOS. it has a TON of tools and references. I find the User Interface a bit annoying when trying to type values and you MUT turn off the default that tries to download updates every time you launch, but it does that job.
 
Back
Top