jeffwhitfield
Well-known member
Another one I'm surprised I nailed on the first try. This is one of those pedals that I though for sure would have an issue after the initial build. While it didn't work initially after firing it up for the first time, I quickly realized that I needed to adjust the internal trimmers. Took a little bit of work but nothing painful.
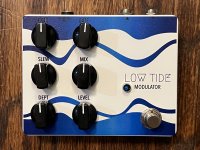
Gotta say, this is an odd effect...but I like it! I think this one will be good on a few songs with mostly clean tones. There's a beauty in the randomness with it. It ebbs and flows for sure. Kind of dreamy really.
Being that the effect itself is rather abstract, I figure the design should match the effect. After searching around for graphics, I stumbled onto the blue one, which looks really nice against a solid white background. I matched it up with an equally abstract font style for the logo. Only thing I don't like is the treatment of the fonts at the top. They didn't come out the way I expected...just a bit too dark. Labels on the blue do have a bit of white to help separate them but even they didn't turn out as expected.
The other thing is how the corners turned out. Can't see it in the photo but the blue tapers off in a weird way off the corners. Had I known I would have made sure to round off the graphics on the corner.
Other than that, I'm still pleased with the overall result. I can live with the flaws. Still looks good.


