Metal face plate, stamped. Is it a good idea?

Synchrony Pedalworks

Well-known member
I like clean lines and simple graphics. I have tried water slide graphics, but didn’t like it. Paint pens display my dysfunctional hand writing, so I wanted to explore other options. I have really liked the faceplates that pedalPCB has done and the simplicity of Fairfield Circuitry’s stamped appearance.

I have seen a lot about stamping the enclosure, but the forums have mentioned lots of problems and it seems that most people eventually move away from stamping on the enclosures.

Has anyone tried to take a metal blank, stamp it, and fix it to the enclosure (like a face plate)?

If you anyone has done this idea, I would love to hear about the experience and to see pictures.
 
Not as a faceplate for a pedal but I use can lids and metal stamps to make garden markers. You just might have to think about flattening your sheet metal after stamping, and you need to think about how you're going to cut and debur the sheet metal, and if you're going to polish it because it will get scratched up in the process
 
If you do it with punch letters, even with good technique and a proper backer block/anvil, you’ll still get some deformation in the backside that you’ll want to take care of. If you have a drum sander you can run it through, that’ll make easy work of it. Just set it to barely kiss the surface. Otherwise a belt sander, a dremel, or a nice sharp file is your friend. Just the tiniest amount of material to remove, so don’t go overboard!
 
Not as a faceplate for a pedal but I use can lids and metal stamps to make garden markers. You just might have to think about flattening your sheet metal after stamping, and you need to think about how you're going to cut and debur the sheet metal, and if you're going to polish it because it will get scratched up in the process
I had found some “credit card” sized blanks that were finished and deburred. I was hopeful that these products would not need a lot of finishing work. The credit card size is almost perfect for a 125b enclosure, covering about 2/3rds of the face.
 
If you do it with punch letters, even with good technique and a proper backer block/anvil, you’ll still get some deformation in the backside that you’ll want to take care of. If you have a drum sander you can run it through, that’ll make easy work of it. Just set it to barely kiss the surface. Otherwise a belt sander, a dremel, or a nice sharp file is your friend. Just the tiniest amount of material to remove, so don’t go overboard!
If the block is larger than the metal blank, does it still deform the blank to where you need to finish it with the drum sander?

Sorry a dumb question, but I am totally inexperienced with this art. I thought that any deformity from the punch would be minor and easily massaged/bent out.
 
If the block is larger than the metal blank, does it still deform the blank to where you need to finish it with the drum sander?

Sorry a dumb question, but I am totally inexperienced with this art. I thought that any deformity from the punch would be minor and easily massaged/bent out.
Not enough for any of that stuff to be too necessary, but at the very least you’ll want to stick a sheet of 120 grit sandpaper to a flat surface and give the backside of the blank a few swipes to get it all good
 
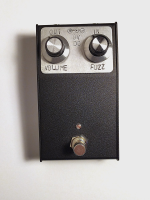
I start with oversized piece and cut to final size after stamping. I print the template, glue it to the piece of aluminium and use the template as a guide for stamping a letters. I use hammer (quite small) or arbor press. Aluminium sheet is rather soft (i use 1050A type) so small hammer is ok.
You need a realy hard surface as a backing. Forget about wood and plastic. Steel bar or anvil.

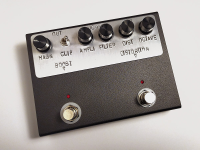
1655050636991.png 1655050617023.png
 
I start with oversized piece and cut to final size after stamping. I print the template, glue it to the piece of aluminium and use the template as a guide for stamping a letters. I use hammer (quite small) or arbor press. Aluminium sheet is rather soft (i use 1050A type) so small hammer is ok.
You need a realy hard surface as a backing. Forget about wood and plastic. Steel bar or anvil.

View attachment 27370View attachment 27369
That’s it! That look is exactly what I was envisioning! I like it!

What size letter stamps do you use? Also, would the metal block, found with most stamping kits, do the trick?
 
I use 1.5mm thick aluminium. Zero experience with copper sheet. Letters are 3.2mm tall (1/8").

edit.. er.. sorry,
I've just measured letters on a faceplate - 5mm tall.
 
Last edited:
Also, what gauge of metal do you use and have you used a copper sheet?
I’ve done copper. Don’t know where it went since it was for an abandoned project a few years ago, but it turned out quite nice and patina’d in a pretty cool way before I lost it. I used pretty thin copper, but didn’t have too much of an issue with it.

For an anvil I always use a solid steel 1-2-3 block that I got on Amazon a while back that was out of square on one side and therefore useless as a normal 1-2-3 block
 
Kaisertronics has custom metal plates printed locally and then letter punches the name and serial number. No idea how he attaches them to the enclosure but he's one DM away on Instagram and Reddit.
 
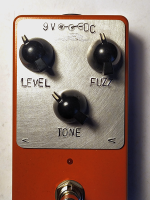
One more example. For a good readability of the letters you can use some kind of the dark fill. It can be paint, ink, black pen, crayon. Anything that won't fade away or won't run when you try to fix it with a spray.

1655137433086.png

ps. I'm not sure if you've seen my edit to the previous post - letters are 5 mm tall, not 3mm.
 
One more example. For a good readability of the letters you can use some kind of the dark fill. It can be paint, ink, black pen, crayon. Anything that won't fade away or won't run when you try to fix it with a spray.

View attachment 27392

ps. I'm not sure if you've seen my edit to the previous post - letters are 5 mm tall, not 3mm.
Fantastic. I did see the edit. I appreciate the clarification, because I like the size you are using. I am going to find some 5mm stamps. Thanks again for everyone’s advice!
 
Back
Top