Southern Lights (Greer of Tone)

Grubb

Well-known member
I've been shamed into posting this through reading the All In Good Fun thread 😅

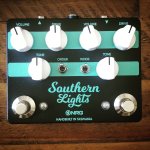
I have been stepping up my pedal skills into designing my own PCBs in DipTrace (speaking of good fun!) and recently completed a build I've been wanting to do for ages. This two-channel overdrive has a Lightspeed clone for the left channel, and a Southland clone with added clipping modes for the right channel. Both channels sound great, but the Lightspeed side is already appealing as an "always on" drive/boost. The PCB has order switching baked in. The knobs are just placeholders, I have the same knobs as Greer pedals coming from Banzai later this month. I have since re-designed this pedal to be in portrait orientation, as the KoT layout doesn't fit well on my pedalboard.

I hope you will all appreciate:
  • No melted caps
  • No white f/s washers
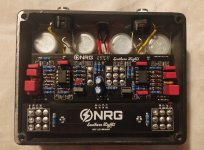
  • Acceptable soldering - apart from the yellow jack wire on the left, which I melted a bit 🤬
  • No Gorva
  • UV printing
  • Custom breakout board for the foot switches
Feel free to point out any noticeable flaws, I'm here to improve my skills.

Obligatory photos:
IMG_20211228_124053_506.jpg


IMG_20220104_005547__01_copy_2346x1727.jpg
 
Lightspeed is probably my fav build so far but looks like you took things to another level.

That soldering looks super consistent. That's one thing I realized I suck at. I think I am trying to rush too much. Do you have a set temp, and time that you use? I watched a few vids where people count out a few seconds before using the solder. I also realized I have just been throwing in the resistors and not paying attention to the orientation. If I ask someone to troubleshoot it, they are going to be annoyed if they try to figure out the resistor values.
 
Thanks for the comments. I've only been soldering for a year or so, but I focus on getting a nice "boob" shape to the fillets each time I do one 😁 I also make sure my iron is properly warmed up before starting. I have a cheapie iron at this point but will upgrade sometime this year.

In terms of technique, I definitely have the iron on the pad + lead for a second or so before I add solder. Then I work the solder into the "corner" between the tip and component lead for a quick melt. I also leave the iron on the component for a second or too after withdrawing solder, to ensure it takes shape as I want (you see it plop into position).

I'm not sure on resistor orientation, but I noticed most have a brown strip at one end and I try and put that at the same end each time.
 
I'm not sure on resistor orientation, but I noticed most have a brown strip at one end and I try and put that at the same end each time.
I think the brown strip is supposed to go on the right. I struggle to see the colours on the resistors since I am red green colourblind and now need reading glasses (getting old sucks). TBH, I haven't bothered to place them in any specific orientation yet.

If you plan to get a nicer iron, the Pinecil is basically the same as the T100 but much cheaper. Just takes a long time to arrive in the mail.
 
If you like the Lightspeed you might like the Tim or Timmy, as the Lightspeed is a modded version of those pedals. Personally I like having a bass pot and don't understand why you would remove it! Anyway it could be interesting to compare them.
 
Oh, and resistor orientation? I'm not sure what the "norm" is but assume that it's that you put them so that you can read them left-to-right. So a 22K resistor would have the two red stripes for two and two to the left. That's what I do. Anal and tedious? Sure! But it does make it easier down the road if you ever want to check you got the right resistor.
 
My soldering technique is as follows, in case that helps: I apply heat on the pad and component leg for 2-3 seconds, then apply solder on the pad and/or component lead (not on the iron!) and let it flow, adding as much as I need (I’ve been using really thin solder so I have to push a few millimeters in), then remove solder and iron, in that order. I’ve had really good results so far!
 
I loaned this pedal to one of my students at school and it has been returned in good condition, but now the Southern Belle side is oscillating at high gain, whereas it wasn't before. If I mess with my tone pot while it's oscillating, I can make a sound not unlike a dentists drill 😬

Any advice for troubleshooting oscillation? I'm assuming there was probably a timebomb issue with the original build which has now reared its ugly head.
 
It oscillates in all 3 positions, but less with the BAT41 pair engaged. I will crack it open and have a look at the board.
 
It looks great. That sucks about the oscillation. I hope you get it figured out. I haven't had any of my op amp based pedals oscillate on me, but a common culprit seems to be the small cap in the feedback loop. I'd try reflowing the solder on them for sure.
 
That sucks about the oscillation. I hope you get it figured out. I haven't had any of my op amp based pedals oscillate on me, but a common culprit seems to be the small cap in the feedback loop. I'd try reflowing the solder on them for sure.
It sucks somewhat. I prefer to view these things as learning opportunities. It's also only oscillating at high gain, so it still works fine for most of the tones I'm aiming for out of the pedal. I will definitely check that troublesome spot out, thanks for the tip.
 
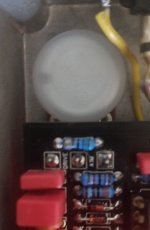
So I got the back off this pedal this morning. Immediately noticed some of the external coating of the resistor above the drive pot was missing. I'm guessing I accidentally damaged it when soldering in the drive pot, and that subsequent moving and rattling has shaken the coating loose. When I put my finger on the resistor when the pedal is powered up, the oscillation immediately stops. Hopefully a quick swap sorts this out.
IMG_20220529_084105_copy_1897x2897_copy_1422x2172.jpg
 
Well my movement theory can't be true, it's already missing in that first picture I posted 😲🤔 How did I not notice that?
 
Wow that’s crazy! I wonder what physical phenomenon is causing the oscillation.
No idea yet what is causing the oscillation as replacing the resistor didn't change anything. The oscillation stopping when I put my finger on the resistor was a mistake on my part - I get the same result when I touch the middle pin of the drive pot with my fingertip, which I may have done accidentally when poking around.

Curiously, when I stack both sides of the pedal, the clipping switch alters the frequency of the oscillation, but if I reverse the order, then changing the clipping diodes in the circuit no longer affects the pitch, which remains constant. The pitches work musically too, I've somehow made myself a 3 tone electronic instrument 🤷‍♂️😅

When I built the pedal, I could stack both sides without any issues.
Could it be a grounding issue then?
 
Back
Top