Waterslide decal insight wanted

SYLV9ST9R

Well-known member
Hi all,
As my first post, I have an inkjet waterslide decal-related questions for you guys.
I've got my first builds lined up (Plecostomus, Chop Shop, Catalyst, Informant, Pro-Filter, Simulcast and Unicab), as I'm still waiting for my iron who's in the postal system somewhere, but I've started to apply waterslide decals to my enclosures to pass the time.

I've gone through a couple of sheets ironing my kinks and getting better, but still have some issues.

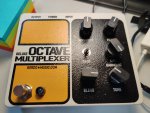
As you can see, there are a lot of microbubbles that appeared while drying (some due to the irregular surface in the paint I think), even though I was very careful and it looked pretty fine when I applied the decal.
IMG_4853.JPG

So here are my questions if you have any hindsight:
- Is there something I should do prior to applying the decal?
- Would a solution (i.e. Micro-Sol or Solvaset) help removing those bubbles?

I had better luck with this one on which I applied a light clear coat before applying the decal (as the paint was really orange-peely). Would that be the way to go?
IMG_4856.JPG

Thanks for any help, can't wait to share my builds, as this forum has already been a great resource!
 
I've found that there's always a few bubbles under my decals, no matter how hard I try to apply them carefully and squeeze them out.

However, after a few clear coats the bubbles are basically invisible, so I've stopped fretting over them so much. Just make sure you've cleaned the surface and wiped with a lint-free cloth before applying.
 
I use a lint free cloth and alcohol to clean mine, I don't do textured surfaces with water slides, the smoother the surface the better, there are applications you can get that "burn them in", I've never tried any of them though
 
Couple of ideas. What twebb6778 said works well, the clearcoat tends to melt the decal around bumps so that helps. I've also used Micro-sol to help. Ideally you want as flat a surface as possible but I've even had decent luck on textured surfaces. How many coats are you spraying on the decal before it's applied?

Not sure if you're doing this but I use a drop of dish soap in the water the decal sits in and I also use that soapy water on the face of the enclosure prior to applying the decal. The soap breaks the surface tension and makes it easier to position the decal but also aids in releasing the bubble pockets. Once I have the decal placed where I want it I GENTLY work out as much water as possible with the rounded front edge of an old credit card.

This is a fairly extreme example: It's a pebbled powdercoat (ivory) with a large waterslide and Micro-sol. You can see a few places where the finish bit thru the decal at the top of a bump but for the most part it's pretty clean. That's a couple of light coats of clear over top of a laser decal.
 

Attachments

  • octmult.jpg
    octmult.jpg
    938 KB · Views: 61
Couple of ideas. What twebb6778 said works well, the clearcoat tends to melt the decal around bumps so that helps. I've also used Micro-sol to help. Ideally you want as flat a surface as possible but I've even had decent luck on textured surfaces. How many coats are you spraying on the decal before it's applied?

Not sure if you're doing this but I use a drop of dish soap in the water the decal sits in and I also use that soapy water on the face of the enclosure prior to applying the decal. The soap breaks the surface tension and makes it easier to position the decal but also aids in releasing the bubble pockets. Once I have the decal placed where I want it I GENTLY work out as much water as possible with the rounded front edge of an old credit card.

This is a fairly extreme example: It's a pebbled powdercoat (ivory) with a large waterslide and Micro-sol. You can see a few places where the finish bit thru the decal at the top of a bump but for the most part it's pretty clean. That's a couple of light coats of clear over top of a laser decal.
I may have to give that micro-sol a try, I've got a couple of slightly textured boxes lying around.
 
Couple of ideas. What twebb6778 said works well, the clearcoat tends to melt the decal around bumps so that helps. I've also used Micro-sol to help. Ideally you want as flat a surface as possible but I've even had decent luck on textured surfaces. How many coats are you spraying on the decal before it's applied?

Not sure if you're doing this but I use a drop of dish soap in the water the decal sits in and I also use that soapy water on the face of the enclosure prior to applying the decal. The soap breaks the surface tension and makes it easier to position the decal but also aids in releasing the bubble pockets. Once I have the decal placed where I want it I GENTLY work out as much water as possible with the rounded front edge of an old credit card.

This is a fairly extreme example: It's a pebbled powdercoat (ivory) with a large waterslide and Micro-sol. You can see a few places where the finish bit thru the decal at the top of a bump but for the most part it's pretty clean. That's a couple of light coats of clear over top of a laser decal.

Thanks guys, pretty much tried a bit of all you mentioned. I tried 1 and 2 coats of clear coat on the decal, but the best results I had were with 1. I found it much depends on the surface. I think a light clear coat to even the surface is the way to go for textured paint. All my painted boxes are from Tayda, but the texture really varied from one color to the other. I have a bigger box which I'm going to put the decal on tonight

Also, I did some with a drop pf soap in the soaking water, but didn't see a big difference without.

As in all, experiences vary, and there is also the factor of having different brands of waterslide paper which makes it hard to have the "right" process. Most of the ones I did are not so bad, so either I'll start the red box over, or learn to live with less-than-perfect ;)

That large enclosure looks good, and it shows the nice texture of the enclosure instead of those bubbles.
 
Finally, before applying the decal, I gave it a coat of lacquer, lightly wet sanded with 2000 grit and brought back the shine with some Meguiar's Ultimate Compound. Looks way better. Should have done this to some of the other boxes painted Tayda boxes that I bought, but I can live with those as the pedals will mainly be for me.
IMG_4889.JPG
 
WOW - now that's a beautiful decal. I can't even see the edge of the waterslide! I haven't though about "pre-treatment" as an option before for my Tayda enclosures. Might have to go snag some of that compound and 2000 grit sandpaper...

I've been disappointed in my attempts, too. Here are three things that improved my situation this weekend, in part inspired by this thread.
- Soap - Tried the soap trick over the weekend, and I thought that helped the bubbles for sure.
- Squeegie - I used the wet paper backing from the decal as a super gentle "squeegie" to lightly shuttle the decal around the enclosure.
- Print mode - Printed the decal in "high definition text" mode for my laser printer (duh, didn't try that one yet)
- Pre-coat - sprayed a quick super-light coat as an immediate pre-coat prior to actually making the actual wet coat pass. That's called reading the instructions on the can, folks. ;)
Thanks! Actually, you can see the edges a bit, but I' sure after a couple of clear coats (and a bit of sanding if needed), they'll barely be noticeable. Definitively the way to go. I don't mind having to do that, it's a good tradeoff to having aligned holes!

Also, another "trick" I picked up was holding the decal on the baseplate (printed side facing it) while having it sit in the water, it greatly helped me as it countered the curling of the decal.

I actually learned about the compound fixing the finish on my MIJ foto-flame Strat, which is prone to cracks, and it works pretty well after wet sanding.
 
What I do that gets rid of all my bubbles is prepare the powder coat finish. I take the surface down level with 1500 grit then 2000 grit. Decals go on great. Now here’s the potential problem. The corners. Extreme care must be taken around the corners because the powder coat is always thinner there. I screwed up a couple finding out how far I could go.and getting a feel for it. The genuine Hammond boxes are way better than the knock-offs. I usually don’t have any trouble with those. The knock-offs usually have a pretty thin lousy powder coat and it’s a lot easier to blow through to metal on the corners. Getting the surface flat is key though. I’ve thought about laying downs a few heavy coats of clear coat first on the cheapies and then leveling but I haven’t got around to trying it yet. Good luck
 
Can anyone tell me where they purchased their water slide decal paper? Do you just buy a rattle can of spray lacquer to finish?
Is there a template to design the decal or is it trial and error?
Thx!
 
Can anyone tell me where they purchased their water slide decal paper? Do you just buy a rattle can of spray lacquer to finish?
Is there a template to design the decal or is it trial and error?
Thx!
For the decal paper, I just took something that was fairly priced on amazon. Just important to select the right one (inkjet or laser / white or transparent).
For the lacquer, I use Duplicolor acrylic laquer, and it works pretty well. It's my first time doing waterslide decals, and they are not all perfect, but with the lacquer, they look pretty good.
For the design, I import the drilling template from the build instructions in Illustrator, and work from that. I think you can use Inkscape in the same way.
Hope this helps!
 
I like the Smallbear stuff the best but they're all slightly different and take a bit of practice to get the "feel" for it. I've been using some from an eBay seller lately that loosens from the backing almost immediately so took me a while to grok that.

The best lacquer I've used is the StewMac stuff but it's pricey. Most of the time I just use whatever I can find from Home Depot.

I've recently converted to Affinity Photo for my graphics software and it's killer. A bit of a learning curve if you're not used to working with layers but it's ability to pull in individual sheets from a PDF is a cool trick. So if the box layout is, say, page 6 of the build doc: open the PDF in Affinity, specify Page 6, import at 300dpi to keep the edges sharp, and then save it as the Affinity file format. Make sure you print at 100% and you don't have to worry about getting the size right.

From there just add text, frames, artwork, or whatever strikes your fancy. You can set opacity (transparency) on a per layer basis so lining up text with the holes is a breeze. When you print to the decal, turn off the background layer you used to line everything up, turn opacity back to 100% (unless you're using it as an effect) and let rip thru the printer.
How are the SmallBear sheets different to use?
I just received one in an order and any hindsight would be greatly appreciated!
 
They need to be soaked longer, but the stock is a bit thicker/sturdier. They hold the toner better and are less prone to flaking. And finally they have a protective onion skin layer over the top that has to be removed before use. The easiest way to remove it is to catch the edge with a piece of tape.
 
Back
Top