bretvh
Member
Ok, since it took me a brutally time-consuming scavenger hunt to get this set up, I am going to document it here for others. I had a lot of issues having to find documentation on several different websites, and with paths not being found once I got everything installed, so here are detailed instructions that have worked for me so far. It works great for single-command build and flash (no more enclosure flipping and button smashing!) with:
So now you can run that command and it will compile your code, and automatically flash the memory on the SEED, thereby eliminating the need to flip your enclosure over and push the two tiny buttons to put it into bootloader mode. Also: debug output and being able to see variables and data as the patch is running.
One last caveat: be forewarned that you may have to do some detective work and/or keep track of the paths in which things are installed so you can update your PATH variable in your ~/.zshrc file. Always remember to either close your terminal after editing this file, or do a
to tell your terminal session to reload those variables.
Note that the files referenced in "configFiles" are contained in the OpenOCD install directory and if you have the correct version of OpenOCD (the XPack version), they will be found at runtime.
How your project should look (note that the this folder is in a parent folder located inside the DaisyExamples folder on my desktop):

7. Now you will connect your ST-Link to your laptop, the ribbon cables to your Daisy, then execute from the terminal in your project folder:
If all goes well, you will see output in your terminal connecting to the ST-Link, which will in turn attempt to connect to the Daisy Seed and flash it with your build. You can open the debugging panel on the left, start the debugger, then see your variables and set the ones you want to watch to be watched in the watch panel by right-clicking on them in the variables panel.
Hope this helps... if anyone has changes or suggestions, let me know.
Bash:
make && make programOne last caveat: be forewarned that you may have to do some detective work and/or keep track of the paths in which things are installed so you can update your PATH variable in your ~/.zshrc file. Always remember to either close your terminal after editing this file, or do a
Bash:
source ~/.zshrc- First, install Visual Studio Code, and then install the C++ and Cortex Debug plugins
- You will need a ST-Link programmer. I ordered this one from Mouser (it comes with the ribbon cable and note the cable has to overhang by 4 pins on each side as evidenced in this post), but there are a bunch of other options out there.
- Install OpenOCD from XPack (links below). The Homebrew version is too old to work with the STM32H750 chips. This one seems to work. Note that you should have Node and NPM installed. Also note that I had a lot of trouble with my system not finding Node or NPM once installed (even though I've had them installed for years and use them daily in web development). I eventually removed the Homebrew install and used the official LTS release installer from the node website, and had to add its paths to my .zshrc file:
- /usr/local/bin/npm
- /usr/local/share/npm/bin
- Once you have Node and NPM working:
- Install XPM:
-
Bash:
npm install --global xpm@latest - Check to make sure it installed correctly with:
Bash:
which xpm- If it does not find it, you will have to update the PATH environment variable (because again, node uses weird directory structures) to include the following paths in your ~/.zshrc file, as such:
- /Users/YOURUSERNAMEHERE/.npm-global/bin
- If it does not find it, you will have to update the PATH environment variable (because again, node uses weird directory structures) to include the following paths in your ~/.zshrc file, as such:
-
- Install OpenOCD:
-
Bash:
xpm install --global @xpack-dev-tools/openocd@latest - Test to make sure OpenOCD installed and your system can find it
Bash:
openocd --version - If it can't find it, then you need to add this to your .zshrc PATH:
- /Users/YOURUSERNAMEHERE/Library/xPacks/@xpack-dev-tools/openocd/0.10.0-15.1/.content/bin
-
- Install XPM:
- In your project, you will need the following files in the hidden .vscode folder that is created for your project:
STM32H750x.svd (link)
launch.json (contents below):
JSON:{ // Use IntelliSense to learn about possible attributes. // Hover to view descriptions of existing attributes. // For more information, visit: https://go.microsoft.com/fwlink/?linkid=830387 "version": "0.2.0", "configurations": [ { "name": "Cortex Debug", "cwd": "${workspaceRoot}", "executable": "build/PitchDiver.elf", "request": "launch", "type": "cortex-debug", "servertype": "openocd", "configFiles": [ "interface/stlink.cfg", "target/stm32h7x.cfg", ], "openOCDLaunchCommands": ["init", "reset init"], "runToMain": true, "svdFile": "./.vscode/STM32H750x.svd" } ] }
Note that the files referenced in "configFiles" are contained in the OpenOCD install directory and if you have the correct version of OpenOCD (the XPack version), they will be found at runtime.
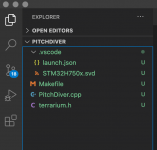
How your project should look (note that the this folder is in a parent folder located inside the DaisyExamples folder on my desktop):

7. Now you will connect your ST-Link to your laptop, the ribbon cables to your Daisy, then execute from the terminal in your project folder:
Bash:
make programIf all goes well, you will see output in your terminal connecting to the ST-Link, which will in turn attempt to connect to the Daisy Seed and flash it with your build. You can open the debugging panel on the left, start the debugger, then see your variables and set the ones you want to watch to be watched in the watch panel by right-clicking on them in the variables panel.
Hope this helps... if anyone has changes or suggestions, let me know.
Last edited:
