
This build tested my sanity in every possible way. "It's only a few resistors and a few capacitors, how bad could it be". I am happy with the outcome but this build was insanely time consuming and issue prone for how simple of a circuit it is 
First time using germanium anything, Got 4 GT402 from stompboxparts and they all tested pretty good (using the RG keen method) with low leakage, using a 77/115 hfe pair for Q2/Q3. I have an order from oleg (SOVCOM on ebay) on the way with some other goodies so I might try some other combinations (or more likely just breadboard another fuzz face or tone bender to play with them).
First time doing etching....My printer isn't really up to snuff, I did a few test pieces of aluminum to dial in the process but struggled a lot here, I think primarily due to my printer. It says it is 600 DPI but I am pretty sure it is only doing 300 DPI, and all of the advanced settings did not get me there, however I used a few months-worth of toner in testing it, so that's cool. The mask would leave some tiny pinholes that then would be very difficult to completely mask off. I am using NaOH, which you can't just touch up the mask with some nail polish, perhaps ferric acid and using sharpie/nail polish to touch up the mask would be the way to go for me, but all of that is still a bandaid on a subpar printed toner mask.


Originally I wanted to use the alpha 9mm pots like @owlexifry in https://forum.pedalpcb.com/threads/vero-zvex-fuzz-factory-w-oc71-mp20.30371/ and that sabro layout, but stompboxparts was out of the values I needed so I decided "how bad could it be" to just use regular solder lug pots.
The answer is below (cover your eyes):
I breadboarded it, liked it, then moved it to vero. Everything that could go wrong, then did go wrong.
1. Burnt/destroyed 2 pots (the stab pot), probably due to a combination of the following issues
2. A few specks of bridged connections on the vero that were a huge pain to find
3. The clear coat got on to where the jacks mount, so the enclosure was floating at like ~4.5V at times, took awhile to find because clear on an enclosure is less obvious than powder coating preventing a good ground
4. Another intermittent ground wire because of how many times I took it in/out of the enclosure
5. I didn't realize 1 spot of the protoboard underside was touching an un-taped millimeter of enclosure which caused another short
O well, I am happy with the outcome and it was fun I suppose. I can get some pretty creative sounds out of it and some completely unhinged oscillations and generally unusable sounds.
Etching was it's own set of challenges. I finally got a result I liked after 2 attempt/give up/sand flat tries:
Then I went to spray some clearcoat on it, and the solvent ate away all of the paint. I didn't want to paint it again/sand it again because the etch was now becoming VERY shallow, so I tried this product (a special crayon essentially)
I was very hopeful this would be what I needed. So I applied it to one of my test etchings, waited a few minutes, and then went to wipe the excess and it just like took all of it off. So I repeated the test but waited an hour, same result. So I decided to just crayon it and then let it sit overnight... I could not wipe ANY of it off (filled or non filled portions)...oof, give me a break please.
So I painted it 1 more time, sanded it SUPER carefully with 400 grit, and ended up with my final result (the finished picture with the knobs). I then (stupidly, but it worked out) used the same clear coat, but started with 2 or 3 of the FAINTEST coats to minimize the solvent interaction on the black paint. Then 1 or 2 thicker coats and we were done.
I could probably adjust the design or reverse etch and get good results even with my printer, but I don't mind dymo labels or paying tayda to UV print the enclosure.... I also would get a pretty similar result just doing a toner transfer and clear coating it, but then I wouldn't get to play with chemicals.
First time using germanium anything, Got 4 GT402 from stompboxparts and they all tested pretty good (using the RG keen method) with low leakage, using a 77/115 hfe pair for Q2/Q3. I have an order from oleg (SOVCOM on ebay) on the way with some other goodies so I might try some other combinations (or more likely just breadboard another fuzz face or tone bender to play with them).
First time doing etching....My printer isn't really up to snuff, I did a few test pieces of aluminum to dial in the process but struggled a lot here, I think primarily due to my printer. It says it is 600 DPI but I am pretty sure it is only doing 300 DPI, and all of the advanced settings did not get me there, however I used a few months-worth of toner in testing it, so that's cool. The mask would leave some tiny pinholes that then would be very difficult to completely mask off. I am using NaOH, which you can't just touch up the mask with some nail polish, perhaps ferric acid and using sharpie/nail polish to touch up the mask would be the way to go for me, but all of that is still a bandaid on a subpar printed toner mask.
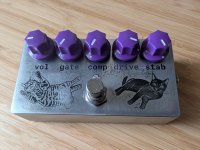

Originally I wanted to use the alpha 9mm pots like @owlexifry in https://forum.pedalpcb.com/threads/vero-zvex-fuzz-factory-w-oc71-mp20.30371/ and that sabro layout, but stompboxparts was out of the values I needed so I decided "how bad could it be" to just use regular solder lug pots.
The answer is below (cover your eyes):
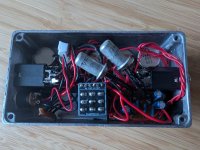
I breadboarded it, liked it, then moved it to vero. Everything that could go wrong, then did go wrong.
1. Burnt/destroyed 2 pots (the stab pot), probably due to a combination of the following issues
2. A few specks of bridged connections on the vero that were a huge pain to find
3. The clear coat got on to where the jacks mount, so the enclosure was floating at like ~4.5V at times, took awhile to find because clear on an enclosure is less obvious than powder coating preventing a good ground
4. Another intermittent ground wire because of how many times I took it in/out of the enclosure
5. I didn't realize 1 spot of the protoboard underside was touching an un-taped millimeter of enclosure which caused another short
O well, I am happy with the outcome and it was fun I suppose. I can get some pretty creative sounds out of it and some completely unhinged oscillations and generally unusable sounds.
Etching was it's own set of challenges. I finally got a result I liked after 2 attempt/give up/sand flat tries:
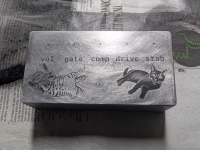
Then I went to spray some clearcoat on it, and the solvent ate away all of the paint. I didn't want to paint it again/sand it again because the etch was now becoming VERY shallow, so I tried this product (a special crayon essentially)
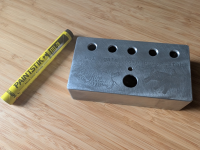
I was very hopeful this would be what I needed. So I applied it to one of my test etchings, waited a few minutes, and then went to wipe the excess and it just like took all of it off. So I repeated the test but waited an hour, same result. So I decided to just crayon it and then let it sit overnight... I could not wipe ANY of it off (filled or non filled portions)...oof, give me a break please.
So I painted it 1 more time, sanded it SUPER carefully with 400 grit, and ended up with my final result (the finished picture with the knobs). I then (stupidly, but it worked out) used the same clear coat, but started with 2 or 3 of the FAINTEST coats to minimize the solvent interaction on the black paint. Then 1 or 2 thicker coats and we were done.
I could probably adjust the design or reverse etch and get good results even with my printer, but I don't mind dymo labels or paying tayda to UV print the enclosure.... I also would get a pretty similar result just doing a toner transfer and clear coating it, but then I wouldn't get to play with chemicals.
Last edited: