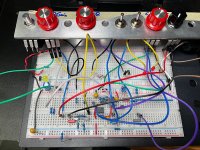
While auditioning clipping diodes, I realized it is more efficient and fun to take the time to setup some switches instead of manually swapping them in / out of the breadboard.
In the picture below, the 2 switches are spdt on-off-on. The blue wires are feeding the switch from the op amp output. Each switch can select 2 pairs of diodes or be set to OFF.
Considering the interaction between the diodes and the pots in this circuit AND the volume difference between the diode types, it was nice to be able to quickly switch settings without setting the guitar down.
In the end, I think I saved time by setting up the switches instead of repeatedly fiddling with the components.

If anyone is interested, this is a System Overdrive modded with a master volume and clipping options. I’ll make a thread in the mod section once I populate the board. I “sort of” liked the stock circuit, but it kicks ass with these simple additions. Thanks to @Chuck D. Bones for the breadboard, it is seeing some action

In the picture below, the 2 switches are spdt on-off-on. The blue wires are feeding the switch from the op amp output. Each switch can select 2 pairs of diodes or be set to OFF.
Considering the interaction between the diodes and the pots in this circuit AND the volume difference between the diode types, it was nice to be able to quickly switch settings without setting the guitar down.
In the end, I think I saved time by setting up the switches instead of repeatedly fiddling with the components.

If anyone is interested, this is a System Overdrive modded with a master volume and clipping options. I’ll make a thread in the mod section once I populate the board. I “sort of” liked the stock circuit, but it kicks ass with these simple additions. Thanks to @Chuck D. Bones for the breadboard, it is seeing some action

