Illustrator to tayda drill template for cuttouts- tips, tricks or shortcuts?

jwin615

Well-known member
Looking to do some custom cutouts for some C2C projects.
Any illustrator wunderkind 's have any tips to easily extract cutout points from illustrator? The only way I can figure to do it for more complex shapes seems extremely tedious. Thought about asking an AI to assist but I'd rather not consume BTUs on such a simple task. I'm still struggling with the human impact of it's use. Everything costs something...
I really wish one could just submit it like an art file as its own layer. Would be so much easier.
Also, if anyone has a means to do this, what's the best way to accommodate tayda accuracy tolerances, especially with not standard shapes(curved edge polygons). I would like to avoid manually entering 1000 coordinates if 300 would do...
 
No one has any recommendations on this? All I could find was exporting an xml and processing it with a third parts tool or writing and running a JavaScript, which is beyond me.
 
I'm not aware of anything off the top of my head, unfortunately.

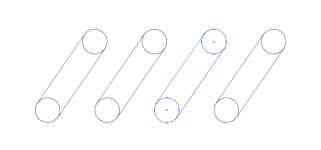
Depending on the shape in question, you can get around some of the curves with using drill points instead. E.g. for drilling vents you can put down ellipses of the diameter you want, then add lines from the anchors on the ellipse.

hole and paths.png
Obviously you'll want to note the position of the ellipse center anchor and the diameter, but not draw it in the line thingy.

As far as complex shapes, I hadn't noticed their shape tool recently, but it looks like it's not going to do what you want. You'll likely be encumbered with the line section. It's going to be a slog, like monk said. But here's how you go about turning a shape with beziers into straight lines:

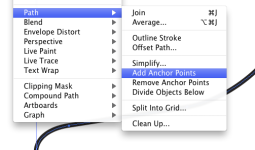
Make sure the shape is expanded (but not converted from stroke to fill), then you go to the object>path>add anchor points:

add anchors.png

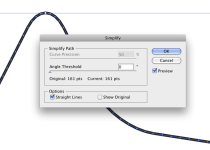
And keep adding until you think you've got enough "resolution" in the shape and then go to object>path>simplify

simplify path.png

Make sure the "straight lines" option is selected, and now you have coordinates you can plug and chug.

I know it's not ideal, but given the interface, that's really the only way. Hopefully that's helpful
 
I dunno if they accept any kind of CAD format at present. Probably falls under the tedium and liability element I mentioned in the Drawing Board thread, so at present nothing approaching that simplicity.
 
Well you have me interested. It seems like it’s going to be tedious to get anything into tayda templates regardless. Remember the 0 points are different for Tayda and illustrator. I haven't really seen anyone take advantage of the cutouts besides Nathan from c2c. Also remember past 40 drill points (i think its 40) you have to pay .10 per hole so if you get to crazy it may get pricey. That being said i would love to see some cool designs
 
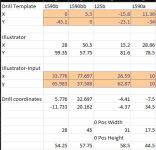
I did some conversion in Excel (drill to Illustrator and Illustrator to drill) this might help.

It's kept very simple and only for the front-face but it works to translate the coordinates of tayda drill templates to illustrators. The illustrator templates of tayda are used for this. I mostly use 125b and I haven't had any problems yet.
1786991230947.png

You can simply draw all holes on a seperate layer that you don't export, can place them where you like and just convert the illustrator coordinates to drill coordinates. That only works for points, circles and rectangles - so not the requested complex shapes.
1786991802762.png

I did it only for those enclosure-sizes that I already used.

Here is the Excel if someone is interessted: https://erel.ch/tayda_drill.xlsx

best regards
Daniel
 
the 0 points are different for Tayda and illustrator
Easily modified :)

Up in the upper left there's an axis looking thing you can drag from there and set the origin to wherever you'd like.

I plop down a simple rectangle align it center on the art board, then drag the origin to its center anchor point.
 
Easily modified :)

Up in the upper left there's an axis looking thing you can drag from there and set the origin to wherever you'd like.

I plop down a simple rectangle align it center on the art board, then drag the origin to its center anchor point.

Holy crap thats awesome. Never knew that. I can confirm it works in the ios illustrator version. I just did it.
 
Back
Top