OD is Glorious
Well-known member
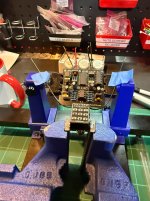
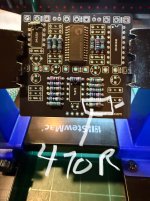
This pedal has quite a bit going on; probably more than most players need. I am not a person who would enjoy all of these sounds but I am working my way through the reverb pedals and I put this together in an afternoon. After adding components and wires it went on the PedalPCB auditorium platform for testing.. I thank PedalPCB for this platform. Previously I would just box it and if it had problems I had the frustration of removing everything and fraying wires. On the platform I discovered the pedal was underpowered so I looked for incorrect resistors and found a 470k in R12 where a 470r should have been. Who the heck did that? Thank God I have a solder sucker. The solder sucker is my friend on many builds. So I finished the main parts of this pedal yesterday but I boxed it this morning. It could have been completed in a day.
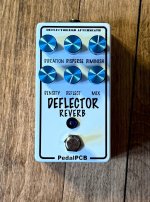
I thought it was fairly easy to assemble. Personally in most things I prefer less choice… so I prefer less knobs than this… too many choices reminds me of Cheesecake Factory’s menu – so many options that I cannot decide. Really I just like straight spring reverb and usually the kind in my Fender amplifiers. I previously assembled the PedalPCB Sproing Reverb which was a great one knob design with classic reverb, and I assembled the PedalPCB Gravitation Reverb which has more going on. My friend is a Nashville producer and I sent him the Gravitation which he said he loves. Gravitation has reasonable and useable reverb choices. Contrast that with the Deflector which could be used to make horror movie soundtracks. If you like “out there” sounds you should build one.
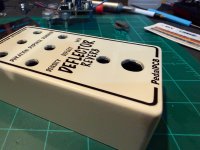
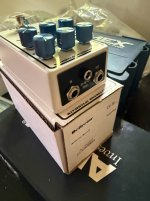
I used a powder coated matte white enclosure from Tayda with a decal I made with clear media in my Brother QL-1110NWB (only prints black). The FV-1 was installed at PedalPCB and the resistors are ¼ watt. I use pre-cut wire from Love My Switches and all the pots have dust covers. IMO the dust covers are needed because there are so many potentiometers close together. I used Switchcraft jacks and the control knobs are anodized 15mm blue aluminum; knobs match the blue LED.
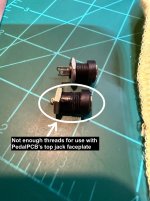
Note: Lumberg D.C. Jacks do not work with the PedalPCB top jack faceplate. Ask me how I know?
I thought it was fairly easy to assemble. Personally in most things I prefer less choice… so I prefer less knobs than this… too many choices reminds me of Cheesecake Factory’s menu – so many options that I cannot decide. Really I just like straight spring reverb and usually the kind in my Fender amplifiers. I previously assembled the PedalPCB Sproing Reverb which was a great one knob design with classic reverb, and I assembled the PedalPCB Gravitation Reverb which has more going on. My friend is a Nashville producer and I sent him the Gravitation which he said he loves. Gravitation has reasonable and useable reverb choices. Contrast that with the Deflector which could be used to make horror movie soundtracks. If you like “out there” sounds you should build one.
I used a powder coated matte white enclosure from Tayda with a decal I made with clear media in my Brother QL-1110NWB (only prints black). The FV-1 was installed at PedalPCB and the resistors are ¼ watt. I use pre-cut wire from Love My Switches and all the pots have dust covers. IMO the dust covers are needed because there are so many potentiometers close together. I used Switchcraft jacks and the control knobs are anodized 15mm blue aluminum; knobs match the blue LED.
Note: Lumberg D.C. Jacks do not work with the PedalPCB top jack faceplate. Ask me how I know?