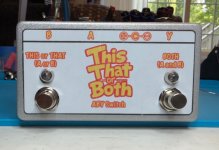
Passive A/B/Y

This one has been very useful in jam session environments. I did have a bad broken trace that was preventing the LEDs from actuating correctly. I was able to jumper the bad trace to get it rolling. I must say that I prefer the foot switches to be off-board. It allows for a bit more latitude with your drilling skills.
 

Attachments

  • IMG_0239.jpeg
    IMG_0239.jpeg
    455.5 KB · Views: 53
  • IMG_0240.jpeg
    IMG_0240.jpeg
    695.3 KB · Views: 53
I didn't know PPCB had one of these. One of my first DIY's was the A/B box from BYOC

RE: drilling skills. Pick up one of these and use it as a depth gauge set against the bottom lip of the enclosure to get the position right for the 1/4" jacks
 
I didn't know PPCB had one of these. One of my first DIY's was the A/B box from BYOC

RE: drilling skills. Pick up one of these and use it as a depth gauge set against the bottom lip of the enclosure to get the position right for the 1/4" jacks
Thanks for the tip. I have combo squares. I don’t generally have trouble with off-board components. They are more forgiving. It is when there are a lot of on-board components that are through the enclosure both top and side that I run into occasional problems.
 
IMG_0584.jpeg
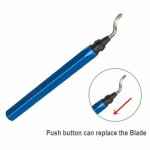
If you don’t have one already, a de-burring tool like this one ^ can be very handy for making little adjustments to slightly misaligned holes.
Works great on soft metals like aluminum, and I find it quicker and neater than using a file most of the time.
 
View attachment 120862
If you don’t have one already, a de-burring tool like this one ^ can be very handy for making little adjustments to slightly misaligned holes.
Works great on soft metals like aluminum, and I find it quicker and neater than using a file most of the time.
I like that idea. In past builds I've brute forced it with a reamer. This would allow you to focus on one side rather than making the entire hole bigger. I appreciate the tip.

Is there a de-burring tool that you prefer that is more effective or more durable than others?
 
…This would allow you to focus on one side rather than making the entire hole bigger.
Yep, that’s exactly how I’ve used it several times.

I’ve have this generic Chinese one off of Amazon: https://www.amazon.com/dp/B09376DFYP
It’s been working fine.

Milwaukee does make one (they call it a “Reaming Pen”) if you want something with a slightly better pedigree, and red! ;)
 
This one has been very useful in jam session environments. I did have a bad broken trace that was preventing the LEDs from actuating correctly. I was able to jumper the bad trace to get it rolling. I must say that I prefer the foot switches to be off-board. It allows for a bit more latitude with your drilling skills.
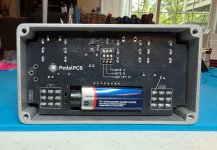
Looks nice, what stereo jacks did you use? I picked up the Tayda versions but they have 6 pins and I noticed that for 2 of the jacks on the board require 8 pins
 
Looks nice, what stereo jacks did you use? I picked up the Tayda versions but they have 6 pins and I noticed that for 2 of the jacks on the board require 8 pins
I used the Tayda A-1122 - https://www.taydaelectronics.com/6-35mm-1-4-stereo-insulated-switched-socket-jack-pcb.html. Actually, only one of the jacks needs a Cliff Grounding ring, which is a separate part, and that is what goes into the two other pads. If you look at the gutshot of mine, you'll see that the on the middle jack (which is the A jack) doesn't have those two pads soldered. The 6 pins are because there are switches on each of the contacts so you have TRS and TS, RS and SS.
 
Avoid the cheaper plastic-handled de-burring tools — I bought one and it was utter crap, I kept breaking blades even on aluminium enclosures;
basically the classic "XYZ"-shaped object. It looks like a deburring tool, but it's strictly ornery-mental.


The best deburring tool I ever got to use was when I worked at Brodie — one of the guys in the shop had made it himself (Mike Truelove? or perhaps Paul Brodie himself?). It was perfect and if I'd known it at the time... well, I wouldn't have taken it but I sure would've been tempted to.
I should hit either of them up and see if they'll teach me how to make a copy of the one that was in the shop.


Good looking build and...
Thanks for the gutshot; I didn't realise there was a wee bit more to the PPCB ABY what with the dip-switch. I just P2P wired up an ABY (like you said there's more freedom of what goes where), but the dipswitch-options intrigue me.
 
Avoid the cheaper plastic-handled de-burring tools — I bought one and it was utter crap, I kept breaking blades even on aluminium enclosures;
basically the classic "XYZ"-shaped object. It looks like a deburring tool, but it's strictly ornery-mental.2 minutes ago
I grabbed the one that @pricklyrobot recommended. It has a nice heft to it. It arrived today. Looking forward to putting it to use when I screw up 😁
 
Back
Top