Archibald build squealing

jhaneyzz

Well-known member
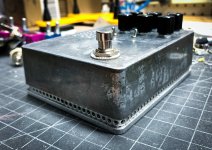
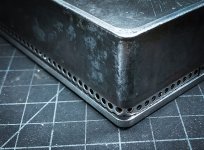
I "finished" my Archibald build today but I have two problems.

1) Um... I built in in a 1590B rather than a 1590BB so it doesn't quite fit. (oops) Anyone have a 3D printer that wants to make a bushing for me?
2) There is a constant shrill sound, like a tea kettle screaming in a distant room.

Thoughts? (other than "I have a thought, I think you're an idiot")

IMG_6696.jpg IMG_6698.jpg
 
It's looking pretty cool.

Sounds great too. except for the high pitched whine...

Look how much more "in control" the etching is! I'm not completely dissolving the labels and the shadow areas are staying black.

Added a bit of citric acid to the etchant, agitated less and shortened the time to around 15 minutes.

IMG_6699.jpg
 
First, I hope someone can help with the squeal. Especially since I am starting mine soon :)

But that enclosure looks rad! How are you doing that?
Ferric Chloride (acid) etching.

This is the best guide I've found.


I actually do a few things slightly different that this but that guide doesn't contain any gross misinformation or out of date tips.

I am happy to share tips if you are interested.
 
SOLVED!

I was using a separate 12v wall wart power supply that I had laying around. I swapped it for a different one and <boom> working great.

This thing is a whole different beast from the pedals I’ve built in the past. I think I like it, but going to let the honeymoon wear off a bit before I decide.

I’ve got 2 other tube builds on the works and then I’m going to tackle a Sushi Box build and try not to kill myself.
 
Ferric Chloride (acid) etching.

This is the best guide I've found.


I actually do a few things slightly different that this but that guide doesn't contain any gross misinformation or out of date tips.

I am happy to share tips if you are interested.
Thanks for this.
 
If you still have trouble with the height of the enclosure, I may have a rustic solution for this :

Use pieces of wooden matches everywhere along the enclosure's sides (or on the back of the enclosure), and secure them with some pieces of thick tape, you will get the additionnal few millimeters needed to close it.

You'll probably need some clever trick to hide the tape visible from the outside. On a build with a similar issue, I used some paint.
I have a devious plan.... more "adventures in sourcing" to be revealed soon...
 

It’s transparent, so you’d see the tube glow
I had another thought...


bought some perforated steel sheets and made this:::

Proving once again that screwing up is the mother of invention...
 

Attachments

  • IMG_6718.jpg
    IMG_6718.jpg
    573.5 KB · Views: 13
  • IMG_6719.jpg
    IMG_6719.jpg
    657.6 KB · Views: 13
Turns out, it wasn't the wrong enclosure, but when I melted the header pin L-bar and had to build my own contraption, I didn't pay close enough attention to tolerances.

But, Hell... I'm sticking with this design..
 
Back
Top