ON-ON-ON Toggle Switch

lyricbread

New member
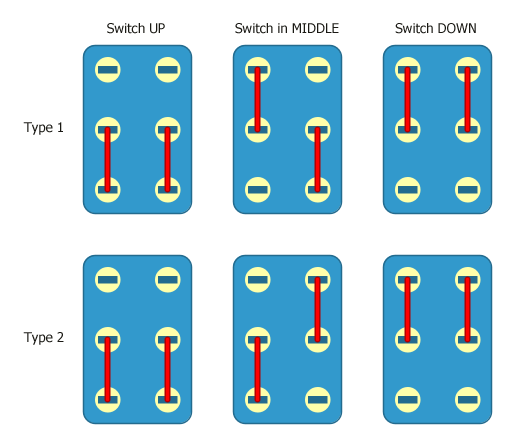
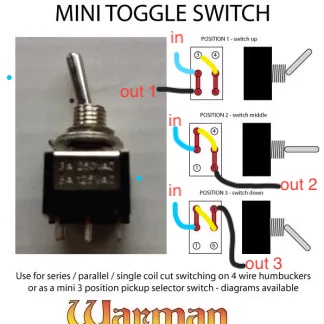
I want to utilize a 3-position toggle switch to switch between (3) capacitors:

Up: Cap 2+3
Middle: Cap 2
Down: Cap 1

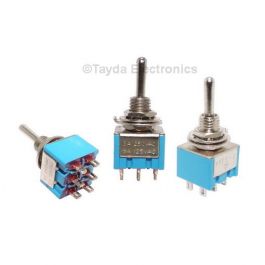
Can anyone recommend a proper switch? I know I need an ON-ON-ON, I’m just a little confused with type of switch. Thanks!
 
If parallel, I think you could do it with this one:

Double check this, but I think:
Input goes to both middle lugs.
Top green goes to Cap 1.
Top blue is empty.
Bottom blue goes to Cap 2.
Bottom green goes to Cap 3.
Tie all three remaining legs together and that’s the output.
 
Check the data sheet for the switch before you start. The lugs on an on-on-on switch aren't always connected the same.
 
Is 2+3 in parallel or series?
Sorry, I forgot to mention that it'll be in parallel.
If parallel, I think you could do it with this one:

Double check this, but I think:
Input goes to both middle lugs.
Top green goes to Cap 1.
Top blue is empty.
Bottom blue goes to Cap 2.
Bottom green goes to Cap 3.
Tie all three remaining legs together and that’s the output.
If you connect the input to both middle lugs, wouldn't you get a short?

I guess I just have a hard time wrapping my head around toggle switches.
 
If you connect the input to both middle lugs, wouldn't you get a short?

I guess I just have a hard time wrapping my head around toggle switches.
No, the middle lugs act like 2 separate switches. Referencing the Tayda diagram, you could replace the blue and green side with 2 separate single pole switches. And flip the green and blue individually. (I’m not sure if that helps you picture it or not)

I like the on/on/on idea, because you can organize it for small/medium/large values in logical order as you flip the switch up or down.

The on/off/on wired in parallel would put the smallest value in the middle position of the switch. So you get medium/small/large as you sweep the switch.
So this should do the job?

Switch.jpg
 
I should also add that I'll be building the PedalPCB Cobalt Drive and want to be able to switch between the stock 18nF on C14, as well as the Keeley's mod value of 33nF plus the 33nF+68nF for the "Phat Mod." I was originally going to go with just Keeley's value, but find that I like the sound of the stock 18nF.
 
Last edited:
Yes, so C1 would be 18 nF. C2 would be 15 (so middle position is 15+18=33). Then C3 could be an 82, to give 15+82=97. That’s a little shy of 33+68. I picked 82 because that’s what Tayda has in stock. You could add a 4n F in parallel to the 82 (or some other combo that adds up to 86).

I would draw up Big Monk’s idea also. And see which one you like better. I think you’d put the 18 in the center, 15 on one end to give 33, and 82 on the other end to get 100.
 
Like Dan M said, the on-on-on allows for a logical order, for example in a Muff EQ switch:
UP: BUMPED
MIDDLE: FLAT
DOWN: SCOOPED (stock)
It's better described in AionFX's Halo doc.

Tayda has a different view than the rest of the world on which is a type 1 and type 2 DPDT on-on-on switch.

Switches2_Diag_4.gif

It was established in another thread that Tayda sees it opposite of the above, so when you order a Type II, you're actually getting a Type I. Or maybe it was vice versa... whatever, Tayda only offers one type and it wasn't the type I needed, of course.

For a simple on-off-on config, put the caps across the lugs...

Screen Shot 2022-04-29 at 15.47.51.png
 
  • Like
Reactions: fig
The “on-on-on to switch between three options” wiring diagrams always confuse the hell out of me. Three rows: top, middle, bottom. Signal enters middle row, and exits via either top or bottom. If I’m using an on-off-on, signal enters middle row, but how does it exit in the off position?…
 
The “on-on-on to switch between three options” wiring diagrams always confuse the hell out of me. Three rows: top, middle, bottom. Signal enters middle row, and exits via either top or bottom. If I’m using an on-off-on, signal enters middle row, but how does it exit in the off position?…
Lug 2 is in, Lug 5 is out; have a look at my previous post. The Cap soldered from Lug 2 to Lug 5 is always in the circuit no matter which position the bat is in, flicking the switch from middle "off" to either top (lugs 3 & 6) or bottom (lugs 1&4) engages the respective caps in parallel.


Warman guitars has a good on-on-on diagram showing the bat's position relative to which lugs are connected:

mini-toggle.jpg


Nonetheless, I still have trouble understanding on-on-on, too. I'm not sure what's going on in @jubal81's diagram — is that an On-On-On and if so which type?
 
Back
Top