Passinwind PW8B DIY 500 watt Bass Head

Passinwind

Well-known member
Oh noes, Fig's got a contest going on and the hummingbirds ate my homework. What to do, what to do?

Cheattowin.jpg

Yeah, that's the ticket. I'll palm off a build from many years ago as something from 2022, no one will be the wiser. Oh wait...that probably won't work out so well. OK, maybe a retrofit to an older build I finished up recently will suffice. I'm only looking to be a playa, not a winner anyway.

So back in the Stoned Ages I decided to try my hand at building a Class D bass amp using an ICEpower module I found used on Diyaudio.com. At the time you needed to be vetted as an OEM by ICE to even buy their stuff from them and they gave you pretty much no tech support if they caught a whiff of DIYer. The guy I bought it from had the right tooling to make me a cable set, which was the next hurdle. This was the 500ASP module, which has been around since the early 00s, was/is quite a bit more expensive than the newer ones, and requires a good bit of finesse to make it suitable for musical instrument builds. I found out later from the US rep that no one else had actually attempted this at that time. Ah well, ignorance is bliss, right?

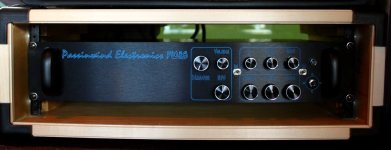
OK, so I had a power module that had an OK aux power supply that I could run my preamp on, so obviously I decided not to use it, it only does +/-12V, isn't fused, and the audiophile crowd tended to diss it mightily. Fine, I'll buy a separate one from John Broskie's awesome TubeCad website, and then I can run just the preamp for recording or whatnot. I found an old official builder's manual for the power module on some Polish website and figured out what model of toroidal inductors I needed for RFI supression. Spitballed the necessary heatsink size for a fanless build and ordered a custom cut from HeatsinkUSA. Settled on a rack case from Modu in Italy: http://www.modu.it/. I figured on using Front Panel Express for the graphics, who I'd worked with before a few times. Their proprietary software lets you import Inkscape HPGL cutter files directly, you send them the front panel, and it comes back engraved and infilled in a couple of days, like so in the software render, which includes knob mockups:

PW8B_FP.JPG

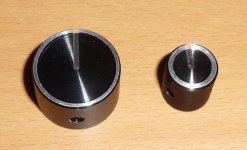
Found some pretty nice knobs on eBay:

MonyKnobs.JPG


And some killer stepped Noble pots that were NOS Hafler amp pieces. OK, but what about the pie?

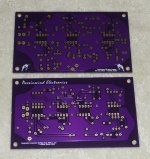
I decided on a control fomat of Bass/Mids/Treble with a Baxandall bass/mids section and a Fender-ish separate treble stack. Then a 4th order high pass filter and a one band fully parametric EQ. The first HPF/PEQ board was duff but I have fairly decent rework skills and made it work well enough for proof of concept testing. Here’s the newer set that I finally replaced the old ones with (heh) 8 years later:

V1_2_boards.JPG


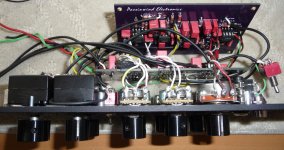
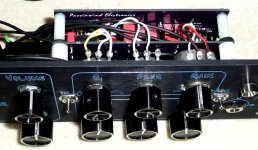
Front Panel Express included glued in studs for mounting the preamp boards in a stacked arrangement:

PW8B_boardsopen.jpg


PW8B_boardsfastened.jpg


By the time I got this far I was one day out from a big Talkbass GTG in Seattle where I was supplying amps for a friend who was hauling a car load of commercial cab prototypes up from southern Idaho, no pressure or anything. But it all worked and I showed up with it in a janky homemade rack case with the glue still drying, literally:


PW8B_racked.jpg

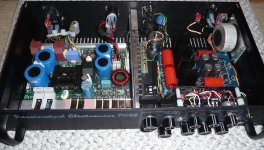
And a full gutshot:


PW8B_gutshot.JPG

There's a Jensen input transformer visible at the back just to the right of the heatsink, which is wired straight to the input of the power amp module.

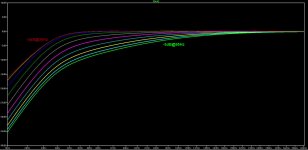
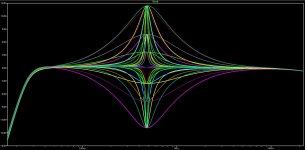
I gigged regularly with this amp for a few years but then built a smaller lighter version using the ubiquitous ICE 700ASC module that is used in many popular 800 watt class bass amps. More on that later. Before I wrap this first book up here are a few sims of the basic PEQ and HPF functionality:

HPF_26_95Hz.JPG


PEQ_BoostcutQ_Sweeps.JPG

IIRC the PEQ sweep range was something like 100Hz-1.5Khz, the new one is a little more extended both ways now, more like 80-2.6KHz.

More later, I burned through the whole attachment allotment for a single post now. ;)
 
Last edited:
I always enjoy your posts, thanks for sharing. This is pretty rad.
Thanks. This is just the first of four I’ve done, but it worked surprisingly well for my first try. I think it’s leapfrogged the later ones in its revised version for the most part, but I don’t have all that much playing time in on it just yet.
 
Chapter Two:

I forgot to mention some features on the back panel, the EFX Send and Aux In. The Aux is pre-HPF and can function as an EFX return or as an input for other preamps, an MP3 player, a mixer, etc. And then there's a straight power amp input that bypasses everything but the Jensen transformer, which can be handy for biamping, slaving, and the like.

Here's a quick and dirty noise and distortion test of the original version preamp done in RMAA, which is not totally trustworthy in absolute terms, but good enough for comparative testing of mods. The EMU soundcard I had at that time had a noise floor of -118dB, which I definitely miss for testing some of my quieter builds.

PW8B_RMAA.JPG

That was with OPA2132 opamps, later versions have used more uptown ones like OPA827, OPA1612, OPA1642, and ADA4627-1. All of those are SMT only and I made up my own SO-8 to DIP-8 converter boards to use them. That allows using both FET and bipolar opamps in one dual DIP slot, which is arguably bordering on cork sniffer material but pretty fun to mess with anyway. It's especially useful for allowing nicer board layouts, which is always a good thing.

I like to make my tone controls very interactive, as illustrated by these Bass/HPF control sweeps in my LTspice model:

HPFsweep_B_85_99.JPG

The top set of curves reflects Bass left at max and the HPF swept over its full range. We can see the peak frequency moving from around 30 to 80Hz depending on the HPF setting. The bottom set shows Bass at around 3 o'clock and HPF swept fully again. That looks like ~40-110Hz effective peaking, just by tweaking one control. We have to mess with gain staging a bit to keep the peak amplitude the same throughout though, assuming we need that. There are many other possible curves, and that's before we even get to the Mid control and/or the parametric EQ. Those of you who are familiar with the Pultec EQ might notice some common DNA here.

And then the Treble control is a bit unusual, as I went for something similar to a classic constant directivity horn EQ when the control is dimed. It starts working above where most hiss lives and you might think of it more as an "air" control. Even at high boost settings there's very litttle noise, but it takes a good quality compression driver and horn to really leverage what it can bring. It doesn't do hard treble cut super well and the expectation is that the user will get that from their onboard preamp or maybe a pedal. Since I play fretless nearly exclusively I don't tend to need a ton of treble cut anyway...LOL.

Speaking of which, there's an input impedance switch and the default setting is optimized for active basses, at somewhere in the 20K ohm range on most of these builds. I only own one switchable active/passive bass for pedal testing purposes and never run it passive otherwise, but I usually keep that facility as a courtesy to my firends who occasionally end up playing through these things at open mics or other jam situations. I find somewhere in the 300K-700K range to be good enough for that, while still yielding a very low noise floor, FWIW. Seemed to work OK even for slappers at NAMM when my friend used the later versions in his booth there, but I'll be implementing a rotary impedance selector on my new tube amp build, because why not.

Notice that the dimed treble curve peaks way up around 15KHz, but there's still no harshness or excessive noise to speak of:

PW8B_V1_2_TrebMax.PNG

Not a whole lot of boost on tap, but it does what I need it to very well.

Enough for tonight, but I'll be happy to do up more frequency response curves or discuss any other aspects you all might care to hear about. I'll get to some of the other versions later, I used some different vendors who might be of use to some of you and at least one you might want to avoid. ;)
 
Last edited:
Chapter 3: Nothing exceeds like excess

So the above build managed to catch the attention of someone at ICEpower who happens to play bass, and I was offered a "long term loaner" of their then-new 700 watt module which was developed with MI applications in mind. Naturally I set out to build whatever would interest them the least, a simple monoblock power amp. They tend to avoid selling to people who just want to throw a module in a box without any value added circuitry. Hey, I designed a custom heatsink to again avoid needing a fan, that's got to count for something, right? Beyond that, my concept was to use a 1/2 rack format and do some different matching preamps, one solid state and one with toobs. Sort of like the studio lunchbox thing, but even clunkier.

I started with the solid state preamp, using the same boards and general control layout as above. I also added a FET line driver designed by a friend of mine who works for a very well known studio electronics firm. I did the board layout and contributed a few ideas along the way, but it was basically his baby. It measured pretty well on my computer analyzer and could even add a little hair at the higher gain settings. It would make a really nice DI and is also great for driving line level effects. I bought a nice modestly priced extruded case on eBay from a company that does laser power supplies:

halfrack_case.JPG


PW7B_V2_gutshot.JPG


PWBPS.JPG

This time I designed my own power supply, added a more uptown Jensen stepup line output transformer with crazy bass response that was used in some highly regarded DBX gear, and then once I got the test front panel sussed I went ahead and had Front Panel Express do another custom one for me:

PW7B2_completed.jpg

On to the matching power amp:

Heatsink, again from HeatsinkUSA in Michigan:

Heatsink_700ASC.JPG

Heatsink and 700ASC power module crammed into the enclosure, this is the flipped view:

PW700_guts.JPG

I went with the next longer size enclosure from the same eBay vendor, and yet another Front Panel Express panel:

Halfstack5.jpg

The unusual Speakon output jack placement was meant to minimize crosstalk between the line supply and input wiring, but that turned out to be unnecessary and I would have swapped in an input jack on the front and moved the Speakon to the back if I hadn't eventually sold off the power amp. I still have the preamp and it kills for recording, here are the specs when using the FET line driver:

PW7B_V2_DIspecs.PNG

Next up: I go completely off the deep end and attempt a compact lightweight all in one bass head build.
 
Last edited:
Chapter Four: Are we having fun yet?

By this time all my gigs were just using a single 112 cabinet, so the rack stuff was kind of goofy size wise and the half rack pieces were a bit unwieldy and maybe too homemade looking for tony winery jazz shows and the like. A few guys in my circle of friends were putting together a power module group buy and I managed to snag a couple at a crazy good price, so on to a compact build similar to the soon to be released Mesa Subway, Genzler Magellan, et al. Finding the right enclosure proved to be a huge can 'o worms and I decided to just throw money at a custom one. Protocase in Canada promised a lot and seemed like a decent way to go, so I dove into learning their proprietary software and after about a month came up with a hilariously impossible feature request set. Sure, we can UV print these graphics, piece of cake:

Disco.jpg

I was quickly disabused of that notion by the graphics department and the lead tech then told me I would have to use a light color powder coat, preferably light gray or white, and I could only use Adobe Illustrator to do the file. Sound familiar? Thanks for waiting a month to tell me that BTW.

These guys use a laser cutter and fold up all the sides, then weld the edges if you're willing to pay for that. All the holes are laser cut too, so things like toggle switch keyways are very easily realized, and decorative venting is dead simple. Here's a visualization of the flat panel phase:

Protocase_PDAscreenshot2.JPG


You get a 3D render for approval and it should take about two days from there, supposedly. Nice, what could go wrong? A few things, as it turns out. Notice the masked off area in the powder coat at top right, which was missed on their end. And then they also forgot to weld the seams. And so after a lot of time consuming back and forth with their graphics crew I was sent a very expensive coaster:

Protocase_chassis_seam.JPG

Oh, and the graphics were pretty subpar and the sheetmetal gauge they had suggested was too thin. So at this point I was finally put in touch with the chief engineer to make sure the "free" do-over would be up to snuff. Within one day we worked out a lot of improvements and he personally oversaw the production the next time around. I was also allowed to keep the first try, which we figured would be helpful in getting all the internal detailing right before the prime build.

The power module with heatsink attached to the heavy aluminum lid looks like so:

Powah.JPG

Work in progress gutshot, this is actually the duff case which I glued up with JB Weld and sold to a local friend since I already had the second power module on hand:

PW8B2Guts_Mals.JPG

That's a Jensen DI trafo at the top, there's an XLR on the back of the amp for it.

And voila, the finished product using the second, heavier case


PW8Bv2_Pink_3.jpg

Weight came in at around nine pounds due to the very bomber heatsink, and it did end up fitting pretty nicely on my AudioKinesis TC112: PW82_TC112.JPG
Notice the difference between the cases in the last two pics, second one has the unwelded seams.

That's all for now, I'll come back and attempt to clean up all the typos in a bit. Thanks for reading!
 
Last edited:
Always love reading about your exploits.

It's both inspiring and humbling to do so. 😺
We all need to keep pushing ourselves a bit IMO. Doesn't matter where you are on the curve, just keep looking higher!

If you want to talk about humbling, seeing and hearing lots of killer players using this last build at NAMM in my friend's booth definitely qualified. I can probably scare up some demo vids, I reckon. It was even crazier seeing someone play a bass with one of my preamps in it on the huge outdoor main stage though, with no inkling that was happening until I went out there to see what was up since two of that band's members endorse my buddy's instruments.
 
Chapter Four: Are we having fun yet?

By this time all my gigs were just using a single 112 cabinet, so the rack stuff was kind of goofy size wise and the half rack pieces were a bit unwieldy and maybe too homemade looking for tony winery jazz shows and the like. A few guys in my circle of friends were putting together a power module group buy and I managed to snag a couple at a crazy good price, so on to a compact build similar to the soon to be released Mesa Subway, Genzler Magellan, et al. Finding the right enclosure proved to be a huge can 'o worms and I decided to just throw money at a custom one. Protocase in Canada promised a lot and seemed like a decent way to go, so I dove into learning their proprietary software and after about a month came up with a hilariously impossible feature request set. Sure, we can UV print these graphics, piece of cake:

View attachment 39056

I was quickly disabused of that notion by the graphics dpartment and the lead tech then told me I would have to use a light color powder coat, preferably light gray or white, and I could only use Adobe Illustrator to do the file. Sound familiar? Thanks for waiting a month to tell me that BTW.

These guys use a laser cutter and fold up all the sides, then weld the edges if you're willing to pay for that. All the holes are laser cut too, so things like toggle switch keyways are very easily realized, and decorative vetting is dead simple. Here's a visualization of the flat panel phase:

View attachment 39057


You get a 3D render for approval and it should take about two days from there, supposedly. Nice, what could go wrong? A few things, as it turns out. Notice the masked off area in the powder coat at top right, which was missed on their end. And then they also forgot to weld the seams. And so after a lot of time consuming back and forth with graphics crew I was sent a very expensive coaster:

View attachment 39058

Oh, and the graphics were pretty subpar and the sheetmetal gauge they had suggested was too thin. So at this point I was finally put in touch with the chief engineer to make sure the "free" do-over would be up to snuff. Within one day we worked out a lot of improvements and he personally oversaw the production the next time around. I was also allowed to keep the first try, which we figured would be helpful in getting all the internal detailing right before the prime build.

The power module with heatsink attached to the heavy aluminum lid looks like so:

View attachment 39059

Work in progress gutshot, this is actually the duff case which I glued up with JB Weld and sold to a local friend since I already had the second power module on hand:

View attachment 39061

That's a Jensen DI trafo at the top, there's an XLR on the back of the amp for it.

And voila, the finished product using the second, heavier case


View attachment 39060

Weight came in at around nine pounds due to the very bomber heatsink, and it did end up fitting pretty nicely on my AudioKinesis TC112:


View attachment 39063
Notice the difference between the cases in the last two pics, second one has the unwelded seams.

That's all for now, I'll come back and attempt to clean up all the typos in a bit. Thanks for reading!

It's always fun to read things like this that just affirm that little voice in my head that says "that kind of thing is above your paygrade." Deep down I want to have diy'd every part of my rig but I think building everything but a power amp is going to be, as the say, "close enough for jazz." Not gonna build a tuner either. Didn't use one for years out of pride.

Anyway, nice builds and impressive follow through! That custom case runaround sounded frustrating af.
One of the Peavey engineers who used to hang on TB tried to convince me to DIY a Class D power amp from scratch too. But even I can recognize when it's time to shut up and play my guitar! ;)

And yeah, I probably could have gone to a friend's local machine shop and had them CNC me a case from a solid billet for around the same money, and it would have been dead perfect the first time, I'm sure. If Amplifyfun had been around back then I probably would have gone that route and used them for the graphics, actually.
 
Back
Top