rwl
Well-known member
- Build Rating
- 5.00 star(s)
This is a report on my build of a Rockman Acoustic Guitar Pedal. This was a collaboration with @Cybercow - he traced the circuit and made a few tweaks, while I laid out the PCB. I thought this pedal would be a novelty, but I quite like it! This is also an entry in the Inventory Contest. You can download the gerber files here.

Inspiration
Cybercow and I were working on another, less ambitious project, and I was wondering if he had any other circuits that needed a PCB - and he did. Enter the Rockman Acoustic Guitar Pedal. I actually didn't select the name for this - I requested a bird name and Cybercow suggested "Wood Owl". The Wood Owl is a southeast asian owl that looks quite alien.
I wanted to do a build based on this, but I also thought this would be a fun entry into the Inventory Contest. For a weird-looking bird like this, I was worried that a hand-drawn version would just look derpy. It would really need the precision of a UV print to avoid just looking like a poorly drawn owl.
I've had in my head for a while that I'd like to do a wooden guitar pedal (or at least, a faceplace). So instead I decided to do a regular Great-Horned Owl, but in wood, to represent the wood owl motif.
I had some 1/8" plywood left over from finishing the loft of a shed and by my measurements, I thought it would be just thin enough that I could fasten pots through the wood as a faceplate. Cutting and sanding was straightforward. I had a budget Harbor Freight wood-burner gathering dust in my basement and I figured this would be more stylish than painting the owl or something.
I think it turned out well, but the plywood was relatively soft and had a strong grain, so the wood-burner would often press into the grain, creating divots and dark spots. I don't think it's that noticeable from a distance, but either I need to find better wood to use or perhaps a better wood-burner. Maybe after I do more burning.
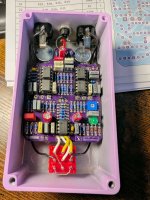
The Build
This build really pushed my PCB layout skills. I really wanted to squeeze this sucker into a 125B, and after a lot of sweat and tears, I was able to make that happen. It's a lot of components and the board is exactly the right height to fit into a 125B, there's no space between the bottom of the board and the footswitch; luckily my footswitch daughterboard overhangs the PCB and I was able to just use resistor legs to connect the two. The only problem is that I made a stupid mistake early in the layout process and swapped the volume and gain (I wanted volume on the top left). Cybercow pointed this out later but it was too late to switch without extensive revisions to the layout. Maybe someday I'll come back to it.
I had all the parts laying around except the TL061 and a 220P capacitor. I swapped the TL061for TL071 with no ill effects, and soldered two smaller caps together.
I mentioned the wood-burning above. Basically I took a 1/8" thick piece of plywood, sanded it down, and burned it with a cheap wood-burner. Then I attached this to a white 125B enclosure I had used for a previous pedal. I would have preferred to use a plain metal enclosure instead, but this was an inventory build... the faceplate overhangs the edges slightly, so from the top you can't even see the metal enclosure. The wood is just slightly too think for the nuts to get a grip on the pot shafts. So I sanded around the edges of the pot holes for a bit until the nuts could just get a grip, then used a wrench to tighten aggressively, pressing the wood down and getting a solid fit. the footswitch and a 5mm LED bezel fit through without problems. It was a big relief, the thickness of the wood relative to potswas my biggest concern with the build.
Finally, I debated using black and orange davies knobs for a halloween feel, but went with the oxblood mini chicken head knobs as a more tasteful choice. I think they look great, but they do overlap the labels and owl a little bit.
Overall I'm very happy with how this turned out, as a first attempt at woodburning and my first wooden faceplate.
The Pedal
I really like it! It'll stay on my board for the foreseeable future. I was actually looking for a good rhythm guitar pedal that would allow me to play chords cleanly without being gainy, and I think this fits the bill. I'm not an expert on the circuit but it's supposedly a strong compressor with bass and treble controls. It adds a really nice resonance and tone. Probably my only complaint is that I wish it was a little bit louder (it's a bit more than unity gain).
Does it make an eletric guitar sound like an acoustic guitar? Kinda! It gets about halfway there. I've found I quite enjoy pedals that make electric guitars sound like other instruments (sitar/theremin/synth/acoustic guitar/trombone/violin). They all feel like they should be novelties but the end results are pretty interesting.
Firsts

Pedal rating: 5/5

Inspiration
Cybercow and I were working on another, less ambitious project, and I was wondering if he had any other circuits that needed a PCB - and he did. Enter the Rockman Acoustic Guitar Pedal. I actually didn't select the name for this - I requested a bird name and Cybercow suggested "Wood Owl". The Wood Owl is a southeast asian owl that looks quite alien.
I wanted to do a build based on this, but I also thought this would be a fun entry into the Inventory Contest. For a weird-looking bird like this, I was worried that a hand-drawn version would just look derpy. It would really need the precision of a UV print to avoid just looking like a poorly drawn owl.
I've had in my head for a while that I'd like to do a wooden guitar pedal (or at least, a faceplace). So instead I decided to do a regular Great-Horned Owl, but in wood, to represent the wood owl motif.
I had some 1/8" plywood left over from finishing the loft of a shed and by my measurements, I thought it would be just thin enough that I could fasten pots through the wood as a faceplate. Cutting and sanding was straightforward. I had a budget Harbor Freight wood-burner gathering dust in my basement and I figured this would be more stylish than painting the owl or something.
I think it turned out well, but the plywood was relatively soft and had a strong grain, so the wood-burner would often press into the grain, creating divots and dark spots. I don't think it's that noticeable from a distance, but either I need to find better wood to use or perhaps a better wood-burner. Maybe after I do more burning.
The Build
This build really pushed my PCB layout skills. I really wanted to squeeze this sucker into a 125B, and after a lot of sweat and tears, I was able to make that happen. It's a lot of components and the board is exactly the right height to fit into a 125B, there's no space between the bottom of the board and the footswitch; luckily my footswitch daughterboard overhangs the PCB and I was able to just use resistor legs to connect the two. The only problem is that I made a stupid mistake early in the layout process and swapped the volume and gain (I wanted volume on the top left). Cybercow pointed this out later but it was too late to switch without extensive revisions to the layout. Maybe someday I'll come back to it.
I had all the parts laying around except the TL061 and a 220P capacitor. I swapped the TL061for TL071 with no ill effects, and soldered two smaller caps together.
I mentioned the wood-burning above. Basically I took a 1/8" thick piece of plywood, sanded it down, and burned it with a cheap wood-burner. Then I attached this to a white 125B enclosure I had used for a previous pedal. I would have preferred to use a plain metal enclosure instead, but this was an inventory build... the faceplate overhangs the edges slightly, so from the top you can't even see the metal enclosure. The wood is just slightly too think for the nuts to get a grip on the pot shafts. So I sanded around the edges of the pot holes for a bit until the nuts could just get a grip, then used a wrench to tighten aggressively, pressing the wood down and getting a solid fit. the footswitch and a 5mm LED bezel fit through without problems. It was a big relief, the thickness of the wood relative to potswas my biggest concern with the build.
Finally, I debated using black and orange davies knobs for a halloween feel, but went with the oxblood mini chicken head knobs as a more tasteful choice. I think they look great, but they do overlap the labels and owl a little bit.
Overall I'm very happy with how this turned out, as a first attempt at woodburning and my first wooden faceplate.
The Pedal
I really like it! It'll stay on my board for the foreseeable future. I was actually looking for a good rhythm guitar pedal that would allow me to play chords cleanly without being gainy, and I think this fits the bill. I'm not an expert on the circuit but it's supposedly a strong compressor with bass and treble controls. It adds a really nice resonance and tone. Probably my only complaint is that I wish it was a little bit louder (it's a bit more than unity gain).
Does it make an eletric guitar sound like an acoustic guitar? Kinda! It gets about halfway there. I've found I quite enjoy pedals that make electric guitars sound like other instruments (sitar/theremin/synth/acoustic guitar/trombone/violin). They all feel like they should be novelties but the end results are pretty interesting.
Firsts
 First wooden faceplate
 First contest entry
Pedal rating: 5/5
")