chongmagic
Well-known member
**********************
I have been working on a UV Artwork Generator.
If you don't have Illustrator or hate dealing with layer management, this tool automates the process for Tayda UV printing.
Also note that these tools do not store any files that are uploaded. They process the upload, generate the result for you to download, and immediately wipe the data from the server.
Also, this is beta, I have tested it with my own files, but please double check your output.
If anyone is interested in trying it out, you can get to it here: PedalForge
If you find bugs, let me know, and if you find it useful let me know if you have any suggestions or anything to add to it.
***********************************************************************
I found a few bugs in this so for the time being I am placing it in maintenance mode until I iron a few things out.
Update: I asked Hugo if I could send him a file from the app and have him test it directly. As soon as I get the green light, I will make this tool available again.
************************************************************************
Update 2:
Quick update on the PedalForge → Tayda UV workflow:
Both the 125B and 1590B raster-generated UV files were accepted by Tayda and have already shipped, which confirms the core pipeline is working (color + white underbase from raster input).
I’m currently waiting for the printed enclosures (non-gloss) to arrive this week so I can verify real-world print quality and alignment.
At this point the only remaining technical verification is the spot gloss layer, since I don’t have a gloss enclosure in this batch.
Once gloss is confirmed, the full raster → Tayda UV process should be considered validated end-to-end.
I’ll report back as soon as the enclosures arrive and I can inspect the actual print results.
-------------------------------------------------------------------------------------------------------------------------
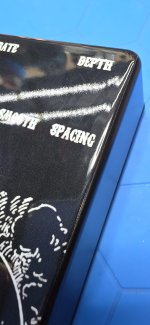
Gloss Result Update:
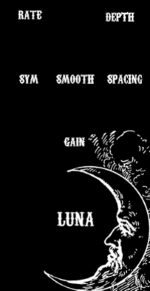
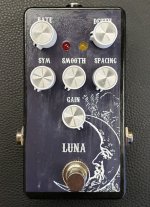
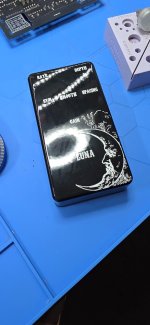
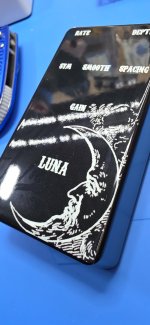
I just received my last test enclosure. For this run, I enabled the gloss layer and used a design from a pedal I built back in 2019. The original artwork was created entirely in Paint.NET for an AionFX Luna.
I exported that original PNG, uploaded it into the tool with gloss selected, generated the PDF, and sent it directly to Tayda.
Attached are:
I have been working on a UV Artwork Generator.
If you don't have Illustrator or hate dealing with layer management, this tool automates the process for Tayda UV printing.
- Auto-Layers: Upload your design (PNG or JPG), and it automatically generates the required WHITE, COLOR, and GLOSS-V layers.
- Spec Matching: The output is sized to match Tayda's exact enclosure specifications (Full Bleed).
- Smart Gloss: If you use a transparent PNG, it automatically maps the White Base and Spot Gloss exactly to your artwork pixels. If you use a JPG, it creates a solid base.
- Supported Sizes: 1590A, 1590B, 125B, 1590BB, 1590BB2, 1590XX, 1590DD.
Also note that these tools do not store any files that are uploaded. They process the upload, generate the result for you to download, and immediately wipe the data from the server.
Also, this is beta, I have tested it with my own files, but please double check your output.
If anyone is interested in trying it out, you can get to it here: PedalForge
If you find bugs, let me know, and if you find it useful let me know if you have any suggestions or anything to add to it.
***********************************************************************
I found a few bugs in this so for the time being I am placing it in maintenance mode until I iron a few things out.
Update: I asked Hugo if I could send him a file from the app and have him test it directly. As soon as I get the green light, I will make this tool available again.
************************************************************************
Update 2:
Quick update on the PedalForge → Tayda UV workflow:
Both the 125B and 1590B raster-generated UV files were accepted by Tayda and have already shipped, which confirms the core pipeline is working (color + white underbase from raster input).
I’m currently waiting for the printed enclosures (non-gloss) to arrive this week so I can verify real-world print quality and alignment.
At this point the only remaining technical verification is the spot gloss layer, since I don’t have a gloss enclosure in this batch.
Once gloss is confirmed, the full raster → Tayda UV process should be considered validated end-to-end.
I’ll report back as soon as the enclosures arrive and I can inspect the actual print results.
-------------------------------------------------------------------------------------------------------------------------
Gloss Result Update:
I just received my last test enclosure. For this run, I enabled the gloss layer and used a design from a pedal I built back in 2019. The original artwork was created entirely in Paint.NET for an AionFX Luna.
I exported that original PNG, uploaded it into the tool with gloss selected, generated the PDF, and sent it directly to Tayda.
Attached are:
- The original 2019 pedal with the printed label
- The PNG file saved from Paint.NET
- The new UV + gloss enclosure
Attachments
Last edited:


")