leadfoot
Well-known member
I'm devastated. Here I was thinking White Test was a modded SD-1 or TS.I know, I was being a jackass!")

I'm devastated. Here I was thinking White Test was a modded SD-1 or TS.I know, I was being a jackass!
New since January 2025 you mean?Here I was thinking it was the new immigration policy.
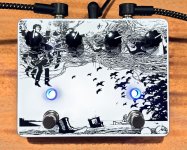
That looks really good. You consider it good enough to use it?I just received my last test enclosure. For this run, I enabled the gloss layer and used a design from a pedal I built back in 2019. The original artwork was created entirely in Paint.NET for an AionFX Luna.
I exported that original PNG, uploaded it into the tool with gloss selected, generated the PDF, and sent it directly to Tayda.
At this point, yes. I’ve run multiple physical tests including white and gloss, and the files have passed Tayda’s RIP without rejection. That said, I still recommend reviewing the generated PDF before submission to confirm sizing and layer setup.That looks really good. You consider it good enough to use it?
AmplifyFun sends you a pre-production proof for approval, and is much more flexible on artwork submission format to boot. My bet is that if it works at Tayda it’ll work for Spencer.This is fantastic! I passed two bar exams in three days but I couldn’t figure out how to configure Tayda artwork if my life depended on it! I got as far as vectorizing a cool photo of an Echoplex for my EP-3/Aion FX Ares, then hit a wall.
Has anyone tried using this for AmplifyFun? Just curious.
Thanks for your thoughts!AmplifyFun sends you a pre-production proof for approval, and is much more flexible on artwork submission format to boot. My bet is that if it works at Tayda it’ll work for Spencer.
Again, I cannot thank you enough on behalf of myself and the similarly “vector-challenged” among us! At the risk of exposing just how utterly perplexing I find this entire subject matter I have two possibly very stupid questions:I used the attached PNG to generate the Tayda-ready PDF for some reason it won't let me attach it so here is a screenshot, and these are the results on 125B and 1590B.
White layer mapping printed correctly, gradients came out smooth, and there were no rejection flags from Tayda.
I’m just waiting on the third enclosure with the gloss layer for final validation. As soon as that arrives, I’ll post another update.View attachment 111747
Trust me, you are definitely not alone in the vector-challenged group.Again, I cannot thank you enough on behalf of myself and the similarly “vector-challenged” among us! At the risk of exposing just how utterly perplexing I find this entire subject matter I have two possibly very stupid questions:
1. When using this tool, is it ever necessary (or advisable, or design-dependent) to order a powder coated enclosure as the base?
2. (Perhaps even dumber), is there any need/means to designate text as text (i.e., is text treated any differently than any other part of the design)?
Thanks to anyone that can answer these - with or without your eyes rolling! I currently have SEVEN completed builds living in “temporary” 3D printed enclosures while I swore to myself I’d figure out how to create a proper Tayda file!
Thanks so much for all your help (as if building your awesome tool didn’t already make you the GOAT)! The last time I attempted this, the Tayda “PDF Artwork Analyser” tool wasn’t a “thing” afaik, so that just saved me a ton of headaches in addition to your guidance. I just have to tweak my CYMK colors a bit more and I’ll finally be cranking out some proper homes for my pedals!Trust me, you are definitely not alone in the vector-challenged group.
1. UV printing will work on bare aluminum, but many choose to use powder coated enclosures because it gives a more professional result. Bare aluminum should still work fine, but the final look can depend on the design and the natural aluminum texture.
2. You don’t need to designate text separately. Tayda’s UV printing treats everything in the file as artwork. Text, shapes, images, logos, and gradients are all handled the same way as long as they’re part of the file you upload. Just make sure your images and text are high resolution for the best results.
Once you run your design image through the tool and upload the generated PDF to Tayda’s UV printing service, you should be good to go.
If you run into any issues or have questions, feel free to ask.
Thanks so much for the kind words! I’m glad the tool helped make the process easier.Thanks so much for all your help (as if building your awesome tool didn’t already make you the GOAT)! The last time I attempted this, the Tayda “PDF Artwork Analyser” tool wasn’t a “thing” afaik, so that just saved me a ton of headaches in addition to your guidance. I just have to tweak my CYMK colors a bit more and I’ll finally be cranking out some proper homes for my pedals!
All of this was MUCH easier when I gave a friend a file to set up in illustrator for me, but I don’t want to keep going back to that well:
 ) but when I was asked to contact them for info about it they provided me with a link to a PDF test tool. I signed in and uploaded my file and it was immediately apparent what the issue was so I made the fix, tested it again, and now it should be good to go.
That’s the one.I currently have a pending UV print job with Tayda that had an issue (really boneheaded move on my part ended up being the problem
I dunno if this is what counterdeliver was talking about when you mentioned “PDF artwork analyzer”? First time I’ve been linked to it by Tayda but it’s a god-send! I hadn’t seen anything about it on their website (not yet at least, tho it must be pretty new) in a quick search so I don’t wanna post the link here just in case but hopefully it becomes readily available cuz I’m sure it’ll save both builders and Tayda themselves hours upon hours of trying to fix issues from halfway around the world.
 . Maybe I’ll just use sharpies
Yeah that’s the same analyzer I was talking about. It’s actually really helpful for catching issues before sending the file to Tayda.That’s the one.
It’s easy to miss (and a bit hard to find even in your browser history) but Tayda links to it publicly on their site and provides the username/password to use (both “pdfman”) on this page :
The direct link is here: https://pdf.tayda.com/login
Again, user and password are both “pdfman” (without quotes).
Hope that helps someone. As for me, I won’t embarrass myself further in this thread by conveying what an epic failure the tool revealed my design to be nor trouble chongmagic with anymore questions
This is expected behaviorI'm most likely missing something here but I've uploaded my .png file and processed it through the PedalForge tool but it seems that it is cropping and scaling the image to fill the entire template area (.pdf output also attached l). Maybe this is due to the transparency of the background, and the amount of space between the text / icons and the edge of the image.
Should I try adding a border around the image?
Any help is appreciated
P.S. love your eork, your saving me from going down another rabbit hole in learning Illustrator hah
Nice yeah, I was pretty sure it was user error ha. I didn't mean to sound like I was taking shots either.This is expected behavior
PedalForge trims transparent space before scaling, so if your PNG has a lot of empty space around the artwork it will remove that and then scale what’s left to fill the enclosure.
That’s why it looks like it’s zooming in.
Best fix is to export your design at full enclosure size with a solid background (even white). That way your spacing stays exactly how you laid it out.
Adding a border works too, but it’s just a workaround.
Let me know if this helps.
The details in the skulls and hexagons came out really nice! Thanks for sharing!I'd say your tool works well. One finished and one needing knobs installed..
View attachment 114904
View attachment 114905