ThatDude
Active member
I need to start off by mentioning that working with amps can be very dangerous if the correct precautions are not taken and if you are unaware of the dangers lurking in higher voltage circuitry. Please don't temp the fates unless you take the proper precautions and are aware of the risks. I say all that, but this was my first amp build, and I didn't buy the farm, luckily...
I've been wanting a Benson Monarch since the time I heard one a few years back. I've also been wanting to build an amp, but have been trying to decide if I should get a kit, or go with an amp design that might not have a kit available. So when I came across a build report by @CanadianDave detailing his experience and process making an amp based off the Benson Monarch circuit and design, I was sold on making my own Monarch. I reached out to CanadianDave to pick his brain and get as much information as I could. I cannot express how integral Dave's help was here. Thanks Dave!! If you have not seen Dave's build report for his Monarch, check it out. It's awesome and really informative.
I went through the layout and schematics and planned out what parts I needed and started acquiring them from multiple sources. Once I got the chassis I started making sure the layout would work for the size chassis I had, and it did thankfully. So I drilled and cut the holes I needed for mounting.


Then I needed to decide how to label the chassis. I wasn't sure how well water slide decals would hold up over time, and I didn't have a laser to laser etch it yet, so I decided to saltwater electro etch the chassis. I printed out some labels from a label marker and cut the lettering out by hand using a razor. The cutting out of the letters took a pretty long time and the end product wasn't the sharpest looking lettering. I don't think I would repeat this process again. I'd probably just ask someone with a cricket cutter to make the labels so I wouldn't have to hand cut them if I was going to salt water etch a chassis again.

After the chassis labeling was done, it was time to start working inside the chassis. I started where most of my research said to start, with the heater wirings for the tubes. With the heater wiring done, I moved on to the rest of the wiring, including the filter caps, and transformer wiring. I left the passive components in the audio signal path like the resistors, and caps till last because the layout is essentially point-to-point wiring rather than a board, and I wanted to make sure I ran all the wiring before trying to make sure all the components were positioned in a way that would not cause any shorts or unintended connections.


At this point I was ready to start trying to power this thing up for the first time. I made a dim bulb tester and a capacitor discharge stick. I brought the chassis outside. I made sure to have a fire extinguisher on hand, and went for it. No smoke, no shorts, no problem on first start up, Pheww. I tested voltages and everything looked as expected. I was over the moon! I placed the rest of the tubes in, connected a speaker, the reverb tank, and tested for audio output. It passed that test also! I am on cloud 9 at this point!
In terms of what sort of speaker enclosure and what kind of enclosure to mount the chassis in, I was on the fence between making a combo amp, or trying to make a small speaker cab, and separate head. Coming off the high of actually hearing it work, I decided to go with a head and small speaker enclosure. So I picked up some 12 inch wide pine board, and some 1/2 inch plywood from the nearest corporate hardware, lumber and tool store. The dimensions I used for the speaker enclosure were measurements for a Fender style extension speaker cab I found online which is semi-open back. The dimensions for the head enclosure are measurement I came to based on how much space I would need for the chassis, reverb tank, and some extra room to allow for tube heat dissipation.


For the finish, I used a slate grey wood stain and sealed with a satin poly. I went with Burgundy grill cloth for the speaker baffle and face of the head enclosure. It came out a bit more industrial than I intended, but I dig it. After talking with Mojotone about what speaker they recommend for the sound I was going for and what the speaker was going into, they recommended their British Vintage 25 speaker. I am enjoying the sound I am getting out of it and have no complaints!
Finished product:


I completed this project a few months ago, but I've been putting off publicizing it because I wanted to play the amp for a while to make sure nothing blew up or went sideways shortly after. I am actually thinking about starting a new amp build at this point. This project was incredibly fun, and I doubt this will be a one and done situation.
I've been wanting a Benson Monarch since the time I heard one a few years back. I've also been wanting to build an amp, but have been trying to decide if I should get a kit, or go with an amp design that might not have a kit available. So when I came across a build report by @CanadianDave detailing his experience and process making an amp based off the Benson Monarch circuit and design, I was sold on making my own Monarch. I reached out to CanadianDave to pick his brain and get as much information as I could. I cannot express how integral Dave's help was here. Thanks Dave!! If you have not seen Dave's build report for his Monarch, check it out. It's awesome and really informative.
I went through the layout and schematics and planned out what parts I needed and started acquiring them from multiple sources. Once I got the chassis I started making sure the layout would work for the size chassis I had, and it did thankfully. So I drilled and cut the holes I needed for mounting.
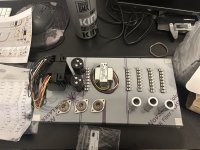
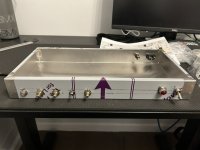
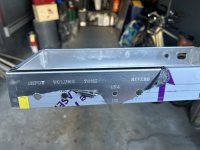
Then I needed to decide how to label the chassis. I wasn't sure how well water slide decals would hold up over time, and I didn't have a laser to laser etch it yet, so I decided to saltwater electro etch the chassis. I printed out some labels from a label marker and cut the lettering out by hand using a razor. The cutting out of the letters took a pretty long time and the end product wasn't the sharpest looking lettering. I don't think I would repeat this process again. I'd probably just ask someone with a cricket cutter to make the labels so I wouldn't have to hand cut them if I was going to salt water etch a chassis again.
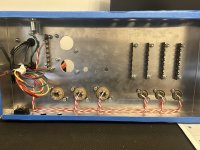
After the chassis labeling was done, it was time to start working inside the chassis. I started where most of my research said to start, with the heater wirings for the tubes. With the heater wiring done, I moved on to the rest of the wiring, including the filter caps, and transformer wiring. I left the passive components in the audio signal path like the resistors, and caps till last because the layout is essentially point-to-point wiring rather than a board, and I wanted to make sure I ran all the wiring before trying to make sure all the components were positioned in a way that would not cause any shorts or unintended connections.
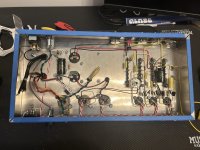
At this point I was ready to start trying to power this thing up for the first time. I made a dim bulb tester and a capacitor discharge stick. I brought the chassis outside. I made sure to have a fire extinguisher on hand, and went for it. No smoke, no shorts, no problem on first start up, Pheww. I tested voltages and everything looked as expected. I was over the moon! I placed the rest of the tubes in, connected a speaker, the reverb tank, and tested for audio output. It passed that test also! I am on cloud 9 at this point!
In terms of what sort of speaker enclosure and what kind of enclosure to mount the chassis in, I was on the fence between making a combo amp, or trying to make a small speaker cab, and separate head. Coming off the high of actually hearing it work, I decided to go with a head and small speaker enclosure. So I picked up some 12 inch wide pine board, and some 1/2 inch plywood from the nearest corporate hardware, lumber and tool store. The dimensions I used for the speaker enclosure were measurements for a Fender style extension speaker cab I found online which is semi-open back. The dimensions for the head enclosure are measurement I came to based on how much space I would need for the chassis, reverb tank, and some extra room to allow for tube heat dissipation.
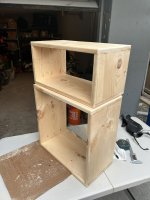
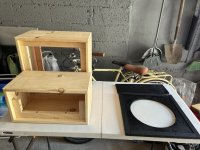
For the finish, I used a slate grey wood stain and sealed with a satin poly. I went with Burgundy grill cloth for the speaker baffle and face of the head enclosure. It came out a bit more industrial than I intended, but I dig it. After talking with Mojotone about what speaker they recommend for the sound I was going for and what the speaker was going into, they recommended their British Vintage 25 speaker. I am enjoying the sound I am getting out of it and have no complaints!
Finished product:
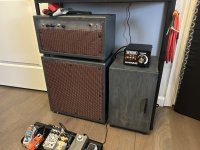
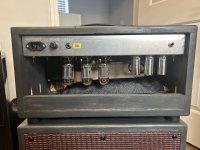
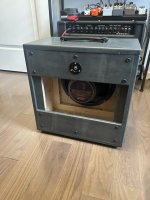
I completed this project a few months ago, but I've been putting off publicizing it because I wanted to play the amp for a while to make sure nothing blew up or went sideways shortly after. I am actually thinking about starting a new amp build at this point. This project was incredibly fun, and I doubt this will be a one and done situation.


