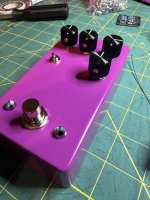
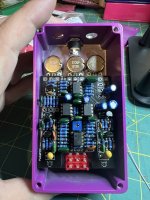
Caeser Chorus Mounting

Itsmedant

Member
Hey all! New to the forum but I’ve built a few pedals in the past. Mainly wah wahs with a guy who owned his own company that made them, so plenty of room to run wires between switches and pots!

This is the first full build I’ve done with everything mounted directly to the PCB and I thought I did a pretty good job with lining up the drilling template but now that I’ve test mounted everything, I have found that i overestimated my skill level at that point. Everything is a bit low by a few millimeters which prevents the pots to “lock in” to their spots on the pcb without bumping into the switch.

My question here, I have a ton of hookup wire and heat shrink available, can I just solder some of it too the lugs on the pots/switches and run it into the pcb spots? Anyone see any huge issue with doing that?

Or do I need to scrap the enclosure and try again? IMG_9620.jpeg IMG_9618.jpeg
 
I think I can safely say that most of us here are “above average.”

(At least in terms of hobby expenditures.)
And I have too many hobbies. Apart from guitar and all the gear that goes along with it, I'm pretty big into leatherworking. I spent $600 on a set of custom knives for my self. The pricking irons (things you use to do the holes for stitching) were $190 each, and then that doesn't even include the leather itself!

I am going to start making some custom guitar straps soon, and my first instinct is to figure out a way to use shell cordovan (the most expensive leather per sq/ft there is).

Why am I like this!?
 
I think I’m going to give this a try tomorrow and see if it gives me enough space to fit it all in there. If not, I’ll just try on another enclosure! I need to get my 3d printer up and running so I can print of that enclosure guide someone made here


I think I’m going to order a handful of the mini switches anyways. Does the switch pcb fit on those as well? Was debating on grabbing a few of those too.

I hadn’t even fully planned out what I was going to do about the LEDs. I was going to put them in and perhaps run a small wire from each leg.

But at this point, the amount of extra work I’ll need to do is probably how long it would take to drill out another enclosure!
I just did this as an experiment, 1/8'' or 3.25mm is all you will get at the extreme!

16 mm Offset Legs.jpg
 
Just got my low profile switches in and a bare metal enclosure to practice with. I also have the 3d printed drilling template someone posted ready to try out too!

May give it a go tonight after work if my brain isn’t mush
 
Well that escalated quickly…went to the site to buy JUST the low profile switches…$70 later my order is in.

0f23169ec402896814b9df6d11e57686.jpg


You didn't really want to pay those $₶৲₱₱৲₦₲ ¢₶₳₹₲€$ just for a handful of switches?
Better to make the $₶৲₱₱৲₦₲ ¢₶₳₹₲€$ worthwhile and order up.


IMHO...
Never scrap an enclosure (or anything).
Save the enclosure for a different build, you'll find the right project for it down the road if you don't make it work with this current project.
 
Haven't been able to work on this since I got the new parts. One of my dog's needed emergency eye surgery so we've been working on helping him heal.

He's pretty much blind and just bumps around the house right now.
 
IMG_0430.jpeg
Alrighty, bringing this old thread back up. A lot of ups and downs with the dog, he went through a lot of recovery and is still healing, I’d post a picture of his eyes after surgery but don’t want to ruin anyone’s meal if they are eating, but they looked like chewed hamburger meat, they are still all “zombie dog” looking but slowly (too slowly) getting better.

Tons of changes with my job too, got promoted to manager of the team I’m on. So with all that said, I’ve been pretty lacking on the “free time” aspect of life.

But I finally decided to get moving again. Found an awesome deal on a grizzly drill press, some new step bits, and the willingness to finally clean my garage…I have a full workbench to start making into my pedal building palace. I’m going to attempt to redrill an enclosure within the next few days and get this pedal finally finished!!

I do need some advice on storing/organizing parts, any ideas out there?
 
View attachment 86304
Alrighty, bringing this old thread back up. A lot of ups and downs with the dog, he went through a lot of recovery and is still healing, I’d post a picture of his eyes after surgery but don’t want to ruin anyone’s meal if they are eating, but they looked like chewed hamburger meat, they are still all “zombie dog” looking but slowly (too slowly) getting better.

Tons of changes with my job too, got promoted to manager of the team I’m on. So with all that said, I’ve been pretty lacking on the “free time” aspect of life.

But I finally decided to get moving again. Found an awesome deal on a grizzly drill press, some new step bits, and the willingness to finally clean my garage…I have a full workbench to start making into my pedal building palace. I’m going to attempt to redrill an enclosure within the next few days and get this pedal finally finished!!

I do need some advice on storing/organizing parts, any ideas out there?
As a user of this method, the baseball card binder method is the most condensed. I use a few sets of component drawers for hardware but through hole components mostly go into was bags into the binders.
 
As a user of this method, the baseball card binder method is the most condensed. I use a few sets of component drawers for hardware but through hole components mostly go into was bags into the binders.
This is a great idea!! I could easily store some binders on the desk for each type of component and the different measurements!
 
This is a great idea!! I could easily store some binders on the desk for each type of component and the different measurements!
It's definitely the cheapest and most condensed method for mass storage. Also easy enough to add more and keep things organized. I mostly use 6 pocket sheets like these but do use some 9 pockets for smaller things like LEDs.
I recommend 3-4 inch D ring binders. I just bought a lot of Bindertek 4in binders off eBay(if you check them out, make sure they're 3 ring). They're a lot tougher than your average binder. Not cheap new though.
Standard small pink bags from tayda fit well. I'll repackage semiconductors into these esd bags, 65x120 is almost perfect for 6 pocket pages. I trim just a hair off the side of each bag, picking the side with the bigger seal, for an easier fit. Baseball cards are 64mm...
60x90 fit well for 9 pocket pages. I use those for individual transistors (measured Germs).
I do add a staple to the top of the pocket seam in pages that carry a bigger load(film and lytic caps) to help enforce the seam. I've split a couple of seams on hundreds of pages but not had an issue with staples ones.
This works best for me as a space saver. If I had all my components in parts pins/drawers, it would take an entire wall. As is, it's all within arms reach. Downside is you have your bench clean enough to have room to open the binders :ROFLMAO:
Thanks for the details! This is awesome and the way I’m going to go. I want to get rid of (or move) the wall mounted thing I have and I still have the drawer thingy I got from RadioShack years ago for bigger parts!

Time to find some binders!
 
Just ordered 2 bindertek binders and those card holders. Also bought a nice silicone work mat since my new work space is covered in carpet…probably not a good combo for an accidental drop of an iron! Thanks for all the advice!

I plan on drilling out the case tomorrow! Hopefully get this darn chorus finished finally then moving onto an octave and a buffer pedal!
 
Back
Top