Any Silk Screening / Finish Experts Out There?

I am new to this Forum and noticed it is very electronics centric and was surprised that there wasn't as much traffic on pedal finishes.

I currently use shaker cans of paint, make my own nitro lacquer or use baked Cerakote for covering. I either use waterslide decals, laser etching (remove paint and/or drop fill), or printable vinyl stickers for lettering and pictures.

For decades I wanted to try silk screening and learn of other techniques. What is everyone else doing for finishes and graphics?
 
UV printing has become popular, especially from Tayda, since the printers themselves are cost-prohibitive for hobbyists. Laser engraving is popular, CNC engraving is around here and there but not really widespread. Vinyl cutters like Cricut can produce nice results, I've seen some of those around. Spraypaint and waterslide decals will never stop being out there though, that's where I (and many others I'm sure) started.

I've been wanting to get into screenprinting and picked up that xTool setup where you can use a laser to etch away the mask on your screens, but I've only done a couple projects with it and haven't had time to really dig in and find a good workflow. I have a tentative project for the summer that I'm hoping to use it for more though.
 
I've used a variety of techniques for graphics.

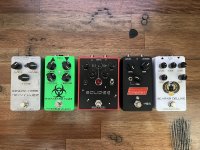
Here are some examples:

Enclosure examples.jpg

From left to right:
  • PedalPCB Ionosphere (Hovercraft Ionostrofear clone) - Hot toner transfer onto Tayda ball silver enclosure. I printed the artwork in reverse using a laser printer, and transferred it onto the enclosure using a clothes iron. It melted the powder coat on the enclosure and didn't transfer evenly, but I think it's a good match for the pedal's sound.
  • PedalPCB Plecostomus (FuzzHugger Algal Bloom clone) - Tayda enclosure screen printed and sprayed with a semi-matte clear coat. This was a very time consuming process. I also had issues with the ink running, but it was a happy accident—the lo-fi screen print has more of the post-apocalyptic vibes than a hi-fi UV print.
  • Eclipse (Spaceman Gemini IV clone) - Tayda enclosure topped with an engraved faceplate manufactured by Spencer at @amplifyfun. I was trying to hew pretty close to the Spaceman aesthetic, and I was very happy with the results. I've done 5 or 6 builds that use one of Spencer's faceplates, and they've all been top notch. If you want to finish your pedal with an engraved faceplate, I cannot recommend Spencer more highly.
  • Compañero Fuzz (Shin-Ei Companion/Basic Audio Zippy clone) - Black sand Tayda enclosure with a Tayda UV print. I had the white layer printed twice and used gloss on the logo in the middle.
  • PedalPCB Dung Beetle (Basic Audio Scarab Deluxe clone) - Toner transfer using GAC 200 acrylic and covered with EnviroTex, and a giant 8mm green LED. I printed the artwork in reverse, applied acrylic, used a roller to ensure that the artwork was flat, and let the acrylic dry. I then washed off the paper (this was a real PITA!), and applied EnviroTex. This technique can look really good, but I'd recommend sticking with a white enclosure because you can't always get all of the paper fibers out of the GAC. It also requires care to clean the edges so that there aren't EnviroTex ridges at the edges of the enclosure. But when done right, it really makes the artwork pop.
With my most recent builds I've stuck with either a UV print from Tayda or a faceplate from AmplifyFUN because (1) they look great; and (2) they require a lot less work and are harder to mess up than the other techniques.
 
Last edited:
When I first got into pedal building years ago I’d already done a lot of screenprinting (t-shirts and posters mainly) so it seemed like a natural thing to try on enclosure.

I quickly learned that trying to print on metal is a whole different beast. Paper and fabric are fairly forgiving. Metal, being completely hard and non-absorbent, is not. Way easier to smear and otherwise screw things up. I think you probably need high-tension, fine- mesh screen, and a press with tight tolerances and really good off-contact.

In any case, it became clear that the home made rig that worked fine for posters wasn’t going to cut it.

I pivoted to etching, had good early success with that, and haven’t looked back;)
 
I 100% DIY screen print my pedals and enclosures and i can tell you with certainty that you can build your own setup and get away with printing pedals. I print on angled pedals by making simple jigs that will angle them while holding them in place.

The key to printing is mesh count. The mesh count needs to be appropriate for the type of ink youre going to use. For instance i use 280 mesh count screen for one shot paints. If i were using UV inks i would increase the mesh count because those inks are so thin.

Another thing to keep in mind is the higher the mesh count the higher the resolution and vise versa. There are pros and cons to using both.

Everything from angle of screen to how high the screen is from the pedal will play a part in how the print will turn out. Make sure your screen is perfectly parallel to the enclosure you are printing on. Pressure when printing is very very important as well. A medium even pressure when squeegeeing is necessary otherwise your print can come out uneven (some spots will have less ink than others). You should take speed into account as well.

Different colors will have different viscosity's. This is important to note, whites are typically very light in weight and will be very runny (One Shot paint) and you will have to wait a few min before squeegeeing to let the paint thicken up. Other colors are thicker and can just be squeegeed right out of the can.

When making your screen include all the print guides to properly line up your pedal you can always use low adhesive tape to cover up the guides. Which leads me to my next point, clean up can be a breeze if you lay down low adhesive tape before printing. This allows you to just peel the tape back and throw it away without much clean up afterwards.

If you have any questions feel free to send me a message!

-Steve
 
Back
Top Bottom