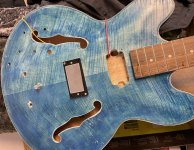
I'll tackle the body on my lunch break today, but the past few mornings I've put some time into the neck/fretboard. It all appeared to be unfinished with the exception of the fretboard itself. As mentioned in one of the early posts here, this was the nicest looking piece of the kit and I want to let it shine in all its glory. Unfinished, it's in pretty good shape from a smoothness perspective, but AWLAYS make 1000% sure you're working with raw wood. Many times, and even if you get raw wood from a hardware store, there's a slight film or coloring on the outside and it's a good idea to take it off with some sandpaper. I started
lightly with 400 grit, then moved up to 800, 1000, then 1500 even on the fretboard. This thing feels like glass now!!! That's what I did over the US holiday weekend.
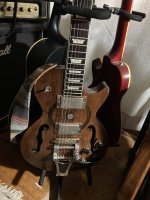
For the past few mornings this week, I've used Tru-Oil to finish it. You can also use boiled linseed oil for the same result, but I already had this from my first kit build. There are 2 methodologies to applying it from the research I've done: with your finger or with a paper towel. My first coat I used my finger and probably put on too heavy of a coat. With this stuff,
less is more in terms of coat thickness. Same goes for painting a room or a piece of furniture. Lighter coats make it look better. The next day I applied it with a paper towel and got better results. With this stuff, its best to apply a coat then wait 24 hours or at least overnight to semi-cure. For every other coat I'm going to buff/knock it back with some 0000 steel wool. Today I buffed it out with the wool and applied a 3rd coat. I may stop at 5 or 6 coats, but it's really up to you how many you want. More coats = more shine and a thicker finish. I like the feel of the raw wood so 5 or 6 will be enough. Once I'm done with this process, let it sit somewhere and cure for a whole week. I hate waiting...
View attachment 51887


")


