My first attempt at graphics. I was inspired by some of the GREAT graphics I've seen here on this Forum. I used an adhesive-backed inkjet label. I made a few mistakes along the way, but I learned a lot. It's a smidge off center, and the ink was blue before I slapped it on the yellow pedal. Gonna try adding a border on future attempts to help with alignment, plus it should look 'neater'. This is probably my favorite overdrive of my 'collection'. There's a lot of range on all of the controls.
You are using an out of date browser. It may not display this or other websites correctly.
You should upgrade or use an alternative browser.
You should upgrade or use an alternative browser.
MDMA Graphics
- Thread starter Iceman53
- Start date
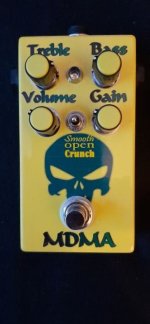
My first attempt at graphics. I was inspired by some of the GREAT graphics I've seen here on this Forum. I used an adhesive-backed inkjet label. I made a few mistakes along the way, but I learned a lot. It's a smidge off center, and the ink was blue before I slapped it on the yellow pedal. Gonna try adding a border on future attempts to help with alignment, plus it should look 'neater'.
This is how I apply all the Pedal Graphics I've built on this Forum. I seal the Graphic & Clear Coat after it's applied to Pedal.
Learnt this from a Sign Writer.
First, Make sure the Graphic is Cured (Completely Dried).
Secondly, Make sure your Hands are completely Dry.
Cut to Size.
Place Graphic exactly in place on the Pedal and as Flat as possible.
Critical, Use Low Tack Painters Tape around 20mm wide.
Cut 2 pieces approx. 10mm by 20mm (3/8'' by 3/4'') , Place 1 at each end in the middle of the Narrow sides enough to hold the Graphic in Place.
Adjust Graphic to exact position.
Cut a piece of Low Tack Painters Tape approx. 10mm Longer than Graphic on Longest side.
Apply Tape approx. 10mm on the Graphic & 10mm to the Edge of Pedal & Wrap Firmly over the side to form a Hinge.
Remove Temporary End pieces of Tape.
Fold back Graphic like an Open Book & carefully remove Adhesive Backing Paper.
Make sure Pedal is free of any form of Debris.
Swing Graphic towards Top of Pedal holding Firmly to around 30 degrees away from Face of pedal.
Carefully slide the Tip of your Finger approx. 5 to 10mm (3/8'' Inch) along the length of Tape & Graphic while still holding Graphic up with other Hand.
I find that now working from one corner of Tape Side with the Tip of your Finger & moving approx. 5 to 10mm on a diagonal to the Edges removes any Creases or Bubbles while still holding the Graphic Firmly & Lowering as you go.
If you now have the Graphic nice and flat, Carefully remove the Tape from one end, pulling it Back as low as possible to avoid lifting Graphic.
Now use the Backing Paper with the Shiny side towards the Graphic to make sure it is firmly in place by rubbing with your finger Back & Forth.
PRACTICE MAKES PERFECT!
Last edited:
thank youLooks good to me!
chongmagic
Well-known member
Looks great!
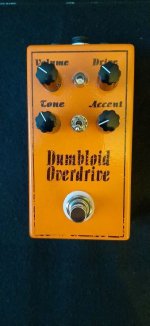
I decided to try a simple waterslide decal with this one, since I had some decals here doing absolutely nothing. I accidentally created a vintage/relic appearance by not following the decal instructions ") . In case anyone is interested (and does/doesn't want to make the same effect), after printing the decal, I clear-coated it ONE time, and let it dry overnight. After applying the decal to the top of the pedal, I was squeegeeing the excess water off and bubbles out, when I noticed the ink started coming off. I was not happy. I figured I'd be re-doing this one, but after looking at it a while, I thought I'd leave it that way...for the 'used' look. I did 2 more coats of clear and re-assembled the pedal.
. In case anyone is interested (and does/doesn't want to make the same effect), after printing the decal, I clear-coated it ONE time, and let it dry overnight. After applying the decal to the top of the pedal, I was squeegeeing the excess water off and bubbles out, when I noticed the ink started coming off. I was not happy. I figured I'd be re-doing this one, but after looking at it a while, I thought I'd leave it that way...for the 'used' look. I did 2 more coats of clear and re-assembled the pedal.
. In case anyone is interested (and does/doesn't want to make the same effect), after printing the decal, I clear-coated it ONE time, and let it dry overnight. After applying the decal to the top of the pedal, I was squeegeeing the excess water off and bubbles out, when I noticed the ink started coming off. I was not happy. I figured I'd be re-doing this one, but after looking at it a while, I thought I'd leave it that way...for the 'used' look. I did 2 more coats of clear and re-assembled the pedal.Attachments
SteveScott
Member
I think we all have had that happen. I now use at least 3 coats of clear coat on my waterslides. But the vintage look works really well in your picture there, it does't look like an accident at all. Good call on leaving it as is.I decided to try a simple waterslide decal with this one, since I had some decals here doing absolutely nothing. I accidentally created a vintage/relic appearance by not following the decal instructions
Thanks. I'm learning as I go...I think we all have had that happen. I now use at least 3 coats of clear coat on my waterslides. But the vintage look works really well in your picture there, it does't look like an accident at all. Good call on leaving it as is.
Chuck D. Bones
Circuit Wizard
Same here!Looks good to me!