pdf design tayda uv print gurus…

owlexifry

Well-known member
i need your help.

on monday i decided to stop dreaming about it and start doing.
so i got on with it and ordered the aion blueshift pcb set (and also the redshift while i was there).
i just gotta hear this thing.

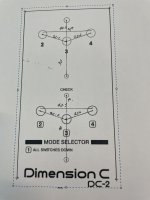
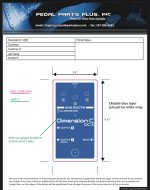
anyone that’s seen this offering has probably seen the super nifty graphic template pdf thing that they offer for this build:
E2C03C34-56BF-4723-917E-C56BD8ED5A4E.jpeg

from what i can tell, i’m pretty sure this isn’t in a final format appropriate for uv printing an enclosure through tayda.
done a lot of reading about the tayda uv printing process/requirements, and i even had a go at trying to make one with a drill template (for a previous build) after downloading inkscape and scribus, and unfortunately i’m just absolutely hopeless at this stuff.

i honestly don’t really expect anyone to respond or do anything for me here, but who knows, maybe some legend out there has some time and feels like helping.
idk, i can only ask i guess.
all i would really hope to achieve is to print that graphic in black onto a 125B.

and if that doesn’t happen, that’s ok :)

obviously not building this to sell, im sure many would be aware how costly it is build this. (tbh i’ve never sold any of my builds).


fortunately for the redshift build @szukalski has kindly uploaded a pdf template from his build and i am totally gonna use that, so thanks in advance @szukalski !
To pay it forward, here is the final PDF if anyone else wants the graphics. Hit me up if you want the Affinity Designer working file.
 
I used that pdf and just dragged it onto the tayda 125b template. Not 100% sure if its going to line up for everything because the print area isn't 100% the same.
edit: it messed up the numbers too, not usable how it is, I'll try to fix it when I get a chance
 

Attachments

  • blueshift125b.pdf
    109.3 KB · Views: 32
  • blueshift125bblack.pdf
    168.8 KB · Views: 26
Last edited:
I used that pdf and just dragged it onto the tayda 125b template. Not 100% sure if its going to line up for everything because the print area isn't 100% the same.
edit: it messed up the numbers too, not usable how it is, I'll try to fix it when I get a chance
ayyy thank you!!

yeah that black one looks just about bang on except for the numbers

cheers 🤟🏻
 
Circling back with this PDF from @Phil hodson converted from the .ai file I linked above.

Happy Blueshifting. :cool:
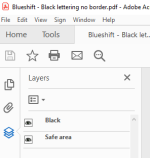
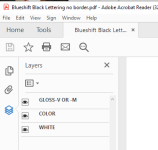
my only issue now, is i'm not sure about what layers are in this design..

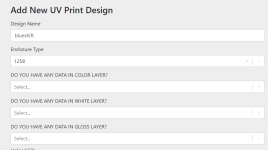
looks like i need to specify this for the order:
1682984252281.png

had a squizz on the reader (yep, im bloody hopeless at this stuff)
1682985020378.png
?


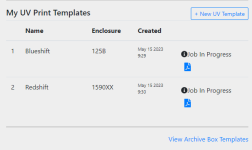
..and then there's the tayda toolbox dashboard.

1682985283470.png
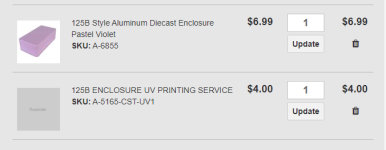
so I've added the necessary items, but nothing happens or appears here in the tayda tool box thingo

1682985252825.png

am i supposed to proceed to checkout, pay and complete the order before doing anything in the tayda toolbox?
 
Last edited:
my only issue now, is i'm not sure about what layers are in this design..

looks like i need to specify this for the order:
View attachment 47517

had a squizz on the reader (yep, im bloody hopeless at this stuff)
View attachment 47533
?


..and then there's the tayda toolbox dashboard.

View attachment 47536
so I've added the necessary items, but nothing happens or appears here in the tayda tool box thingo

View attachment 47535

am i supposed to proceed to checkout, pay and complete the order before doing anything in the tayda toolbox?
From what I understand: “Yes” to all questions on the design upload and check all boxes.

You have to buy enclosure and printing service first, then go to the toolbox a few minutes after checking out to designate what gets printed on and what design it gets. Also if you want a gloss layer you have to buy that separately from the UV service (make sure it goes on the same order).

It’s like buying credits. Say you buy 10 x 125B printing services, 10 x different color 125B enclosures, but only 5 x gloss layers. After checkout, you can go to the toolbox and designate which enclosure gets what:

Enclosure 1 (blue)
• UV service
• Gloss
• uploaded design A

Enclosure 2 (green)
• UV service
• uploaded design B

etc…
 
That PDF file is not correctly formatted. The size is a tiny bit wrong (I mean the physical size of the file, 66x121,1mm instead of 62x117mm it should be for a 125B). You should also have the layers "GLOSS", "WHITE" and "COLOR". Instead it has "BLACK" and "SAFE AREA".

You also don't answer "yes" to everything. If you only have black in the template, say "no" to the questions about WHITE and GLOSS since otherwise there will be an error because the printer expects the gloss or white layers to contain something when they don't.

I can try fixing the pdf later on, it's not a tough fix (and it's possible it could work with the current one - but it's not what Tayda requests).
many thanks for looking into this and confirming.

indeed, i was hoping to click on that layers button and see x3 layers for WHITE, COLOR, GLOSS-V, but all i saw was those layers for 'BLACK' and 'SAFE AREA".... which didn't look right to me, hence the query above.

(i promise i'm not entirely lazy, i've spent hours reading through the Tayda UV Printing thread. Unfortunately reading through every morsel and tidbit about tayda UV printing here and elsewhere isn't really an adequate substitute for having zero skill or experience with graphics design software and a 2012 mac mini that barely runs my DAW)
 
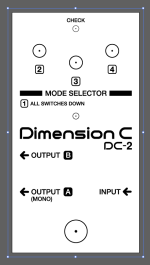
Try this one out, I used the Tayda template, copied the graphics over (I didn't change the scaling at all, hopefully it's ok) and switched the color from the stock AI "Black" (which is a bit gray? for some reason?) to a complete black.
 

Attachments

  • Blueshift Black Lettering no border.pdf
    395.1 KB · Views: 27
Here is that file applied to the tayda template. If you could get the spacing from the PCB for the switches I could verify the scaling, not sure how to get it exact from the other PDF.
Fama beat me to it by a few minutes but figured I'd make my post anyways haha.
1683009321410.png
 
I think when you just copy and paste it the scaling is exactly the same, but yeah, we would need the measurements to be sure they line up perfectly.
 
Try this one out, I used the Tayda template, copied the graphics over (I didn't change the scaling at all, hopefully it's ok) and switched the color from the stock AI "Black" (which is a bit gray? for some reason?) to a complete black.
ohhhhh hell yeah this looks like it's on the right track... thank you!
1683010377138.png

If you could get the spacing from the PCB for the switches I could verify the scaling, not sure how to get it exact from the other PDF.
Fama beat me to it by a few minutes but figured I'd make my post anyways haha.
I was just about to do a fist-pump... and then you mentioned scaling.. aw shit.
that's kind of important 😅

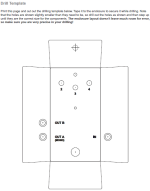
as far as scaling references go, it appears they've provided a drilling template in the build doc (pg.10 of attached .pdf)
1683011203099.png
 

Attachments

  • blueshift_documentation.pdf
    1 MB · Views: 12
alright, so to check the scaling, I thought I'd try something quickly at work....
- opened up the .pdf posted by @Fama
- opened up drill template page on the aionfx blueshift documentation pdf
- with everything at 100% zoom, screen capped + pasted the aionfx drill template onto a word doc, and then screen capped + pasted the critical ('drilling required') part of the uv print template roughly adjacent to the same points over the drilling template (to compare)

printed this out and got out a (shitty plastic office supply) ruler to measure and compare.
I'm fairly convinced the dimensions are the same:
41791EEF-E023-4046-9479-3163C26EB6EC.jpeg

(yep, im still waiting for the PCBs to arrive on the USPS slowboat)
 
well, no turning back now..... 😅

View attachment 48646
fingers crossed.....

many thanks to everyone that has participated in this thread and offered their expertise. this is massively appreciated. i owe you all a beer

so far I had one error message from tayda about the the gloss layer not being 'rdg_gloss' or something, i don't really know how to resolve this stuff and so i selected 'print anyway'.
worst case scenario the gloss layer ends up being a weird colour? idk.

probably should've done 'start over', but I have no idea what I am doing and can't edit the document anyway.
should have just omitted purchasing a gloss layer from the beginning. oh well.
At least the Blueshift I worked on had no gloss layer, so it would make sense that "the gloss layer does not have rdg_gloss" on it, since it doesn't have anything. No need to buy the gloss layer for that one at all.
 
Back
Top