Feral Feline
Well-known member
+1I like your writing style.
Reminded me of Ralph Steadman
+1I like your writing style
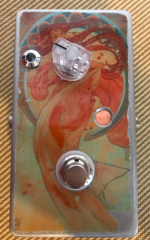
The hand painting is another route I like...sticklady got her BA in fine art, she's a hell of a painter, I've talked with her about possibly collaborating on a few. But...her stuff is awesome, and I'd only want to do that if we could put a solid clear coat over the top.
I have used ferric chloride a couple of times and didn't get the results I was looking for, but it was fun. Now that I have the no-film stuff down I am thinking how I can use the two together since the masking was where I was getting really inconsistent results and with the waterslides I know I can do a good mask.Results!
Personally, I've always liked the look of an etched enclosure. I like my stuff distressed looking. It matches my general disposition.
The hand painting is another route I like...sticklady got her BA in fine art, she's a hell of a painter, I've talked with her about possibly collaborating on a few. But...her stuff is awesome, and I'd only want to do that if we could put a solid clear coat over the top.
It's like how I feel about music. I love dissonance and chaos. I also love vast, endless oceans of contemplative beauty. I'm also a hack and a fraud, so...
With that being said, here's something that I'm thinking...well...close enough. For now. Still not great.
An electrolyte bath was certainly not the right *solution* (eyebrows eyebrows)
Local application of the electrolyte solution with a cotton pad worked exceptionally well. BUT...the toner transfer paper is garbage. yeesh, yellow wax paper from Amazon. I've got some press n peel blue on the way...that should work a bit better.
View attachment 13696


Those three in the middle look like they’re 1590B rather than 125BOh man oh man, I finally feel less alone, I was on an absolute losing streak with my enclosures for about a month straight. It all started when I got all my project parts from Tayda, but noticed the enclosures looked smaller than usual... I had ordered 5 or so 125b style enclosures, which are just a few square millimeters smaller!
View attachment 13729
From left to right, I tried pushing a DOD into 1590A (nope), I tried fitting an TS808 into the 125b but went full space cadet and forgot how potentiometers mount apparently, then tried again and realized I couldnt get the input/power jacks to fit in any kind of place inside. THEN I tried pushing the Haunting Mids into a 125b, gave up, put it in a regular enclosure, and apparently I manhandled the dual gang pot because it's now intermittent and touchy and needs a new one.
Like fig said, sometimes some recreational activities can get in the way of other, more 'detail oriented' recreational activities


Probably why i cant keep it straight, im not cut out for this gigThose three in the middle look like they’re 1590B rather than 125B
Sometimes you just got to look at things from the other side!So...unpleasant surprise. Sure, I'm not crazy about my shitty epoxy pour. So I decided to double down on the irony by making a design on my computer and some toner transfer paper for an electrolysis etch.
Something...not quite right. Can't...put...my...finger...on...it........View attachment 13666