BuddytheReow
Breadboard Baker
- Build Rating
- 5.00 star(s)
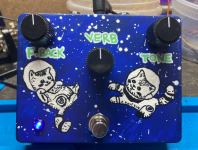
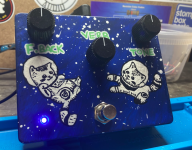
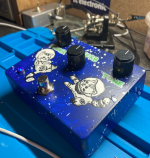
Edit: See post #3 for final build.
About a year ago I picked up a Belton Brick to try out some reverb. There are 3 kinds of Belton Bricks: Short, Medium, and Long. I picked up the Medium one just to try it out. The amp I was using at the time had a decent reverb on it, so a reverb wasn't on my top 5 build list for quite some time. Fast forward to about 6 months ago I've upgraded my amp, but no reverb this time. A great incentive to whip out my brick and try it out. There's another thread out there discussing everyone's favorite reverb builds and the consensus there about bricks was either love it or hate it. Many people, however, enjoy the simple one knob reverbs, such as the Rub a Dub reverb. I tried that one out on the breadboard and was relatively please with it. If anyone's interested in that circuit, it's pretty much a bare bones reverb. I'm not head over heels with Belton Bricks since there's some very slight modulation in the chip itself (once I hear it it's hard to unhear it), but this was a "good enough" scenario.
I've also had a spray painted 190bb enclosure that's been sitting on my bench for well over a year. This made a decent candidate for this build since the brick itself takes up real estate too. So, now I set off trying to find a more versatile belton brick reverb schematic and stumbled upon a Grind Customs Fx Tenebrion Reverb. Here's a link to the stripboard layout if anyone's interested. The demo of the pedal was pretty decent.

 tagboardeffects.blogspot.com
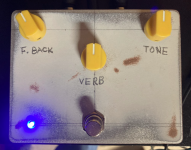
What makes this different than your standard one knob build is that it has 3 knobs: standard Reverb, a tone control for the reverb itself, and FEEDBACK which controls the amount of signal going back into the brick (hence the name). This is probably as versatile as it gets for just a simple belton brick.
The vero build itself was straightforward as far as that goes. Any stripboard build I do I put it together and try it with my test box before committing it into an enclosure. This usually means I've got to redo the wiring when boxing it up.
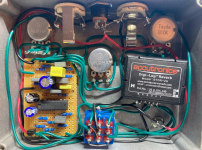
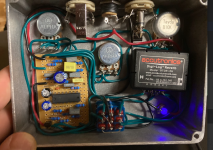
Stripboard builds can get messy very quickly if you're not super anal about neatness. Just ask @HamishR with his amazingly neat stripboard builds! When putting this in the enclosure I made the wiring as neat as I could for the pots. Then I wired up the brick and everything went to hell when it came to neatness. I told myself I could always redo the wiring down the road if I really wanted to. But, once you close the lid on it you won't know the different.
The enclosure is unfinished (of course) and not sold on these knobs until I've got the artwork ready to go. I'll circle back here once this is finished on the outside. But, the circuit works both inside and outside the box. The layout is verified for those of you that are interested. This will be one of my "always on" circuits until I get sick of it or want to dive into the Long version of the Brick.
About a year ago I picked up a Belton Brick to try out some reverb. There are 3 kinds of Belton Bricks: Short, Medium, and Long. I picked up the Medium one just to try it out. The amp I was using at the time had a decent reverb on it, so a reverb wasn't on my top 5 build list for quite some time. Fast forward to about 6 months ago I've upgraded my amp, but no reverb this time. A great incentive to whip out my brick and try it out. There's another thread out there discussing everyone's favorite reverb builds and the consensus there about bricks was either love it or hate it. Many people, however, enjoy the simple one knob reverbs, such as the Rub a Dub reverb. I tried that one out on the breadboard and was relatively please with it. If anyone's interested in that circuit, it's pretty much a bare bones reverb. I'm not head over heels with Belton Bricks since there's some very slight modulation in the chip itself (once I hear it it's hard to unhear it), but this was a "good enough" scenario.
I've also had a spray painted 190bb enclosure that's been sitting on my bench for well over a year. This made a decent candidate for this build since the brick itself takes up real estate too. So, now I set off trying to find a more versatile belton brick reverb schematic and stumbled upon a Grind Customs Fx Tenebrion Reverb. Here's a link to the stripboard layout if anyone's interested. The demo of the pedal was pretty decent.
Grind Customs FX Tenebrion Reverb
Collection of vero (stripboard) & tagboard layouts for 100s of popular guitar effects, with over 1000 verified designs. DIY your own boutique effects!
What makes this different than your standard one knob build is that it has 3 knobs: standard Reverb, a tone control for the reverb itself, and FEEDBACK which controls the amount of signal going back into the brick (hence the name). This is probably as versatile as it gets for just a simple belton brick.
The vero build itself was straightforward as far as that goes. Any stripboard build I do I put it together and try it with my test box before committing it into an enclosure. This usually means I've got to redo the wiring when boxing it up.
Stripboard builds can get messy very quickly if you're not super anal about neatness. Just ask @HamishR with his amazingly neat stripboard builds! When putting this in the enclosure I made the wiring as neat as I could for the pots. Then I wired up the brick and everything went to hell when it came to neatness. I told myself I could always redo the wiring down the road if I really wanted to. But, once you close the lid on it you won't know the different.
The enclosure is unfinished (of course) and not sold on these knobs until I've got the artwork ready to go. I'll circle back here once this is finished on the outside. But, the circuit works both inside and outside the box. The layout is verified for those of you that are interested. This will be one of my "always on" circuits until I get sick of it or want to dive into the Long version of the Brick.


Last edited:


