

falco_femoralis
Well-known member
Here's another one I've been working on


I bought this and the Special Sacue almost a year ago. I completed the Sauce a few months ago but I wasn't feeling this one at the time so I put it off. Inspiration finally striked (strook?) and I ended up with this enclosure.
When I was building it, I bent the pots' legs like this. I got it close useing pliers and then dialed it in by fitting the board over and onto the legs.
Unfortunately I ran into a snag fitting the audio jacks. I'd already done my layout and drilled the enclosure for this setup so I had to get creative
It looks like the board was designed for the Switchcraft style open audio jacks. I like to use these squared off box jacks because they are cheap, reliable, allow the jacks to be placed further apart and closer to the bottom of the enclosure, and I square them up along the screw bosses so if the jack were to come loose, it can A - be tightened from the outside without removing the back, and B not get twisted around and cause more problems.
Thankfully, this worked
And now there is enough space. I didn't have a low profile 100uf on hand, but laying a regular one over fit ok. The solder holes in this board are slightly smaller diameter from the PPCB boards, which makes desoldering a bit trickier as there is less room for capillary action to pull solder out from the holes when using wick (my favorite). But I do like the smaller holes for the pots.
Having all the hook up wires terminate in one row, including the audio in/out signals, made the wiring very clean, and there's a ton of extra space inside the pedal.
Here's how I did the LED. It's a cool violet one I got from Mouser. My 9v battery hook up wire is still kaput so I didn't get a pic of it on, but the way the jewel disperses the light it transitions from pink/violet/light blue in a pleasing way that compliments the color of the enclosure.
I like the pedal! PT2399 delays have an almost distorted harshness I'm not fond of, but the pitch bending features on this one make it ok. I especially like the Noise control, which is a tone control but also adds crackly analog sounding noise when turned up all the way. It's really clever that the knob has two functions in one that relate to and work with each other. It's also nice being able to turn the Mix all the way up and get 100% wet / 0% dry. That and a really low delay time plus the pitch bending is a good time. Last year I focused on overdrive pedals and I don't have very many delay or reverb pedals, but I'm happy to add this one to the collection.
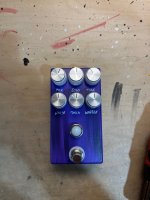

I bought this and the Special Sacue almost a year ago. I completed the Sauce a few months ago but I wasn't feeling this one at the time so I put it off. Inspiration finally striked (strook?) and I ended up with this enclosure.
When I was building it, I bent the pots' legs like this. I got it close useing pliers and then dialed it in by fitting the board over and onto the legs.

Unfortunately I ran into a snag fitting the audio jacks. I'd already done my layout and drilled the enclosure for this setup so I had to get creative

It looks like the board was designed for the Switchcraft style open audio jacks. I like to use these squared off box jacks because they are cheap, reliable, allow the jacks to be placed further apart and closer to the bottom of the enclosure, and I square them up along the screw bosses so if the jack were to come loose, it can A - be tightened from the outside without removing the back, and B not get twisted around and cause more problems.
Thankfully, this worked


And now there is enough space. I didn't have a low profile 100uf on hand, but laying a regular one over fit ok. The solder holes in this board are slightly smaller diameter from the PPCB boards, which makes desoldering a bit trickier as there is less room for capillary action to pull solder out from the holes when using wick (my favorite). But I do like the smaller holes for the pots.

Having all the hook up wires terminate in one row, including the audio in/out signals, made the wiring very clean, and there's a ton of extra space inside the pedal.

Here's how I did the LED. It's a cool violet one I got from Mouser. My 9v battery hook up wire is still kaput so I didn't get a pic of it on, but the way the jewel disperses the light it transitions from pink/violet/light blue in a pleasing way that compliments the color of the enclosure.

I like the pedal! PT2399 delays have an almost distorted harshness I'm not fond of, but the pitch bending features on this one make it ok. I especially like the Noise control, which is a tone control but also adds crackly analog sounding noise when turned up all the way. It's really clever that the knob has two functions in one that relate to and work with each other. It's also nice being able to turn the Mix all the way up and get 100% wet / 0% dry. That and a really low delay time plus the pitch bending is a good time. Last year I focused on overdrive pedals and I don't have very many delay or reverb pedals, but I'm happy to add this one to the collection.
Last edited:


