SOLVED Special k more pot not working

scabiosa

New member
Hi folks

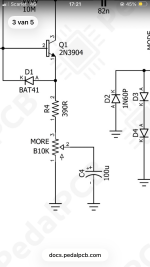
I just made the special k. Everything works, except the More pot only works when it is at the maximum. If I measure with the multimeter from lug 1 to R4, I measure 390 ohms. If I measure from lug 2 to R4, I measure 390 ohms, but only with the pot at max. When not at the maximum, I measure no value at all. Could this be a faulty pot or is there more that i can check?
 

Attachments

  • IMG_6061.jpeg
    IMG_6061.jpeg
    958.2 KB · Views: 24
  • IMG_6062.png
    IMG_6062.png
    469.2 KB · Views: 24
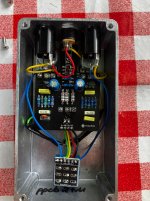
This might be related to your issue. I’d say you really need practice how to make your solder really flow. Most of the component connections on the PCB look like cold solder joints, but it’s fun to notice MORE pot has best joints. :unsure:
 
Yes indeed, multimeter was in the wrong position. when i put the multimeter on 200k ohm i read different resistance values between R4 and the ‘more’ pot lug 2. So not a faulty pot…

Will also redo some solder joints. I guess there is a chance that helps…
Thanks!
Which meter are you using?

It sounds like this might be normal behavior on a meter that is measuring out of it's range.
 
Yes indeed, multimeter was in the wrong position. when i put the multimeter on 200k ohm i read different resistance values between R4 and the ‘more’ pot lug 2. So not a faulty pot…

Will also redo some solder joints. I guess there is a chance that helps…
Thanks!
Your components look fine to me solder joint wise you have solder flowing through the pads. Your switches both I like to try to fill the pad but be cautious as you can end up with a solder bridge underneath that you don’t see. When you say it doesn’t do anything til the end? Do you mean you’re not noticing much of a difference then theres a big difference towards the end? It could be a taper issue. Im not familiar with this particular pedal, but similar set up often use a c taper for this exact reason.
 
Damn, problem found!
i fucked it up and installed the b10k at the place of the a100k…

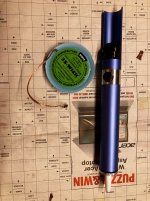
I have these desoldering tools but somehow i can’t make it work properly. Normally i just heat it and try to pull the wrong stuff out, but this time its not working too. Solder at both sides of the pcb…

Is this the right kind of wick? or do i need to add some flux before wicking or sucking? Anyway, searched in the forums and youtube but still struggling with desoldering 🙃. Any tips?
 

Attachments

  • IMG_6065.jpeg
    IMG_6065.jpeg
    1 MB · Views: 5
Last edited:
Damn, problem found!
i fucked it up and installed the b10k at the place of the a100k…

I have these desoldering tools but somehow i can’t make it work properly. Normally i just heat it and try to pull the wrong stuff out, but this time its not working too. Solder at both sides of the pcb…

Is this the right kind of wick? or do i need to add some flux before wicking or sucking? Anyway, searched in the forums and youtube but still struggling with desoldering 🙃. Any tips?

Do you have some spare pots? How sad would you be to lose that A100K?

Truth be told, if you don't have good desoldering tools you're way better off using
wire cutters to snip that pot off of the board, and then desolder each of the pins
individually. That's way easier than trying to desolder a big honkin 3 pin component.
By cutting and then desoldering each pin in order, you can just pull the pin out with
pliers/tweezers while the joint is hot, and then clean up the hole with the desoldering wick.
Use a ton of flux if you have it, makes the cleanup go better.

The only thing I've found to reliably get pots off of the board is a big chisel/shovel
tip that can heat up all three pins at the same time. You can approximate
this by using a thick copper wire across all three pins but honestly it's probably
not worth it to save a $0.39 pot.
 
you're way better off using
wire cutters to snip that pot off of the board, and then desolder each of the pins
individually.
exactly what i did. Did not gave up the pots bt snapped them and rewired them in the correct place. Pedal works perfectly now and really like what its doing!

But really would like to hear what is considered to be the best desoldering method:
- heat it and wriggle?
- also saw some people use desolder needles with variable thickness?
- for me desolder pump or wick never got good results up to now… but you are saying with a wick tons of flux might help, ill try that next time! Thanks!
 
exactly what i did. Did not gave up the pots bt snapped them and rewired them in the correct place. Pedal works perfectly now and really like what its doing!

But really would like to hear what is considered to be the best desoldering method:
- heat it and wriggle?
- also saw some people use desolder needles with variable thickness?
- for me desolder pump or wick never got good results up to now… but you are saying with a wick tons of flux might help, ill try that next time! Thanks!
I'm not 100% sure what the 'best' is, but based on my experience:

I think the only desoldering tool that really works are the fairly big/expensive ones that look like a gun and hook up to a vacuum source (either a built-in vacuum or a venturi system on an air compressor) like the Metcal 1351. I bought a Yihua 948D on Prime Day and it just doesn't work well enough to bother.

Best bet is a big chisel tip or hot air or one of the 'bodge a copper wire against all of the pins' methods, so that you can heat up everything at once and remove the whole component. Otherwise the best way is pin-at-a-time with pliers or tweezers, and making sure that the joint is nice and hot so that the solder on both sides is molten -- if you force it at all, you risk tearing out the pads. I have a JBC [15mm 'blade'](https://www.tequipment.net/JBC/C245752/) style cartridge which can take out pots and SPDT switches (but not dual gang pots or DPDT switches).

Desoldering wick for trying to remove a big component is desperation mode. In my experience, it works well for cleaning up holes once the component has been vacated, but isn't really that good at removing all of the solder around a seated component's pin. It only takes a little bridge of leftover solder to grip the component and that can be really hard to remove the last little bit with wick. It's actually kind of contradictory, the more solder you remove, the harder it is to heat the joint because the liquid solder transmits heat way better -- think of it like using cooking oil vs trying to cook something in a dry pan.

Sometimes adding low-temp solder (bismuth based / 'chipquick') can help because the low melting point of the solder gives you more working time to get everything hot all at once. (The tin/bismuth alloy solder melts at low temps -- ~140C v ~205C for typical leadfree alloys). This can give you enough working time for the soldering wick to draw everything in, or for the little hand-triggered vacuum desolder pumps to get in place and trigger. I've done this to a point by adding leaded solder while desoldering, which is ~180C melting point.

Flux helps the wick work better, because flux is solder magic. Flux really helps solder to flow properly, so it increases the capillary action of the wick quite a bit. A lot of wick will have flux built-in, but some extra flux paste can help things along.

 
I'm not 100% sure what the 'best' is, but based on my experience:

I think the only desoldering tool that really works are the fairly big/expensive ones that look like a gun and hook up to a vacuum source (either a built-in vacuum or a venturi system on an air compressor) like the Metcal 1351. I bought a Yihua 948D on Prime Day and it just doesn't work well enough to bother.

Best bet is a big chisel tip or hot air or one of the 'bodge a copper wire against all of the pins' methods, so that you can heat up everything at once and remove the whole component. Otherwise the best way is pin-at-a-time with pliers or tweezers, and making sure that the joint is nice and hot so that the solder on both sides is molten -- if you force it at all, you risk tearing out the pads. I have a JBC [15mm 'blade'](https://www.tequipment.net/JBC/C245752/) style cartridge which can take out pots and SPDT switches (but not dual gang pots or DPDT switches).

Desoldering wick for trying to remove a big component is desperation mode. In my experience, it works well for cleaning up holes once the component has been vacated, but isn't really that good at removing all of the solder around a seated component's pin. It only takes a little bridge of leftover solder to grip the component and that can be really hard to remove the last little bit with wick. It's actually kind of contradictory, the more solder you remove, the harder it is to heat the joint because the liquid solder transmits heat way better -- think of it like using cooking oil vs trying to cook something in a dry pan.

Sometimes adding low-temp solder (bismuth based / 'chipquick') can help because the low melting point of the solder gives you more working time to get everything hot all at once. (The tin/bismuth alloy solder melts at low temps -- ~140C v ~205C for typical leadfree alloys). This can give you enough working time for the soldering wick to draw everything in, or for the little hand-triggered vacuum desolder pumps to get in place and trigger. I've done this to a point by adding leaded solder while desoldering, which is ~180C melting point.

Flux helps the wick work better, because flux is solder magic. Flux really helps solder to flow properly, so it increases the capillary action of the wick quite a bit. A lot of wick will have flux built-in, but some extra flux paste can help things along.
Waw, thanks for this, is really helpful for the next time!
 
Back
Top