
BuddytheReow
Breadboard Baker
In muff circuits all signal comes out of the collector pins and into a decoupling cap (100n usually) You layout has signal coming out of the bases
In muff circuits all signal comes out of the collector pins and into a decoupling cap (100n usually) You layout has signal coming out of the bases
So I should just start over from scratch and try again.In muff circuits all signal comes out of the collector pins and into a decoupling cap (100n usually) You layout has signal coming out of the bases
Perhaps. It’s not bad for a first attempt. I would also take a look at some of the tutorials in the test kitchen to get a sense of schematic to breadboard. The writer is pretty goodSo I should just start over from scratch and try again.
 . Here are some tips:
It autofills k, thanks for catching that for me!!Much better! Are those 100k resistors from emitter correct? 100ohm would make more sense
I feel your pain, breadboard brother.And don’t get frustrated. I spent 3 days debugging this mess. I had ONE resistor going to V+ that should have been going to ground. I had to walk away from it multiple times. I was about to tear the whole thing apart!


View attachment 24313
This is exactly what I was forced to do with my February Muff, I wasn't getting signal out of the first stage (390k instead of 390-Ohms, I'll never live that down).I'd strongly suggest that instead of trying to work out the whole thing in one fell swoop, you work through the schematic stage by stage by stage and troubleshoot as you go.
The big muff is a really great choice since it's just one thing plugged into another thing plugged into another thing, so there's always an easy place to stop and make sure you haven't dropped in the wrong value resistor or you've got a dead row or a short on the breadboard.
See if you can get the input resistor to the sustain control working and move on to the first clipping stage, etc.
Thank you so much for the information! those look might different from mine... I can't wait to try them out.I feel your pain, breadboard brother.
This is exactly what I was forced to do with my February Muff, I wasn't getting signal out of the first stage (390k instead of 390-Ohms, I'll never live that down).
@Nightendday86
Tried to find the following last night when you first posted the thread, but I was half-asleep and have no access to my computer at the moment so didn't have my bookmarks and couldn't find it online again... You'd think it would've come up with search terms such as "Breadboard layouts effects"; add my signature and searching PPCB and Talkbass (where I knew I'd previously posted it) and it still didn't come up last night; don't know why it finally popped up on radar today and not last night, I used the same damn search criteria... Grrr.
Anyway, enough whinging from me
BREADBOARD GUITAR FX
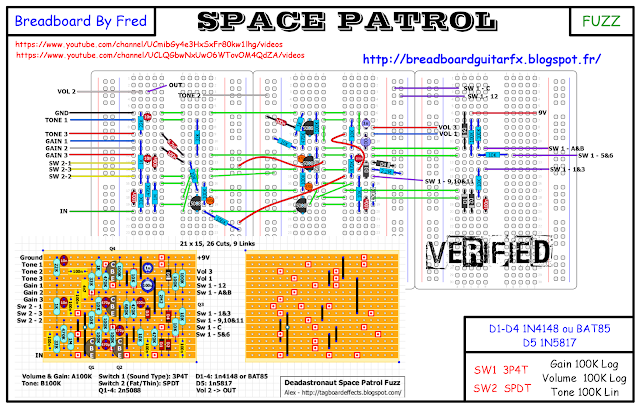
It helps if you can speak a bit of French, but is not necessary. Unfortunately there isn't a plain-jane Muff layout, though there is Dead Astronaut's Space Patrol, which is a muff with some extra switchable features (see below). Take a look at the layouts, try to get a feel for how they're being "flowed", and it'll help you with your future layouts.
There're several categories and numerous FX in each category:
Effets
- Ampli ( 2 )
- booster ( 8 )
- Chorus ( 1 )
- Compresseur ( 3 )
- delay ( 2 )
- Distortion ( 17 )
- Divers ( 1 )
- filtre ( 3 )
- Fuzz ( 22 )
- Lo-Fi ( 1 )
- Octave ( 1 )
- Oscillator ( 2 )
- Overdrive ( 20 )
- Phaser ( 1 )
- reverbe ( 1 )
- Tremolo ( 1 )
- utilitaire ( 2 )
- wah ( 1 )
Good ol' BEAVIS has some breadboarding tips:
beavis audio research
As already mentioned by BtR, there are some fantastic breadboarding resources BtR (and others) put up in the Test Kitchen.
Here's that Space Patrol Fuzz, don't let the extra switchery confuse, and you might just find his style/way of breadboarding is not for you:
It looks neater, but I think you've introduced some errors in the tidying up. Each clipping stages' caps 1uF and 470pF are parallel to each other, which gives you 1.00047uF, but the schematic doesn't have those caps parallel each other.I tried to be a little more neat...

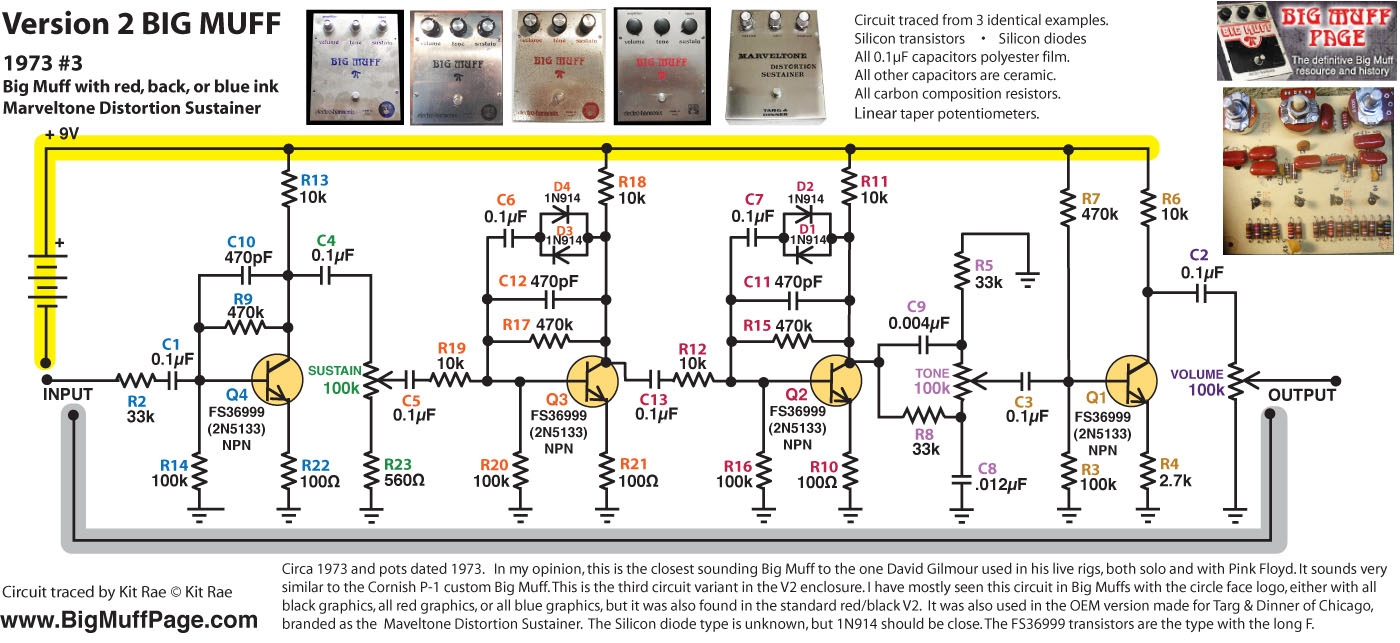
I think this should fix that?It looks neater, but I think you've introduced some errors in the tidying up. Each clipping stages' caps 1uF and 470pF are parallel to each other, which gives you 1.00047uF, but the schematic doesn't have those caps parallel each other.
Those 1uF are meant to be 0.1uF (100n) and should be only attached to respective bases and non-power side of the clipping diodes.
Easy solution, FIRST CLIPPING STAGE: extend the left side of the diodes two spots over to the left (keep the right side of diodes as they are) and move the "1uF" caps over two spaces — that'll connect one end of the cap to the diodes and the other to the base.
A little bit more involved shuffling things around for the second clipping stage, but I'm sure you can sort that out, maybe move the 10k onto an angle to free up space...

Q2 diodes should go collector to base. You can also remove the red jumper going into q3. Oh wait, I see what you did. Extend the 1u cap there one more column to the left. You’re really close…I think this should fix that?
View attachment 24332


