Sealing heatshrink tube of optocouplers

geso

Member
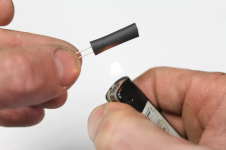
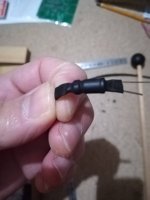
I am testing/rebuilding and copying an existing optocoupler from one of my pedals. The one in the particular pedal was assembled in a way that a LED and LDR is turned towards each other, and they are inserted in this manner into a heatshrink tube, that was shrinked onto them to make a firm grip. Both ends of the tube was sealed by melting the ends. I guess the ends were pressed together with some hot pliers.

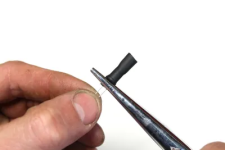
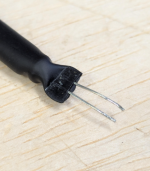
The problem is that I cannot replicate this sealing method. I have pliers that have a shape that makes them ideal for this purpose. I put the tip of the pliers into candle flame, but when they are hot enough and I clamp them onto the ends of the tube, the material of the tube melts together between the protruding leads of the components, but over the leads, the tube material either flows away or sticks onto the pliers. And this way, a little hole will remain around the leads.

The only way I managed to seal the ends successfully is to keep the end of the tubes (with the component inside the tube) into candle flame for a second, and then press down on the ends with a small piece of rectangular wood. Then a uniform firm seal will be created. But why I worry about using this method is that this way, the LDR itself will be very close to the portion of the tube that I put into the candle flame.I worry about that that momentary heat stress will melt the epoxy on the LDR and the cadmium will be released.

Do I need to worry about this indeed, or the LDR epoxy is much more durable than that? Can you recommend any safer solution that can make sealing the tube more secure and successful? I also thought about sealing the ends with cyanoacrylate glue, but I am not sure what happens if some excess glue flows into the tube and reaches the epoxy of the LDR. I have experienced in the past that certain glues react heavily with plastic, and some can dissolve them.
 
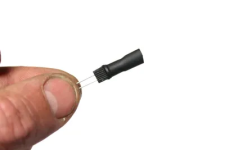
It looks like this guy is squeezing the ends with cold pliers while it's still hot from shrinking.

1793101994712.png
1793102005244.png
1793102017168.png
 
Last edited:
It looks like this guy is squeezing the ends with cold pliers while it's still hot from shrinking.

The original tube on the optocoupler looked exactly like this. But this is the method that I am afraid of. Isn't the epoxy prone to melt or burn when you hold the heatshrink close to the flame???

If you heat the pliers the heat affected area can be controlled much better. You can see it when you sealed the end with the pliers, the rest of the tube has not shrunk. It is just too much for the tube when you do it this way. It melts away around the leads.
 
Might want to check if you are using sealing (ie with glue) shrink tube or not. Looks very easy to do the proper glue loaded shrink?
I read about that method but while I am testing the combo I may need to swap either the LDR or the LED a lot, to find out which one matches the original, and a sticky tube can mess up the process if the glue sticks to the components. The normal tube was a much better method. The original tube in the pedal was non-glued as well.
 
Ever heat shrunk a spot where you twisted two wires together?

Never have I ever seen the wire insulation underneath suffer damage from a pass through an open flame. The epoxy should be even more resistant to this little bit of heat. The shrink tube insulates what's inside to a certain extend.
 
Last edited:
I use my hot air station for heat shrink. You'd have to want to melt a component to damage it that way.

I've never sealed the ends though (is it really necessary?) so I'm not sure if I'm getting it warm enough to deform with pliers.
 
I use my hot air station for heat shrink. You'd have to want to melt a component to damage it that way.

I've never sealed the ends though (is it really necessary?) so I'm not sure if I'm getting it warm enough to deform with pliers.
I guess there is some kind of heatable tool to do the sealing in the factory. They set it to be hot enough to seal it but not heavily melt it, which is difficult when keeping pliers into flame.
 
Also, the hot pliers are heating the outside of the heat shrink, but not the interior. But for testing purposes, just having some unsealed heat shrink should be fine; many designs just leave the pairing out in the open (which is really a pretty black interior of a metal stomp box, unless the circuit has leds as part of it)—I’d just test away until you get the combo you like and then deal with the ends. As has been mentioned, you can also buy heat shrink that has a glue layer on the inner surface.
 
Shrink it down with a heat gun then squeeze then end with cold pliers while it's still hot.

View attachment 126788

I am surprised to see this. I tested a few different ways, but pliers don't work for me just like that. I tried keeping the end over candle flame for a moment while holding the piece with my fingers close to the end, so I could make sure the stuff doesn't get extremely hot. The end shrunk, then I used the cold pliers to squeeze the end. But that way, there was always a hole over the leads, because when the pliers clamp down, they squeeze the material out of the way, the leads stop them. Or, even if the hole was not over the leads, the tube walls between the leads was not pushed together firmly, due to the leads stopping the pliers. The only way it seems to work for me is to keep the stuff over the flame as described for a moment, and then squeezing the tubing only from the front with narrow tip pliers between the leads. That way the tube gets sealed, and most of the time the material around the leads also get shrunk onto the leads firmly. Any method involving heated pliers or other stuff like soldering iron tips burn a hole over the leads, even on lower temperatures.

That's why I am surprised you could clamp the tube just like that and there is no hole. The only case I can think of this can happen is if the tube you use have thicker walls. How thick is it, can you measure it with a micrometer or something?
 
LOL it seems they had a similar problem in the factory too, I totally forgot the original had this problem, too. But the LDR end seems to be better:

IMG_20260518_041208.jpg IMG_20260518_041200.jpg

I did some more tests and now I can do it with the pliers squeezing the end at once. The trick seems to be to heat the end of the tube a bit longer, so it shrinks more and gets softer, then when squeezed, it forms a tight sealing and the hole doesn't appear over the leads. What I worry about is that this way the LDR gets more heat, I hope its epoxy sealing won't melt this way. :rolleyes:
 
I really don’t think it’ll be an issue

As I found there is no way doing it any other way than melting the end of to tube to a certain soft consistency. So either you use a heatgun or candle flame, the end must reach that certain consistency to melt and the opposite walls get connected. They heated the end right next to the LDR in the factory. If that melting temperature did not hurt the LDR, I guess my method won't hurt it either because I leave 5mm relief.
 
You might be able to use self-fusing (aka self-amalgamating) tape. I have a roll of this: XFasten Self Fusing Silicone Tape Waterproof – 1" x 36 Feet Black, Self Amalgamating Tape, Silicone Rubber for Plumbing, Sealing Pipes, Hose Repair, Outdoor Coax and Electrical Cables. I haven't used it for the particular purpose discussed in this thread. But it's super handy when you can't use (or forget to use) heat shrink tube, and it's infinitely better than electrical tape. Might be worth a shot for rolling your own optocouplers; and it's generally useful to have on-hand regardless.
 
Finally I solved it with holding the ends in candle flame, and sealing the ends with pliers when softened. Not possible to seal them any other way. I hope the epoxy didn't melt. I did not dare to apply the sealing right next to the resistor, unlike it was originally done in the factory. So I left a small relief . Maybe I should have bent the legs before sealing :rolleyes: It will be tricky so squeeze it back into its place on the PCB this way.


Opto.jpg
 
Back
Top