Bricksnbeatles
Member known well
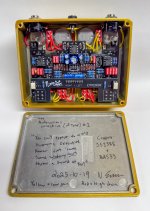
Here's another one that's long overdue. I first came up with the idea for this one back in 2020. Ordered the board from Fuzzdog in 2022, and ordered the enclosure in April 2023.
Let's get the technical stuff out of the way first:
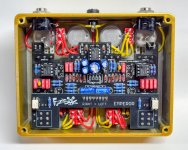
The enclosure is a 1590BB in 'Metallic Gold' from Tayda. It's built on a Fuzzdog Emperor PCB.
The circuit is built more or less stock, with some caveats that I'll note below
It's almost 2AM now, and I'm ready to crash, so I'll come back to this at a later point to give some more insights into this build, the background of the name, and my love of Monty Python.


Let's get the technical stuff out of the way first:
The enclosure is a 1590BB in 'Metallic Gold' from Tayda. It's built on a Fuzzdog Emperor PCB.
The circuit is built more or less stock, with some caveats that I'll note below
- High-Gain red channel. This is just replacing the resistor in series with the gain pot with a 100kΩ (R5 on the Fuzzdog schematic)
- Standard/Low-Gain yellow channel. On the fuzzdog schematic the standard/low-gain resistor (R5 for red channel, R16 for yellow channel) value is listed as 10kΩ, but I used 1kΩ which is most commonly found as the standard value in real KOTs.
- Input cap (C1 for red channel, C10 for yellow channel) for each channel was bumped up to 22nF from the stock 10nF. 10nF is the value used in both the Fuzzdog and Aion schematics for the King of Tone, but the PedalPCB Paragon suggests 22nF. It seems both values have been used over the years, but since I'm mainly using an AC30, I figured the extra little bit of low end would be welcome.
- Fuzzdog Opto-Puss optical bypass. I had ordered TLP240D optocouplers from Mouser for this last year to replace the now-obsolete TLP222G that the bypass calls for, but as I was getting ready to populate them (the very last components I was populating no less) I realized that Mouser had sent me the SMD version, so instead I soldered in some DIP4 sockets, and socketed some very suspicious supposed TLP222Gs that I got from aliexpress a year or two ago. They seem to work fine, but I wanted to socket just in case.
- Presence controls for each channel are wired as external controls. This is conveniently already integrated into the design of the Emperor PCB.
- The dip switches are replaced with a pair of external DPDT on-off-on toggle switches. each switch controls one channel, with up being the hard-clippers active (Distortion), down being the soft-clippers active (OD), and the middle being no-clipping (Boost).
- Speaking of the clippers.... 1S1588 diodes for the hard-clippers, courtesy of @MichaelW, and BAS33 diodes for the soft-clippers
- External toggles added to bypass/activate the internal charge pump for each side. This is integrated into the design of the Emperor PCB, but that's designed to use internal slide switches for each of those, instead of an external toggle.
- 1044SCPA chip instead of a 7660S for the charge pump. no other reason than it's what I had on hand.
- LEDs are scuffed up with a scotchbrite pad to diffuse them a bit and make them a bit nicer looking when lit up.
It's almost 2AM now, and I'm ready to crash, so I'll come back to this at a later point to give some more insights into this build, the background of the name, and my love of Monty Python.


