BuddytheReow
Moderator
@Harry Klippton this one’s for you!
Not really a tutorial, but I wanted to share a few tips and tricks I've learned in my breadboarding journey.
First things first. Light up a diode!
One of the very first things you should do is light up a LED. It accomplished 2 things: you've verified that your breadboard works as it should and you can translate a simple schematic to a breadboard. Take this one for example:

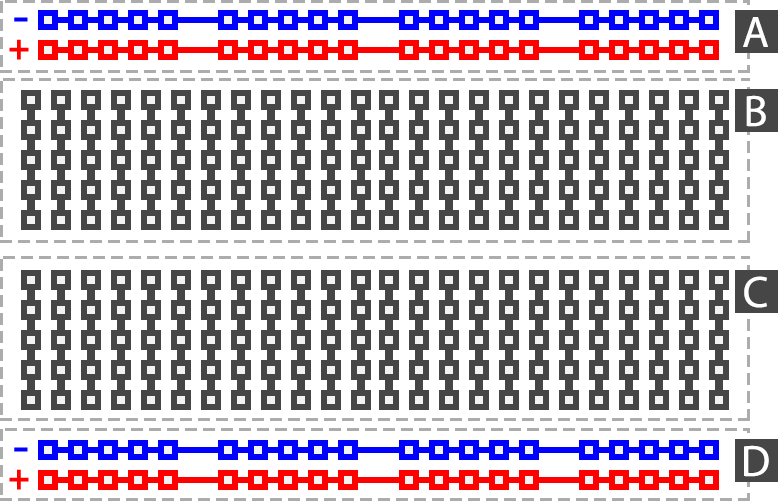
Power to a current limiting resistor to a diode to ground. A schematic reads one way, but a breadboard is laid out differently. For reference here is how a breadboard is laid out. The power rails are connected horizontally (section A) and the columns in section B are connected vertically.
And here is that same circuit above but in breadboard form. I chose a 1k resistor. This seems too simple to breadboard, but many people here don't get a chance to test out their LED brightness before soldering everything up on your PCB. This is a great way to test that out, especially if you've got super brights!

How to layout your circuit
This one may seem most daunting to the breadboard beginner. Schematic to breadboard is not a simple copy and paste. The end results are the same, but the layouts are different as mentioned above. How can you turn schematic to reality? The short and lazy answer is try it out yourself. Figure out what works and what doesn't work. Remember, you do have a limited amount of real estate on your board unless, you know, you've got another board all lined up. Start out with small, simple circuits such as an LPB-1 then graduate to an Electra Distortion. The more you build the more you'll "get it".
Keep jumpers to a minimum length
If you're gonna breadboard, then jumpers are inevitable. The problem with many pre-made jumper cables out there is that they are way too damn long! While this doesn't affect the circuit it does make it very messy looking and can be a little disorienting while troubleshooting. One of the fixes for this is to make your own jumper wires out of some solid core hookup wire. I have different colors that indicate different lengths for holes that are 2, 3, 4, 5, etc apart. It will take you some time to make them and your workstation will look like a bag of sprinkles were spilled on there. It's totally worth it. Just have a good place to store them. I have a pill organizer from Walmart and was totally worth the $1.
That being said, the premade ones do come in handy. My advice is to keep those and their lengths to a minumum.
Stay Organized
Depending on the circuit, your workstation may end up having a ton of pink Tayda baggies all over it. Keep them all in one area so that when you need another resistor or capacitor it can be quickly obtained. Storage containers are invaluable here. Take a look at some electronics or crafting storage containers on Amazon or next time you're in Walmart, Target, etc.
You should also be mentally organized as well. Remember which circuit block you are working on in your schematic, where it is located on your board, and how it should be laid out. This can be a fun puzzle.
Keep things close
What works for me is to keep components as close together for each circuit block on your breadboard as possible. Having a "longer" jumper wire connecting each circuit block allows me to stay organized in my head what's going on with my board. You can build a Muffin Fuzz on a small breadboard with a little extra room to spare.
There is no "right" and "wrong" when breadboarding
There is no 100% correct way to breadboard a circuit. There is only a circuit that works or doesn't work on a breadboard. The grey area here is you've built a circuit that works but is noisy (in a bad way). Check your component values and make sure your breadboarded circuit matches the flow of the schematic. Meaning that if your schematic is reading left to right your breadboard should read left to right. It is simply good practice so stray components don't cross.
ICs vs Transistors
ICs and transistors are incredible important. Every guitar effects circuit uses one or the other or both. Knowing how they work on a breadboard is vitally important. Take a look at the below picture. The 4558 is straddling the canal in the middle. Rows 8-11 on each side correspond to the different pins of the opamp here. As a hint, 2 of those pins will have power connected to it: one for positive power and one for negative power (ground). Right now you have 4 holes for each pin. This may or may not be enough depending on the circuit you are building. If you run out of room, jumper that pin to a different row away from the IC, finish wiring it up, then jumper back to the pin. This is an option.
For transistors you'll have to bend the leads slightly to get them to fit. If you run out of room/holes for a pin simply jumper directly across the canal. You've now got 4 additional holes. Remember the pinouts.

Pot vs Trimmer
There's nothing more satisfying than tweaking the sound of your circuit by twisting a knob. Pots win here. The downside to pots is that they require jumper wires to your offboard section of the protoboard. It can get messy quickly depending on the circuit you are making.
Trimmers solve the mess problem on a breadboard, but you'll need a screwdriver to tweak it and can get annoying at times depending on how much of a "tweaker" you are when playing. Everyone has their preference and each has it's place on the board.
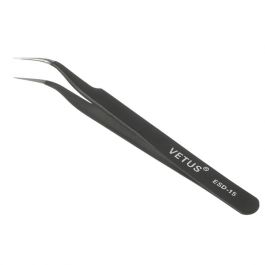
Tweezers are more handy than you realize
I would HIGHLY recommend getting a pair of tweezers. With a fully populated breadboard you may accidentally bend components or push them out of their holes while trying switch out that resistor for a different one. I bought these from Tayda and are DEFINITELY worth the $0.60. They're also handy for adding/removing your DIY jumper cables mentioned above. If you've got a new breadboard they can be a bit stiff trying to put components in and the tweezers help to keep the leads bending.
 www.taydaelectronics.com
Have Extra Breadboard-specific parts ready
If you're like me, I didn't want to sacrifice my nice, clean, straight resistors by bending them all up just for breadboarding. Those should be for soldering! Do yourself a favor and buy extra parts. For $10 on Amazon you can get a box of resistors that have enough variety of values to make dozens if not hundreds of circuits. You may need to buy a few non-standard values from Tayda or wherever you normally buy from.
I also have a spdt and dpdt switch with jumper wires soldered on them specific for breadboarding. It has come in handy and I would recommend.
Test your circuit as you build it
After every circuit blocky you build, stop. Take it over to your amp and test it out to make sure it works. If it works, go back and keep building. Troubleshooting a small circuit block is 439235430 times easier than troubleshooting a whole circuit. Tweaking components should be done at the end of the build. While it may sound one way when you first build the circuit block it will sound very different when the circuit is fully built.
Power Filtering
Many schematics out there have your input power going through an electrolytic capacitor of some kind to ground to act as a power filter. A tip that I learned from the mighty @fig in his first post of the loafing lounge https://forum.pedalpcb.com/threads/loafing-lounge.8167/
Basically, put your filter cap in the power rails themselves. You will free up more real estate space on your breadboard.
Be Ready to go at any moment
This is pretty much how my protoboard is set up before I start putting any components on there. I've got all my preliminary "offboard" jumpers on there connecting my power rails together. I've also got a 100uf filter cap in the power rails

Troubleshooting
There are some general tips out there for breadboard troubleshooting and I've already written them up here. The author is pretty good if I do say so myself
 forum.pedalpcb.com
Be Patient
Patience is probably your most valuable tool while breadboard. If I rush things I tend to put components in the wrong rows, the values are incorrect, or miss a component altogether. Being patient while you're building will save you some troubleshooting headache.
Have Fun
If you're not having fun and enjoying the process of building your own circuits, then what the heck have you been reading this for! Enjoy the journey.
Not really a tutorial, but I wanted to share a few tips and tricks I've learned in my breadboarding journey.
First things first. Light up a diode!
One of the very first things you should do is light up a LED. It accomplished 2 things: you've verified that your breadboard works as it should and you can translate a simple schematic to a breadboard. Take this one for example:
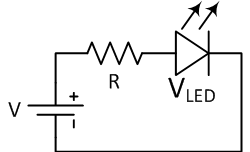
Power to a current limiting resistor to a diode to ground. A schematic reads one way, but a breadboard is laid out differently. For reference here is how a breadboard is laid out. The power rails are connected horizontally (section A) and the columns in section B are connected vertically.
And here is that same circuit above but in breadboard form. I chose a 1k resistor. This seems too simple to breadboard, but many people here don't get a chance to test out their LED brightness before soldering everything up on your PCB. This is a great way to test that out, especially if you've got super brights!

How to layout your circuit
This one may seem most daunting to the breadboard beginner. Schematic to breadboard is not a simple copy and paste. The end results are the same, but the layouts are different as mentioned above. How can you turn schematic to reality? The short and lazy answer is try it out yourself. Figure out what works and what doesn't work. Remember, you do have a limited amount of real estate on your board unless, you know, you've got another board all lined up. Start out with small, simple circuits such as an LPB-1 then graduate to an Electra Distortion. The more you build the more you'll "get it".
Keep jumpers to a minimum length
If you're gonna breadboard, then jumpers are inevitable. The problem with many pre-made jumper cables out there is that they are way too damn long! While this doesn't affect the circuit it does make it very messy looking and can be a little disorienting while troubleshooting. One of the fixes for this is to make your own jumper wires out of some solid core hookup wire. I have different colors that indicate different lengths for holes that are 2, 3, 4, 5, etc apart. It will take you some time to make them and your workstation will look like a bag of sprinkles were spilled on there. It's totally worth it. Just have a good place to store them. I have a pill organizer from Walmart and was totally worth the $1.
That being said, the premade ones do come in handy. My advice is to keep those and their lengths to a minumum.
Stay Organized
Depending on the circuit, your workstation may end up having a ton of pink Tayda baggies all over it. Keep them all in one area so that when you need another resistor or capacitor it can be quickly obtained. Storage containers are invaluable here. Take a look at some electronics or crafting storage containers on Amazon or next time you're in Walmart, Target, etc.
You should also be mentally organized as well. Remember which circuit block you are working on in your schematic, where it is located on your board, and how it should be laid out. This can be a fun puzzle.
Keep things close
What works for me is to keep components as close together for each circuit block on your breadboard as possible. Having a "longer" jumper wire connecting each circuit block allows me to stay organized in my head what's going on with my board. You can build a Muffin Fuzz on a small breadboard with a little extra room to spare.
There is no "right" and "wrong" when breadboarding
There is no 100% correct way to breadboard a circuit. There is only a circuit that works or doesn't work on a breadboard. The grey area here is you've built a circuit that works but is noisy (in a bad way). Check your component values and make sure your breadboarded circuit matches the flow of the schematic. Meaning that if your schematic is reading left to right your breadboard should read left to right. It is simply good practice so stray components don't cross.
ICs vs Transistors
ICs and transistors are incredible important. Every guitar effects circuit uses one or the other or both. Knowing how they work on a breadboard is vitally important. Take a look at the below picture. The 4558 is straddling the canal in the middle. Rows 8-11 on each side correspond to the different pins of the opamp here. As a hint, 2 of those pins will have power connected to it: one for positive power and one for negative power (ground). Right now you have 4 holes for each pin. This may or may not be enough depending on the circuit you are building. If you run out of room, jumper that pin to a different row away from the IC, finish wiring it up, then jumper back to the pin. This is an option.
For transistors you'll have to bend the leads slightly to get them to fit. If you run out of room/holes for a pin simply jumper directly across the canal. You've now got 4 additional holes. Remember the pinouts.

Pot vs Trimmer
There's nothing more satisfying than tweaking the sound of your circuit by twisting a knob. Pots win here. The downside to pots is that they require jumper wires to your offboard section of the protoboard. It can get messy quickly depending on the circuit you are making.
Trimmers solve the mess problem on a breadboard, but you'll need a screwdriver to tweak it and can get annoying at times depending on how much of a "tweaker" you are when playing. Everyone has their preference and each has it's place on the board.
Tweezers are more handy than you realize
I would HIGHLY recommend getting a pair of tweezers. With a fully populated breadboard you may accidentally bend components or push them out of their holes while trying switch out that resistor for a different one. I bought these from Tayda and are DEFINITELY worth the $0.60. They're also handy for adding/removing your DIY jumper cables mentioned above. If you've got a new breadboard they can be a bit stiff trying to put components in and the tweezers help to keep the leads bending.
Stainless Steel Tweezers Black ESD-15
VETUS - Get It Fast - Same Day Shipping
www.taydaelectronics.com
Have Extra Breadboard-specific parts ready
If you're like me, I didn't want to sacrifice my nice, clean, straight resistors by bending them all up just for breadboarding. Those should be for soldering! Do yourself a favor and buy extra parts. For $10 on Amazon you can get a box of resistors that have enough variety of values to make dozens if not hundreds of circuits. You may need to buy a few non-standard values from Tayda or wherever you normally buy from.
I also have a spdt and dpdt switch with jumper wires soldered on them specific for breadboarding. It has come in handy and I would recommend.
Test your circuit as you build it
After every circuit blocky you build, stop. Take it over to your amp and test it out to make sure it works. If it works, go back and keep building. Troubleshooting a small circuit block is 439235430 times easier than troubleshooting a whole circuit. Tweaking components should be done at the end of the build. While it may sound one way when you first build the circuit block it will sound very different when the circuit is fully built.
Power Filtering
Many schematics out there have your input power going through an electrolytic capacitor of some kind to ground to act as a power filter. A tip that I learned from the mighty @fig in his first post of the loafing lounge https://forum.pedalpcb.com/threads/loafing-lounge.8167/
Basically, put your filter cap in the power rails themselves. You will free up more real estate space on your breadboard.
Be Ready to go at any moment
This is pretty much how my protoboard is set up before I start putting any components on there. I've got all my preliminary "offboard" jumpers on there connecting my power rails together. I've also got a 100uf filter cap in the power rails

Troubleshooting
There are some general tips out there for breadboard troubleshooting and I've already written them up here. The author is pretty good if I do say so myself
Breadboard Troubleshooting
You've taken the time to download the schematic, read it, populate the breadboard the best way you think it should be, hook it up to your power supply and In/Out jacks, plug in your guitar and amp, turn everything on and....nothing. No sound, no effect, or the sound doesn't like it should based...
Be Patient
Patience is probably your most valuable tool while breadboard. If I rush things I tend to put components in the wrong rows, the values are incorrect, or miss a component altogether. Being patient while you're building will save you some troubleshooting headache.
Have Fun
If you're not having fun and enjoying the process of building your own circuits, then what the heck have you been reading this for! Enjoy the journey.
Last edited: