greypilgrim76
Active member
Hi All,
So out of the dozen or so PedalPCB projects I've built in past few weeks, all of them are working perfectly, except for the Butt Head pedal. The way that it's not working has me scratching my head, though, so I thought I'd post here and see if anyone has any ideas on where to even start. (Honestly, I'm leaning toward just ordering a new PCB and rebuilding it, but maybe some of you folks have more experience with this sort of issue than I do.)
So the pedal "works," in the sense that the indicator LED is functioning correctly, the bypass mode sounds fine, and the effect clearly "kicks on" when I press the switch. The problem is that it just sounds terrible, and the knob functions are out of whack. Here's the list of issues I'm noting:
1. Volume drops precipitously when engaged. Like, even with the Volume knob up all the way, it's barely at parity.
2. The Grunge knob doesn't introduce any distortion. It sort of just acts like another volume knob, but it gets sort of muffled as it's turned clockwise.
3. The High knob doesn't appear to do much of anything.
4. The Low knob does increase the low end notably, and it also increases the overall volume.
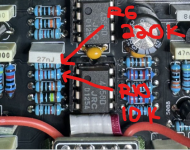
I'm pretty clueless as to what the issue might be. My soldering looks good to me, but here are some pics of the board, in case anyone sees anything I'm missing, either with assembly or components:

It may be that this sort of issue isn't really solvable without hands-on access, but I figured it couldn't hurt to ask. If anyone has any troubleshooting workflow suggestions, or recognizes the issue and its possible cause(s), I'd love to hear it.
Okay, I promise this is my last help request for a bit!")
Thanks!
So out of the dozen or so PedalPCB projects I've built in past few weeks, all of them are working perfectly, except for the Butt Head pedal. The way that it's not working has me scratching my head, though, so I thought I'd post here and see if anyone has any ideas on where to even start. (Honestly, I'm leaning toward just ordering a new PCB and rebuilding it, but maybe some of you folks have more experience with this sort of issue than I do.)
So the pedal "works," in the sense that the indicator LED is functioning correctly, the bypass mode sounds fine, and the effect clearly "kicks on" when I press the switch. The problem is that it just sounds terrible, and the knob functions are out of whack. Here's the list of issues I'm noting:
1. Volume drops precipitously when engaged. Like, even with the Volume knob up all the way, it's barely at parity.
2. The Grunge knob doesn't introduce any distortion. It sort of just acts like another volume knob, but it gets sort of muffled as it's turned clockwise.
3. The High knob doesn't appear to do much of anything.
4. The Low knob does increase the low end notably, and it also increases the overall volume.
I'm pretty clueless as to what the issue might be. My soldering looks good to me, but here are some pics of the board, in case anyone sees anything I'm missing, either with assembly or components:


It may be that this sort of issue isn't really solvable without hands-on access, but I figured it couldn't hurt to ask. If anyone has any troubleshooting workflow suggestions, or recognizes the issue and its possible cause(s), I'd love to hear it.
Okay, I promise this is my last help request for a bit!
Thanks!
Last edited:


 ) and other so-called beginner circuits which tripped me up big-time in my early days. Nowadays I breadboard stuff more often than not beforehand to test tweaks and so forth.