Calling all Etching Experts

twebb6778

Well-known member
So I decided to have a go at etching with sodium hydroxide, but can't for the life of me get the toner to transfer onto my enclosure. I'm laser printing on to high gloss 180gsm photo paper.

My first attempt was a failure, but seemed promising. The second attempt was woeful.

Has anyone experienced this? I feel like there's something I'm missing.
 

Attachments

  • received_698827194227805.jpeg
    received_698827194227805.jpeg
    156.5 KB · Views: 40
  • received_254582515803725.jpeg
    received_254582515803725.jpeg
    102.8 KB · Views: 39
I'm far from an expert but try lowering your iron temperature say to around to 3/4

What I've found is if you iron for too long it adheres to the enclosure way too much and even if you remove it correctly it pulls parts of the transfer off

I place the iron flat on it for around a minute then iron for around 5 to 7 minutes then I leave under running water till the backing becomes soaked and peel one corner off keeping the water running between transfer and enclosure to help loosen it

@Hexjibber is the man for etching here's his tutorial in case you've not seen it

https://diy-guitar-effects.tumblr.com/etching
 
Last edited:
I iron at the highest possible temperature without issues. How are you prepping your enclosure? That part is key for adherence.

After I have the image lined up, I let the iron rest on top without applying pressure for about 30 seconds to a minute then make very slow circles with just the nose end of the iron until I can see the image fully through the paper. Then I go over it again slowly with the whole bottom of the iron. Once it looks good I throw it face down in a sink full of warm water for 5-10 minutes. The paper backing should separate at this point, then under running water I take the rest of the paper residue off slowly with a toothbrush or gently roll it off with my fingers.

What kind of paper are you using I use the el cheapo yellow stuff and el cheapo toner cartridges I'm that kinda guy!

With the yellow stuff at high temp it sticks like a limpit

I definitely agree prep is key and with a nice flat surface you get much better results

I use an old HP1015 which is pretty good but I've read brother printers aren't that great for toner adherence
 
I use glossy cardstock paper I buy at the office supply store for dirt cheap. I tried that yellow stuff once and will never use it again haha. I find the thicker cardstock paper comes off much easier as there’s more mass to the backing, it usually just floats off if I leave it in water.

Id say prep is probably 70% of what it takes to achieve desired results! I use a Samsung M2020 express I got for 20 bucks.
 
Thanks guys, this is really helpful. I ready Hexjibber's tutorial before starting this and thought I had a good idea of what to do, but looks like I need more practice!

In terms of prep, I sanded with 600 grit wet and dry for maybe 7 or 8 minutes, changing paper when it got clogged. I wanted to use 400 as per the tutorial but my store was all out. I think I can definitely improve this part of the process - lower grit for longer to get a smoother surface.

I used the iron on full heat, stationary for 1 minute then circling for 10 minutes. At no point could I see the image through the card, so I feel like there may be an issue here too. The iron is pretty old and might not be distributing heat well, so I'll whip out the new one for next time.

I also didn't run any water over it before peeling the paper off because it didn't mention anything in the tutorial, but this is a great tip. Wish me luck for next time
 
I use 180 to flatten the box first, once all the pits, dents and scratches are removed I go to 400 you really need a more abrasive grade initially to get rid of all the pitting and get it as flat as possible

I use good quality silicon carbide wet and dry which doesn't clog much at all, I'll do around 20 passes then rinse both the box and the sandpaper but for much longer at least an hour usually depends on the quality of the enclosure I just keep going till there aint no dark patches then you know it's level

I know @Nostradoomus has a different procedure having commented on a nice reverse etch he did posted in build reports here

https://forum.pedalpcb.com/threads/parentheses-mini-1590bb.3328/
 
Last edited:
Just edited the post with a little more info on what I do basically keep sanding till it's flat and level and you've got arms like Popeye then do your finishing i.e 400 and move to less abrasive till you're happy

Prep is defo the key

But you'll still get failure I reckon I'm around 80% first time success rate, I usually don't have to sand the transfer off more than twice when it isn't great so you'll get a few failures till you find your favoured routine

Dead Astronaut does a nice video here and his etches are excellent

 
Last edited:
Yeah I start with 180 as well, but I do incremental steps (220,320,400). I have tendinitis right now so I bought a slick random orbital sander to lighten the load. Haven’t done an etch with that technique yet but I should be on it pretty soon (first up was finally organizing and labeling my work space, took forever :LOL:)
 
Second attempt is much better but I think I was a bit impatient getting the backing off. Could probably have left it on the iron for longer too.
I still feel like this is great progress, third time's a charm!
 

Attachments

  • received_942958182811131.jpeg
    received_942958182811131.jpeg
    110.9 KB · Views: 24
Tried a new brand of photo paper and it turned out even worse!

The enclosure prep is going really well and I'm getting a nice flat surface with no pits. I'm starting at 180 grit, then going to 400. It's smooth and clean, but not so shiny that there's nothing for the toner to hold on to. Printing at 1200dpi with as much toner as possible.

The toner just isn't adhering to the enclosure, regardless of paper or print settings, and I can only imagine it's because my $8 iron isn't generating enough heat.

Time to get creative! Next I'm going to try a sandwich press (that should heat both sides of the enclosure and hopefully get it even hotter!) with some parchment paper between the heat source and the photo paper. I've also read that pre-heating the enclosure can help too. If that still isn't hot enough, I'm going directly on to my electric stove top.

I feel like a mad scientist, wish me luck!
 

Attachments

  • 104642980_598039434468431_5656651909209277158_n.jpg
    104642980_598039434468431_5656651909209277158_n.jpg
    50.9 KB · Views: 9
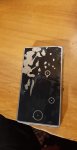
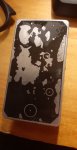
So far I've tried expensive kodak 180gsm gloss photo paper, and cheap target 180gsm gloss photo paper. I think the kodak is better overall, but there's similar results with both so I think I can rule out the paper as the issue.

I clean the enclosure with acetone and place the transfer on with small pieces of painters tape on the edges just to hold it in place. Once the iron is hot I'm putting it directly on the transfer with a little pressure for about 1 minute. After a minute, when some of the toner has transferred, I start moving the iron around, up and down to make sure I get even coverage, and trying to make circles with the nose of the iron on my problem areas. I'll keep doing this for another 10 minutes, but at no point do I ever see any of the image become visible on the back of the paper. Then the enclosure goes directly into running water, hitting the photo paper first. Once my basin is full I'll turn the enclosure upside down so it's submerged and let it sit for 10 minutes. I'll then very carefully try to get the paper off under with my fingers under running water.

Some areas seem to stick really well, but other have really minimal adhesion.
 
Yeah sounds like your iron or printer is crap, I’d try a new one before buying a sandwich press or anything like that. Your technique is what I do pretty much and it always comes through the back of the paper. I also use much thinner paper (I think it’s more like 80gsm glossy card stock) but I’ve used thick stuff as well with good results.

If you have a Brother printer that might be the issue, I’ve heard nothing but bad stuff about em as far as etching goes.
 
Back
Top