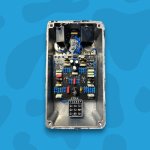
DEMO Kewpie Fuzz

This post contains an audio or video demo

jwyles90

Well-known member
Build Rating
5.00 star(s)
Finally got a chance to put together one of these and man, it certainly lives up to the hype. Admittedly I'm already a fan of Big Muffs, but this thing takes all the stuff I like about them and adds a lot of features that I found myself wishing big muffs had. The two modes are both awesome and distinct from one another while still feeling familiar, and I am always a fan of a mids boost toggle that isn't too in your face about it (I don't think this one is). The Doping switch is a cool little feature as well, and while I'm not entirely sure what's going on under the hood I like how it sounds when it's engaged with the 1979 switch as well.

I put together a couple sound clips to try and show some of the range that this thing has. For whatever reason when I load audio files onto Imgur some of them have this weird crackling that gets introduced. That sound doesn't exist in any other instance when I listen to the clips, which is very annoying.

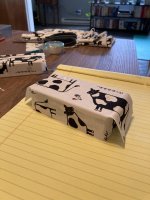
This was also my first go at wrapping enclosures in fabric, and aside from a few spots that are a little rough around the edges on the backplate I think this turned out pretty alright. The biggest struggle I'm having is the varying degrees of thickness that different fabrics have, how well they can handle being coated on the top side with mod podge, getting the spots with drill holes to be sturdy enough to cut while not being super sticky, etc etc. Overall though I think I'm figuring those things out with each new enclosure that I wrap fabric in.
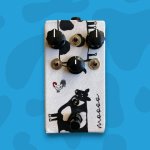
IMG_3563 (copy)-Photoroom (1).jpg IMG_3563 (copy)-Photoroom (2).jpg
 
I love the enclosure wrap. Very whimsical and I love that it's gonna get cooler with age and grit and grime. I did this once and mine looked terrible so I haven't revisited. But this inspires me to try again. Very excited to get to building this circuit too. Muffs are the way.
 
I love the enclosure wrap. Very whimsical and I love that it's gonna get cooler with age and grit and grime. I did this once and mine looked terrible so I haven't revisited. But this inspires me to try again. Very excited to get to building this circuit too. Muffs are the way.
Thanks! Yea it's been fun messing around with different ways of decorating enclosures. Figuring out how to get the fabric to "wrap" was the most challenging part, but I think once you get that part down it makes it easier for it to look more cohesive.
 
Neat! I used to be very into sewing my own biking/camping gear so your build is extra relevant to my interests 🤓. How did you handle the corners on your wrap? A normal corner seam seems like it would be too chonky, but maybe some contrasting seams would look cool. I wonder if you could undersize it a little bit and lay it out on the bias to give a little stretch, assuming the mod podge could hold it in place well enough. For cutting neat holes in thicker fabric, I used to use a little circular punch that came with a cheap rivet kit. Worked pretty well, but maybe overkill here, ha.
 
Very cool!

It mooved me.


If I remember correctly, I used a spray-adhesive (like used in applying automotive fabrics in cars) when I covered my Filigree Siberian Hamster in amp/speaker rat-fur.

I wasn’t going for coverage over top though. I’ll have to try my Mod-Podge on some other lighter fabrics — thanks for the inspiration!
 
Neat! I used to be very into sewing my own biking/camping gear so your build is extra relevant to my interests 🤓. How did you handle the corners on your wrap? A normal corner seam seems like it would be too chonky, but maybe some contrasting seams would look cool. I wonder if you could undersize it a little bit and lay it out on the bias to give a little stretch, assuming the mod podge could hold it in place well enough. For cutting neat holes in thicker fabric, I used to use a little circular punch that came with a cheap rivet kit. Worked pretty well, but maybe overkill here, ha.
Oh man, I might have to look into a punch like that. Overkill or not it sounds way easier than exacto-knifing out each hole.

As for the corners, I basically have just been cutting out the entire square outline of the enclosure (front, top/bottom and sides all laid out) if that makes sense. Then I do a vertical cut along the lines where the top/bottom and side sections of the fabric meet. That creates a little flap on each side, which I then fold around the corners of the enclosure and glue down first. Once those have dried a bit I then fold the top part over and glue it down.

That felt way harder to explain than the actual process is haha, so it ends up looking like this if that helps clear things up a bit.
unnamed (14).jpg
 
Very cool!

It mooved me.


If I remember correctly, I used a spray-adhesive (like used in applying automotive fabrics in cars) when I covered my Filigree Siberian Hamster in amp/speaker rat-fur.

I wasn’t going for coverage over top though. I’ll have to try my Mod-Podge on some other lighter fabrics — thanks for the inspiration!
I'm stoked to see what you come up with!!
 
Back
Top