King Nothing Low Volume

At the input 0.1 VAC sine wave 1KHz.

After the j201 : 2 VAC.

After the first triode 18 VAC.

After the second one 30 VAC.

All the potentiometer at 12 o'clock and switches at middle positions.

I tweaked my King nothing so don't worry if you don't find the exact same measurements, but you should be close.

Don't hesitate if you need extra information.
 

Attachments

  • Screenshot_20240801_151239.jpg
    Screenshot_20240801_151239.jpg
    213.7 KB · Views: 4
  • Screenshot_20240801_151643.jpg
    Screenshot_20240801_151643.jpg
    597.7 KB · Views: 3
I just got the kit. It says on on on for dpdt, but I got on off on. Trying to read the schematic and figure out what works and not, but I couldn't figure it out.
My understanding is that On on on Dpdt have two versions on what connects in the middle position. Since type 1 or 2 is important for on on on and there is no mention of the type, I can only guess that on off on also works?
Feel free to expand @vigilante398
Thanks

View attachment 79452
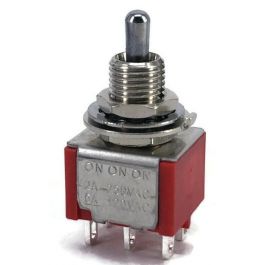
I would not use an ON-OFF-ON DPDT switch on this build, it was made for a DPDT ON-ON-ON switch.
The single SPDT switch is ON-OFF-ON but the DPDT switch should be ON-ON-ON.
The build document specifies a certain switch from Tayda so you could get the switching from that switch document.
 
@bluedmc777 : how did you drill "bars". Template only has holes and they do not match the bars that well either...
There are drill templates for the Sushi C2CE PCB's boxes so you can get them machined at Taydas when you order the boxes, many other places will machine your box as well.
There are also basic paint files so Tayda can print the front of the box for you

If you use the drill template to mark out the holes yourself so you can drill them at home there are some things you should know.
1. All measurements are from the middle of the face, if you draw a cross in the middle of the front of the box you measure from there.
2. Left of center is a minus measurement. ( X axis)
3. Down from center is a minus measurement. (Y axis) (this one confused me to start with)
Just place some masking tape on the front and make a cross and go from there.
Start with the 12mm hole for the stomp switch and go from there, its on the center at the bottom so center is 0 on the X axis and near the bottom is - 48.931mm from the center of the box on the Y axis.
Good luck
Mick
 

Attachments

I would not use an ON-OFF-ON DPDT switch on this build, it was made for a DPDT ON-ON-ON switch.
The single SPDT switch is ON-OFF-ON but the DPDT switch should be ON-ON-ON.
The build document specifies a certain switch from Tayda so you could get the switching from that switch document.
Thanks for this!

I followed the Tayda link, and interesting enough they only have one DPDT On-On-On which is the type 2 from my understanding.
They seem to number the lugs
6 3
5 2
4 1
But it is symmetrical so my usual thinking
1 4
2 5
3 6
also show as Type 2
1722546779987.png
1722546828068.png
Compared with
1722546881236.png
Gives me Type 2.

Thanks @Tassieviking !
 
There are drill templates for the Sushi C2CE PCB's boxes so you can get them machined at Taydas when you order the boxes, many other places will machine your box as well.
There are also basic paint files so Tayda can print the front of the box for you

If you use the drill template to mark out the holes yourself so you can drill them at home there are some things you should know.
1. All measurements are from the middle of the face, if you draw a cross in the middle of the front of the box you measure from there.
2. Left of center is a minus measurement. ( X axis)
3. Down from center is a minus measurement. (Y axis) (this one confused me to start with)
Just place some masking tape on the front and make a cross and go from there.
Start with the 12mm hole for the stomp switch and go from there, its on the center at the bottom so center is 0 on the X axis and near the bottom is - 48.931mm from the center of the box on the Y axis.
Good luck
Mick
Thanks for the drill template @Tassieviking. The one I got from https://drive.google.com/file/d/1AhgdvQF9y32I8An0m1vaOU9VhufoSSim/view
only gave me a grid of holes.
I drill myself and buy enclosures locally.
Once you have the holes at each end of the 5 "bars", would you use a milling machine? Or just drill holes and the file to perfection?

Thanks
 
The drill template is there so you can get the enclosure machined at Tayda or any other machine shop, if I was to do it it home I think I would just pick a nice pattern and drill lots of holes.
The slots and holes are only there so you can see the tube, I don't think they are needed for cooling the tube so they are just decorative as far as I know.

All the drill files and art files are on the link at the C2CE shop, you might have to log in at Tayda to see them.
Tayda is very good with prices and I can save a fair bit using them for most of my shopping for stompboxes, try them out.

EDIT: Tayda has 1 type1 ON-ON-ON DPDT switch, its the blue one for 49cents.
 
Last edited:
The drill template is there so you can get the enclosure machined at Tayda or any other machine shop, if I was to do it it home I think I would just pick a nice pattern and drill lots of holes.
The slots and holes are only there so you can see the tube, I don't think they are needed for cooling the tube so they are just decorative as far as I know.

All the drill files and art files are on the link at the C2CE shop, you might have to log in at Tayda to see them.
Tayda is very good with prices and I can save a fair bit using them for most of my shopping for stompboxes, try them out.

EDIT: Tayda has 1 type1 ON-ON-ON DPDT switch, its the blue one for 49cents.
Thanks.
Yes, I am sure Tayda are a good. I got an enclosure from them a while back. But shipping and customs to Sweden and whatever other fees they imagined made any bargain lose its value. Took over a month as well if I remember. Fast to EU border, but then...
I have a shop in my city with a really good selection of most parts and tools, so I try to support him when I can. More expensive, but I appreciate a shop that stocks caps, resistors, wire, switches, LEDs, bezels, jacks and when l'm lucky the odd IC and transistor.
Still, I think he gets his enclosures from Tayda mostly... :D
 
I think I am lucky in Australia that we don't have too much problems with taxes when we buy from overseas, I am glad that the family moved here when I was a young kid.
I did first strum a guitar in Sweden though when I was young, I think I was about 10 years old when I first started playing.
 
Can't wrap my head around this...
Please correct me if I am wrong.
The DPDT should be type2. Tayda pinout numbering does not seem to match the pcb and schematic.
It seems that looking ar pcb from component side/most text side would indicate pinout
4 1
5 2
6 3
And combining with schematic I think
UP: 5-6 is ground to nothing and 2-3 R16 to ground, thus shorting R16, but no change to MODE-6
DOWN: 4-5 ground to intersection C10 and R19 (wrong label in my pic sorry) thus shorting R19. 1-2 resulting in nothing.
Remains Type 2 MIDDLE position 5-6 and 1-2 result in no changes to main schematic.

Had it been type1 then both R19 and R16 would be bypassed to ground.
I'd be thankful if someone could confirm my ramblings above and clarify that type 2 is what should be the dpdt on on on.
But if so, and middle does not connect anything, wouldn't an on off on have done the same job?

EDIT: I just realized that my own pinout numbering above and in the picture is "wrong" when I want to compare with Tayda.
So where I write type 1 above, it should be type2. And vice verse
Sorry for this confusion.
See below for conclusion of the DPDT selection.
 

Attachments

  • 17226336318543454687237473114401.jpg
    17226336318543454687237473114401.jpg
    291 KB · Views: 4
  • 17226336471335620363285529088183.jpg
    17226336471335620363285529088183.jpg
    325.3 KB · Views: 4
  • 17226336574862916321311051243723.jpg
    17226336574862916321311051243723.jpg
    326.6 KB · Views: 2
  • 17226336693433360691559467281716.jpg
    17226336693433360691559467281716.jpg
    388.9 KB · Views: 4
Last edited:
This has turned into a very informative thread. I appreciate everyone that has contributed. I’m still on vacation so I’m not able to give any updates. The switch could be an easy culprit to overlook. Greatful for the feedback everyone.
 
This has turned into a very informative thread. I appreciate everyone that has contributed. I’m still on vacation so I’m not able to give any updates. The switch could be an easy culprit to overlook. Greatful for the feedback everyone.
Thanks, was about to apologize for hogging and derailing your tread...
 
Ok I’m an idiot. Swapped tubes and it freaking RAWKS now! I originally put in a new Tung-Sol that was working fine. I guess I did something to the tube while inserting or just didn’t have good connection because the pedal is night and day difference now. Thanks everyone for the help. Much appreciated.
 
Great to hear!
We all know the feeling when a (temporarily) failing build finally kicks into life and sounds as it should!

Reminds me I should get my amp checked...
 
Great to hear!
We all know the feeling when a (temporarily) failing build finally kicks into life and sounds as it should!

Reminds me I should get my amp checked...
Yea I’m not usually quick to troubleshoot because I rather be playing than pulling my hair out but new it’d be a quick and easy swap. Not sure if the Tung-Sol just didn’t have a good contact or if it maybe went bad on start up. I’d never had any issues with it being almost brand new. I’m gonna try it in my amp tonight. However I did break one tube in particle accelerato. An older TAD 7025s. Think I was trying to work it into the socket but had to pull it back out and doink…it the tip of enclosure. Didn’t break or release any gas or anything. Just didn’t work anymore.
 
I am still stuck with the DPDT on/on/on selection. According to the instructions and Tayda link, the DPDT should work like this (in red):
1724356840169.png

And by the schematics Position 1 will make R16 bypassed and no impact on R19 (see pictures in my earlier post and full doc in link in even earlier post)
While Position 3 will leave R16 engaged but R19 bypassed.
The middle position from Tayda picture indicate that both R16 and R19 end up bypassed.
(The other variant of DPTD on/on/on would mean both R16 and R19 are engaged)

And I am not sure what the switch is supposed to do in the middle position.

Any help is greatly appreciated.
 
in the middle position for the switch both terminals provide ground connections that bypass resistors. if that is correct, that would be a setting where the most cut in frequencies would occur.
 
in the middle position for the switch both terminals provide ground connections that bypass resistors. if that is correct, that would be a setting where the most cut in frequencies would occur.
That’s how mine is. Lowest bass content in middle position. Sounds like it atleast.
 
Decided to move my specific question to a thread of its own
Asking if anyone can check the pinout of the DPDT. No need to activate, power on etc. Just need to remove the backplate and check continuity for middle position.
 
Back
Top