Kliche Overdrive questions

JPK1

Member
I'm new to the forum so hopefully this thread is in the right place. I just finished an Analog Chorus from BYOC and it turned out great. So my next project is the Kliche Oeverdrive and I'm putting together a BOM spreadsheet to order parts. I just noticed that there's no foot switch, input/output signal jacks, or DC input jack listed on the build document PDF I downloaded from the site. Then I looked at the schematic and they are not shown there either. Finding the parts is no big deal but the schematic does not show the wiring for these devices. Am I missing something? I sure feel like I am. Maybe this site is for smarter BYO pedal builders and I need to step it up a notch. :geek:

I attached the schematic of my last build that shows the devices I'm referencing. Thanks for the help.

Ok I'm an idiot. I just saw that the build document that it shows all the wiring for the devices I mentioned above. It's just not shown on the schematic which is not a bid deal.
 

Attachments

  • analogchorusschematic.pdf
    53.2 KB · Views: 7
Last edited:
Hi thanks for the quick reply. That makes sense. It's the schematic of the PCB not the final assembly. I just noticed the wiring diagram. I can source those parts no problem. I updated my first post.
 
If you run into any issues on where to source anything just ask… There are no dumb questions here and 99% of everyone here is willing to help you… even when something is not working… if your willing to dig into a troubleshoot thread I’ve seen them go for multiple pages diving in to solve a problem… you can pm me for part sourcing suggestions if needed
 
Thanks for the warm welcome. I have all the parts now and wrapped the enclosure with automotive wrap (less than $5 from Amazon, 15 minutes to apply). Way easier and cheaper than paint. Tuned out a little darker than I wanted but that's ok. I have black vinyl on order for the text. I'll get started on the PCB this week.

Is this thread ok to document the build or is there a better forum area for actual builds? I'll just start one there if so.

20230209_223206.jpg 20230211_115546.jpg
 
Last edited:
Thanks for the warm welcome. I have all the parts now and wrapped with enclosure with automotive wrap (less than $5 from Amazon). Way easier and cheaper than paint. Tuned out a little darker than I wanted but that's ok. I have black vinyl on order for the text. I'll get started on the PCB this week.

Is this thread ok to document the build or is there a better forum area for actual builds? I'll just start one there if so.

View attachment 41987View attachment 41986
Welcome! To answer your question you should probably start one! Itll give us a fresh start specifically for you! BTW I like what you did with the wrap!
 
Thanks for the warm welcome. I have all the parts now and wrapped the enclosure with automotive wrap (less than $5 from Amazon, 15 minutes to apply). Way easier and cheaper than paint. Tuned out a little darker than I wanted but that's ok. I have black vinyl on order for the text. I'll get started on the PCB this week.

Is this thread ok to document the build or is there a better forum area for actual builds? I'll just start one there if so.

View attachment 41987View attachment 41986

Great job with automotive wrap!
That seems to be a not widely known method to color a box. Could you post some pics or a short tutorial?
 
Last edited:
Ya, does it conform around the box, or do you have to trim it a certain way and then heat it?

I’m imagining colorshift enclosures, lol.
 
Glad you like the wrap. I got the idea on a forum, the Tele forum I think. I'm too lazy to do all the painting and got the idea to wrap it. And my wrap work is not perfect, trust me. Not like the car wrap people with zero visible seams or wrinkles. I'm getting better at it. Kind of embarrassed even posting this but here goes.

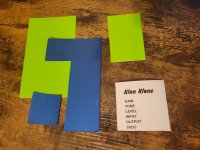
There are 3 x 5 samples on Amazon for like $1.50 each and free shipping. I just estimate the amount of samples I need, like 4 on this size box. Start by cleaning the entire outside with rubbing alcohol. The hardest part is the corners since they are curved. I'm getting better at it but I start by trying to cover the top with one 3 x 5 piece if possible. If it takes more than one piece on top like on this box, I put the [overlapping] seam where I can hide most of it, under the three adjustment pot knobs on this one. So when I measure the top piece I leave about 1/8 to 1/4 more on all sides. I stick the top down using the hinge method to get it lined up perfectly (look it up, too much to type here). I fold the left and right 1/8" to 1/4" sides over and stick them down to the sides. Then I make 4 little careful cuts on all 4 corners with a new Exacto blade. I fold the little corner flaps over for the left/right side. Fold the top and bottom 1/8" to 1/4" flaps/sides down and stick them, fold those little corner flaps over the left and right ones, and the top is done. That's the hardest part. Then I just cut rectangular pieces and stick them to the 4 sides using a little overlap with previously placed panels. I leave the bottom ends long so I can cut right up against the aluminum bottom edge with the Exacto. I use the Exacto to carve out all the holes. Done. You can use a hair dryer when you're done but not totally necessary. If you don't overlap you'd have to cut with extreme precision. I don't bother, the thing sits on the floor 6 feet from my eyes, it's not on display at a boutique effects show. It's not a good as a professional wrap job but I'm 100% happy with it and they get better every time I do one. $5 and 15 minutes. The final touch is the vinyl black letters for the text from smalllettering.com (not cheap, like $18 per stomp box). I wanted just the vinyl lettering to go over the wrap, not the bigger panel stickers that go over the entire pedal that you can print out.

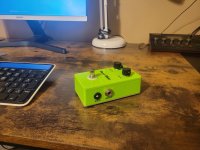
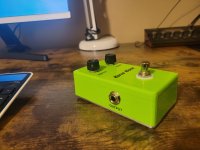
If you look closely you can see tiny wrinkles and overlaps in the attached pics, but to me it looks much nicer than a bare aluminum box. This one says Korus Klone because my next one is called the Klon Klone. They will be sitting right next to each other, the same product line. lol..
 

Attachments

  • 20230213_165602.jpg
    20230213_165602.jpg
    526.3 KB · Views: 26
  • 20230213_165628.jpg
    20230213_165628.jpg
    467.8 KB · Views: 25
  • 20230213_165636.jpg
    20230213_165636.jpg
    371.7 KB · Views: 25
  • 20230214_114237.jpg
    20230214_114237.jpg
    515.8 KB · Views: 26
Last edited:
Just pulling your leg here.

Let me paraphrase:

Painting is too annoying, so here is my 500 word description of the process to apply these finicky, easy to screw up plastic wrappy things.

I get where you're coming from though. So easy to screw up paint jobs and, your result looks fantastic.
 
Thanks for the turorial.

I’d like to try painting an enclosure, then wrap it and partially peel-away some of the wrap…
 
Thanks for the write-up.
My first thought was to the top and the lower side with one piece with overlapping to the left, top (controls side) and right. Then do the left side, top side and the right side in one big piece.
 
Thanks for the write-up.
My first thought was to the top and the lower side with one piece with overlapping to the left, top (controls side) and right. Then do the left side, top side and the right side in one big piece.
Anytime. I was limited by the 3 x 5 inch sample size but there're probably a few ways you could do it. All I know is it's very easy to do and doesn't cost much.

I see you're a Hamer fan? My favorite guitar is my Hamer Studio.

HO Far.jpg
 
Thanks, that's an AX84.com High Octane amp. About 12 watts, class A, high gain. Built it in 2010. The website is gone now, too bad. It was a nice website with cool people. I also built the October from that site (18 watt plexi). Both nice amps.
 
Back
Top