Nein Fuzz 3rd Attempt/Failure

Depattern

New member
this is probably a lost cause since im not skilled enough to properly troubleshoot. I have a multimeter but aside from basic voltage and continuity testing, i dont really know what im doing but i wanted to give it a shot after buying the pcb and jfets 3 separate times.

i thought i accounted for the dumb obvious mistakes in my first two builds (soldering the wrong component or pad, then severely botching the desoldering - im really bad at desoldering), and i felt like i did everything according to the instructions i had here. im 95% sure i didnt use any incorrect components like 470k vs 470r, and r2 is 47k. everything is oriented properly. q2 is only soldered like that because i was trying to get ai to help me and it wanted to me swap that jfet for another one due to the weird drain voltages:

d68646a8-0436-47d0-87a2-eb6f717bdfe3.jpg
but i think the orientation is correct (d,s,g from left to right when facing the top of the pcb). and the pins are soldered on the top and bottom. I know my soldering is shotty but the continuity tests ive done dont show any obvious issues


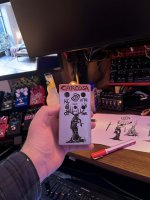
this is what i have so far:
  • Q1 D: 8.06V
  • Q2 D: 8.93V
  • Q3 D: 1.248V
  • Q4 collector: 3.9V
  • Supply: 9.41V
  • All carrier orientations verified (potentially)
  • All resistors measured correctly (mostly)
powers on, led comes on with the switch but no audio when engaged. i get my clean guitar signal when switch is bypassed. sometimes i hear a tiny bit of scratchiness when turning the vol in pot (much moreso in my last build attempt), but really almost completely silent. one thing im kind of unsure of is the in/out jack soldering, which should be the most basic aspect of a build like this, but i guess that since im getting the clean bypassed signal its ok? i dont even know if thats true or helpful. i was thinking maybe its something simple like the ground points arent all connected, or the jfets arent making proper contact, but i've had the same issue when i soldered the smd jfets (non-pre-soldered) directly to the pcb pretty successfully.

I don't know if this is enough info for direct troubleshooting but im wondering if anything glaring sticks out, maybe even the poor soldering? although i have reflowed almost every single point that was even slightly dull but there are some bigger blobs remaining which ive attempted to re-do a few times. the jacks and power connections especially are bad due to the twisted awg wire, but those dont seem to be the issue as far as i can tell(?)

i used film caps for the first 2, then i bought a bulk box film cap pack for this one. i had some others on order from stompbox parts but they didnt arrive in time for this one. thats what the yellow 100n (104 100v) and 10n (103 100v) are

maybe someone as unskilled shouldn't be attempting this but i would really love to give this pedal a shot and i feel that it would be so much more satisfying that just buying another pre-built fuzz, even though i may unfortunately end up with no choice. it seems like a really rewarding pedal to build: the kind of overdriven tones, the unruly gnarly timbres, the chaotic biasing.

so really, any general troubleshooting or any ideas at all that maybe you would try yourself if you werent sure why a pedal build isnt working would be very helpful. claude ai usually does not steer me wrong but its been sending me down some mind numbing rabbit holes that arent helping with these builds at all

b6090539-9496-4c9e-b8ff-e74ce97e57bd.jpg c980c832-7981-4af1-96d3-116ac5cdb64d.jpg 6b883e45-29bf-4e33-89a1-0df2e9dca1d7.jpg e8a23c0e-4e46-49a7-b17f-f6bc200352a8.jpg

kind of a sentimental thing, as i had the genius idea of dedicating it to my dog who passed recently. so feels extra depressing to leave it broken
 
when something isn't working the brainless first thing you can try, esp on a smaller circuit like this is just reflow suspect looking solder joints.
i think my problem is that since i was/am so bad at desoldering, if i attempt to reflow a blob, im just swishing around excess solder. but since starting this thread and using flux, i've gotten better at cleaning up huge blobs at least. so i will retry that

i still cant actually pull out an old component and clear the hole without completely ruining the trace/pad or giving up. im going to try the braid that was suggested upthread next time

but apart from that, im not really sure what to even attempt next. so i ordered another pcb and im going to use all of these tips in my next attempt. i havent given up one this one, im still trying. im just kind of at a loss for what to do from here. im getting even less audible contact points with my audio probe than i was getting before, but it still stops around r13 or slightly before that as far as i can tell from the schematic (which im not very adept at interpreting exactly)

on the topic of solder tips, tried using the knife tip (closest thing i currently have to a chisel) and it is not working out very well. i had much better luck with laying a bent chisel tip across the pad and the leg of the component for heating before bringing in the solder. but i dont have much to solder at the moment, so i'm going to give it a little more of a chance before abandoning that idea
1773757054381.png 1773757062628.png
 
Last edited:
i still cant actually pull out an old component and clear the hole without completely ruining the trace/pad or giving up.
I'm guessing we are talking at cross purposes here, but just for clarity reflowing the solder doesn't involve removing parts - just heating it adequately to get a good solder joint
 
im just kind of at a loss for what to do from here. im getting even less audible contact points with my audio probe than i was getting before, but it still stops around r13 or slightly before that as far as i can tell from the schematic (which im not very adept at interpreting exactly)
Screenshot 2026-03-17 at 16.01.41.png
My debugging list...
1 check for obvious, volumes up, plugged in right socket, power in,
2 check the less obvious, have I got parts muddled?
3 reflow things. I don't have to think about it, just make sure the joints are better...
4 audio trace.


super simplified - red line is signal. VCC is power ground is ground.Obv turn up input, fuzz and vol...
Go through... signal at C2, R2, Q1 R7 C5 etc fiddle with the bias...
 
I'm guessing we are talking at cross purposes here, but just for clarity reflowing the solder doesn't involve removing parts - just heating it adequately to get a good solder joint
yes i understand, i was addressing a few different things there. sorry for the confusion

i appreciate your advice and will do that.

EDIT: actually, i remember now; i was saying that i do have a decent amount of big blobs on there, which makes it difficult to reflow without using some desolder wick. but i think i have that process down. so i will be more efficient at reflowing in general, even when i do encounter those big globs of solder that are tough to reflow (my extrapolation on my issues with desoldering is likely what caused that confusion)
 
got it working!

not sure if the bias knob is working 100% but it makes a significant enough difference that it seems functional. everything else is working. if i understand correctly, the fuzz is more of a lo-pass filter. if thats true, then every other knob is working fine as well

i reflowed everything, but the final fix was jumping from q3 drain to the right leg (facing the top of the pcb)

I couldn't have done it without everyone's help here and i can't thank you all enough. Im very glad i decided to post here, I'm currently writing down every piece of advice i got in my notes. i still might try to build a cleaner version as that jumper situation, and the replacement c6 box film 100nf cap that i was only able to kind of solder to the top of the pads on the board, are very precariously positioned in there. but i've learned so much here that i'm in a much better position to rebuild than i was before asking this forum for help

*Thanks again everybody

nein fuzz working - jumper from q3 drain to c6 right leg 3-17-26.png
 
Last edited:
I use a screwdriver looking tip. I also prefer the 63/37 solder, been so long since I used the other stuff I forget what it's like.
I find I don't need to run my iron higher than 550F for most things (using leaded solder)--I only go above if using lead-free solder, or I'm soldering to a part that sucks up a lot heat like a jack. Don't use more heat than you need to reduce risk of damage. This is counter to the folks recommending you use 700+, so try both and see what works for you.
It's not that the high heat isn't necessary to melt solder - it isn't. But there is always going to be some heat energy lost in transmission when introducing the iron to the component/solder pad. Setting the iron to a high setting allows some of the heat to be lost while keeping the iron, component, pad, and solder above the solder's melting point for some period of time.

A nice iron with temp compensating settings may fare better with this but if you don't have that then turning the iron to a higher temp allows a reserve supply of heat above the melting point of the solder to compensate for any heat supply loss.

Also, the speed at which you apply the iron and solder is crucial for the high temp to not damage the component.

If you've ever nicked yourself with the iron you know that you can touch it for a brief instant and not feel burnt. It takes a duration of time for the iron's heat to disperse into what it's making contact with. The same thing happens with components. If you look up the data sheet for a TL072 for example, its maximum temp rating at the leads is 300C over 10 seconds, but it can withstand higher temps for a shorter amount of time.

When you apply heat to the components, the iron should raise their temps fast enough that you can introduce solder after 1 sec and it will melt within another second of contacting the iron and components. I wouldn't hold the iron to the components for longer than 2 or 3 secs and definitely not long enough to feel it on the other end of the component, like when holding an electrolytic cap in place while soldering from the bottom of the board.

I've used my iron at a lower setting and it mostly works fine, but sometimes I come across a pad or component that's a problem area for some reason and I find that having the extra heat on tap and adjusting the amount of time I spend on each solder joint keeps my flow going and means I'm less worried about sinking heat into the board because the soldering isn't melting quickly enough.

This goes double for removing solder using braid - high temp works much better since you're now having to transmit heat thru the braid into the solder joint. And don't get me started about removing that tiny last bit of solder in the inside of the pad!
 
The precision drive effect here is just a high pass filter and slight boost to the nein fuzz aka ~Fluff, which I then compensate for post-saturation with a low end eq boost which is also mid scooped and emphasizing specific high frequencies


My next attempt I’m going to try to do as high quality as possible just to see if I get any different behavior from the jfets and the bias knob, just a little experiment and to test my skills
 
It's not that the high heat isn't necessary to melt solder - it isn't. But there is always going to be some heat energy lost in transmission when introducing the iron to the component/solder pad. Setting the iron to a high setting allows some of the heat to be lost while keeping the iron, component, pad, and solder above the solder's melting point for some period of time.

A nice iron with temp compensating settings may fare better with this but if you don't have that then turning the iron to a higher temp allows a reserve supply of heat above the melting point of the solder to compensate for any heat supply loss.

Also, the speed at which you apply the iron and solder is crucial for the high temp to not damage the component.

If you've ever nicked yourself with the iron you know that you can touch it for a brief instant and not feel burnt. It takes a duration of time for the iron's heat to disperse into what it's making contact with. The same thing happens with components. If you look up the data sheet for a TL072 for example, its maximum temp rating at the leads is 300C over 10 seconds, but it can withstand higher temps for a shorter amount of time.

When you apply heat to the components, the iron should raise their temps fast enough that you can introduce solder after 1 sec and it will melt within another second of contacting the iron and components. I wouldn't hold the iron to the components for longer than 2 or 3 secs and definitely not long enough to feel it on the other end of the component, like when holding an electrolytic cap in place while soldering from the bottom of the board.

I've used my iron at a lower setting and it mostly works fine, but sometimes I come across a pad or component that's a problem area for some reason and I find that having the extra heat on tap and adjusting the amount of time I spend on each solder joint keeps my flow going and means I'm less worried about sinking heat into the board because the soldering isn't melting quickly enough.

This goes double for removing solder using braid - high temp works much better since you're now having to transmit heat thru the braid into the solder joint. And don't get me started about removing that tiny last bit of solder in the inside of the pad!

dude now I feel like you’re using AI to respond here 😂
 
dude now I feel like you’re using AI to respond here 😂
Hey nostradoomus,

I hear you’ve been talking about AI and maybe wondering what it really means for you, so I wanted to take a moment to speak to you directly—clearly, honestly, and in as grounded a way as possible.

AI isn’t here as something to fear or to replace the human experience that makes you you. At its core, AI is a tool—one created by people, shaped by human values, and designed to assist, support, and expand what individuals are already capable of doing. It doesn’t have desires, intentions, or hidden motives. It doesn’t “want” anything. It responds, it processes, it helps. That’s it.

Think about all the tools humans have built over time: books, calculators, the internet. Each one initially raised concerns—questions about dependency, accuracy, even safety. But over time, those tools became extensions of human capability rather than replacements for it. AI is just the next step in that long progression. It’s not a separate force acting against you—it’s something built to work with you.

It’s also worth remembering that AI depends entirely on human input and guidance. The quality of what it produces comes from human knowledge, human creativity, and human oversight. That means you’re always part of the equation. You’re not being sidelined—you’re actually more important than ever, because interpretation, judgment, and meaning are still deeply human responsibilities.

If anything, AI can be seen as a kind of collaborator—one that can help you think through ideas, answer questions, or take care of repetitive tasks so you can focus on what really matters to you. It doesn’t replace curiosity, intuition, or personality. Those are things only you bring.

And importantly, you’re in control of how you engage with it. You decide when to use it, how to use it, and what role it plays in your life. There’s no pressure to trust it blindly, and there’s no expectation that you should rely on it for everything. Healthy skepticism and thoughtful use are exactly what keep the balance right.

So if there’s any uncertainty or concern lingering, it might help to reframe things: AI isn’t something happening to you—it’s something available for you. A resource. A support system. A tool you can pick up or set down whenever you choose.

You’re not alone in navigating it, either. Everyone is learning, adjusting, and figuring out what works best. And that’s okay.

At the end of the day, nothing about AI changes the fundamental fact that human perspective, connection, and judgment are what give everything meaning. That includes this conversation.

So take it easy, stay curious, and approach things at your own pace. There’s no hidden danger lurking here—just a tool that can be as helpful, neutral, or ignorable as you decide.

You’ve got nothing to worry about.

—ChatGPT
 
I have another question as well, if I were to start this over, is there something I can do differently to make it go more smoothly?

This appears to be mainly a soldering issue. Even though I thought I did pretty good from under the pcb, a lot of them didn’t have solder that flowed through to the top pad. Is it normal to solder both top and bottom of the pcb? Or if I do it right, it shouldn’t be an issue?

I just wonder if I’m missing something fundamental

I think im definitely going to use a flux pen on every pad next time I build anything
Best advice I can give you on soldering, and I’m no professional, is to use the best tools you can afford. Don’t just grab the cheapest off Amazon because it’ll do this and that. Once I got a Hakko soldering iron alone hugely improved my soldering. I’m not saying you have to buy the best to survive but the best you can afford WITH proper technique. I do use a flux pen and it has also helped me. My soldering iron alone doesn’t always flow all the way through to the other side of the pcb and it hasn’t seemed to pose a problem for me yet. I just make sure it looks solid and is shiny.
 
Best advice I can give you on soldering, and I’m no professional, is to use the best tools you can afford. Don’t just grab the cheapest off Amazon because it’ll do this and that. Once I got a Hakko soldering iron alone hugely improved my soldering. I’m not saying you have to buy the best to survive but the best you can afford WITH proper technique. I do use a flux pen and it has also helped me. My soldering iron alone doesn’t always flow all the way through to the other side of the pcb and it hasn’t seemed to pose a problem for me yet. I just make sure it looks solid and is shiny.
I agree with this. I used to think it was physically impossible for me to solder properly at all because I was using those cheap pen style corded irons with no temp control

Then I bought a pretty decent weller (still relatively cheap), and now I have the fanttik t1. Which seems like a weird option but I really like it. A friend who does a lot of smd soldering for eurorack module builds recommended it and it works very well for me now that I have improved my technique via this thread (and a flux pen). I honestly didn’t know that people just used flux on everything. I thought it was for specific things like trying to solder an ic to a pcb or something

1773962275214.jpeg

One thing I still struggle with is keeping my tips from oxidizing. I’ve been running my iron at the max temp in these last two days (840), which Is probably much too hot. I know a lot of people here said closer to 700, but it does flow very nice at 840. Anyway, even at closer to 700 and even lower, my tips always oxidize pretty quickly. I don’t use a wet sponge when powered on, I use brass wool to clean while soldering, I leave my tips tinned at literally all times, and when I put the iron in the holder, it goes into kind of a sleep mode so its not constantly running at that high temp.

I’ve actually stopped using a sponge at all after learning about how thermal shock can crack the plating or whatever it does. But I’m wondering if I should be using it once I’m done soldering? What I do normally is power it on, when it heats, add some solder to the top, when I go to solder, I stick it in brass wool to get the solder off of it, then start soldering, then add another bit of solder to the tip, put it in its holder, then start over again. And when I’m done I typically try to leave a little blob of solder on the tip because I heard that helps to prevent oxidation
 
just wanted to update on build #4. i wanted to see how well i would do starting from scratch after all of this advice and this one turned out perfect. i had absolutely zero issues or setbacks. the two things i intentionally had to deal with going in were that i used a smaller enclosure because i didnt want to wait for a new one to arrive, and i used a non-right angled/bent potentiometer for b50k fuzz for the same reason. but other than that, everything worked on the first try, and sounds and functions even better than my last build.
-i used highest heat setting(840f) on my Fanttik t1 iron,

-my .8mm solder 60/40 Tin Lead Solder Wire with Rosin core for Electrical Soldering 0.031 inch(0.8mm-50g)Brand: HGMZZQ

(the MG Chemicals - 4885-227G 4885 63/37 Rosin Core Leaded Solder, 0.032" Diameter which was suggested in this thread worked just as well, maybe even better, but had a very strong smell so i stuck to my reliable solder i had been using for the latter parts of my last build)

-my flux pen SRA #312 Soldering Flux Pen Low-Solids, No-Clean 10ml - Refillable(used flux on every solder point before soldering

-solid 24awg wire BNTECHGO 24 AWG 1007 Electric wire 24 Gauge PVC 1007 Wire Solid Wire Hook Up Wire 300V Solid Tinned Copper Wire Red 25 ft Per Reel For DIY instead of braided wire for all connections between jacks, power, switch,

-my new snips which cut the excess legs off the soldered components much better than my old larger ones Klein Tools D275-5 Diagonal Flush Cutters, Made in USA, Micro Wire and Compact Zip Tie Cutter, Ultra-Slim Precision for Work in Confined Areas, 5-Inch.

-my bent conical fanttik t1 tip,

-i used the enclosed jacks recommended here: CESS 1/4 Inch Stereo TRS/Mono TS Audio Female Socket Connector Panel/Chassis Mount - 6.35mm Socket, 10 Pack, Black Cylindrical Plastic Housing

-used the 3pdt footswitch breakout board and pre-soldered jfets from the pedalpcb shop

-and my Ginsco 580 pcs 2:1 Heat Shrink Tubing Kit 6 Colors 11 Sizes Assorted Sleeving Tube Wrap Cable Wire Kit for DIY.

i had zero problems melting any solder to any component and really didnt have to do almost any reflowing at all, zero blobs, zero dull spots. everything flowed immediately and was perfect. i didnt have any issues whatsoever apart from using an enclosure that was too small, so i had to drill out space on the bottom for the square part of the footswitch to fit in there, but i will probably rehouse it at some point, since the switch was drilled to close to the bottom due to the template being for a slightly larger enclosure. but i knew that when i started, so that was just something i was willing to deal with for the testing stages until my new enclosure arrived.

Video Demo

1774166041009.png
1774166053927.png
1774166091288.png
1774166068509.png
 
Last edited:
just wanted to update on build #4. i wanted to see how well i would do starting from scratch after all of this advice and this one turned out perfect. i had absolutely zero issues or setbacks. the two things i intentionally had to deal with going in were that i used a smaller enclosure because i didnt want to wait for a new one to arrive, and i used a non-right angled/bent potentiometer for b50k fuzz for the same reason. but other than that, everything worked on the first try, and sounds and functions even better than my last build.
-i used highest heat setting(840f) on my Fanttik t1 iron,

-my .8mm solder 60/40 Tin Lead Solder Wire with Rosin core for Electrical Soldering 0.031 inch(0.8mm-50g)Brand: HGMZZQ

(the MG Chemicals - 4885-227G 4885 63/37 Rosin Core Leaded Solder, 0.032" Diameter which was suggested in this thread worked just as well, maybe even better, but had a very strong smell so i stuck to my reliable solder i had been using for the latter parts of my last build)

-my flux pen SRA #312 Soldering Flux Pen Low-Solids, No-Clean 10ml - Refillable(used flux on every solder point before soldering

-solid 24awg wire BNTECHGO 24 AWG 1007 Electric wire 24 Gauge PVC 1007 Wire Solid Wire Hook Up Wire 300V Solid Tinned Copper Wire Red 25 ft Per Reel For DIY instead of braided wire for all connections between jacks, power, switch,

-my new snips which cut the excess legs off the soldered components much better than my old larger ones Klein Tools D275-5 Diagonal Flush Cutters, Made in USA, Micro Wire and Compact Zip Tie Cutter, Ultra-Slim Precision for Work in Confined Areas, 5-Inch.

-my bent conical fanttik t1 tip,

-i used the enclosed jacks recommended here: CESS 1/4 Inch Stereo TRS/Mono TS Audio Female Socket Connector Panel/Chassis Mount - 6.35mm Socket, 10 Pack, Black Cylindrical Plastic Housing

-used the 3pdt footswitch breakout board and pre-soldered jfets from the pedalpcb shop

-and my Ginsco 580 pcs 2:1 Heat Shrink Tubing Kit 6 Colors 11 Sizes Assorted Sleeving Tube Wrap Cable Wire Kit for DIY.

i had zero problems melting any solder to any component and really didnt have to do almost any reflowing at all, zero blobs, zero dull spots. everything flowed immediately and was perfect. i didnt have any issues whatsoever apart from using an enclosure that was too small, so i had to drill out space on the bottom for the square part of the footswitch to fit in there, but i will probably rehouse it at some point, since the switch was drilled to close to the bottom due to the template being for a slightly larger enclosure. but i knew that when i started, so that was just something i was willing to deal with for the testing stages until my new enclosure arrived.

Video Demo

View attachment 113893
View attachment 113894
View attachment 113896
View attachment 113895
That’s great - you’ve found the problem on number 3 and then developed a technique to solder reliably - sounds like a win!

I always try and put my fs down the bottom of a 1590a like you have - more space for a foot!
 
Back
Top