The tone bypass switch on the Dream Fuzz pedal isn't working

doubledre

New member
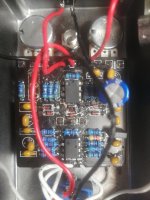
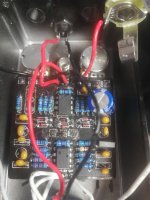
I'm building the Dream Fuzz pedal and I'm having an issue where the pedal isn't producing a signal when the tone bypass is switched on. But when switched off, the signal is going through and everything else works fine.

I tried orienting the switch the other way, I made sure the switch is soldered well and I even tried using a different switch and nothing has worked thus far.

Any ideas what could be going on?
 
Pics would be helpful, but if the switch is working in one position but not the other and you've tried another switch you'll want to look around C13, R19, R20 for an incorrect value, bad solder joint, or solder bridge of some sort.
 
thank you. I will double check those particular componants out. I wonder if I potentially burned one of the resistors or capacitors. Because the switch was previously working, however I used an incorrect IC (for IC2) and I spent a bit of time removing it using a heat gun and I was quite affraid of frying something because of how much heat I applying to it.
 
I checked those componants and the resistors are measuring at the correct values, however my multimeter can't measure caps unfortunately. I did replace the the excisting cap with a another one I had and the issue still persists. Here are some photos. You can ignore the bypass switch as I removed it for the time being. IMG_20230331_171152.jpg
 

Attachments

  • IMG_20230331_171213.jpg
    IMG_20230331_171213.jpg
    318.8 KB · Views: 8
  • IMG_20230331_171218.jpg
    IMG_20230331_171218.jpg
    318.3 KB · Views: 8
It would help to see the underside of the board.

I mean no offence by making these suggestions. Just thinking based on your pics that these tips may be useful:

1. socket ICs (avoids heat damage from soldering and makes swapping out different ICs a breeze)
2. use a hot, well-tinned iron and a solder sucker or desoldering braid (or both lol) when removing components and take your time. Heat, remove solder from one pin. Take a few seconds to clean your iron, re-tin and let the component cool off. Then do the next pin and repeat.
3. keep your iron tinned and hot enough (a well-tinned iron at the right temp will help you get good solder flow and good joints)
4. use less solder (when you apply excess solder, you may not actually be getting a good joint and you risk creating bridges)
5. clean your board with isopropyl alcohol (makes troubleshooting way easier because a close visual inspection is always a key first step in troubleshooting)

by no means is this list exhaustive and I am not a pro builder … I don’t even play one on tv. Just things I have learned to be true and essential.
 
Back
Top Bottom