Tone Vendor MK II (first fuzz build)

steviejr92

Authorized Vendor
Build Rating
5.00 star(s)
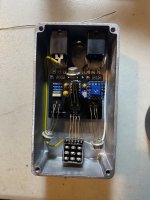
So this is my first fuzz i ever built! Thanks to @MichaelW for providing the NPNs to make this project happen! He also gave me a tip and told me the 8k2 resistor in there is a biasing resistor and showed me a pic of what he did to his build. He ended up putting a 10k trimmer there which is the route i went with. He also mentioned waiting on TRIMMIT boards. Which gave me the idea to use strip board and kind of make my own, definitely not as neat as @Robert boards would be but it gets the job done.

I didnt write down the hFEs or leakage so forgive me. But i had messaged @szukalski and @Big Monk about whats the general rule of thumb here and just went with their guidance. Q1+Q2 are low gain low leakage and Q3 is high gain high leakage. If i remember correctly Q1was in the 50s with a leakage for 14. something. Q2 gain was 60s with a leakage of 16. something. And last Q3 was between 100 and 120s (cant remember) with leakage of about 54. something. Idk if i did it right but it sounds killer to me. I think having the trimmer in there really helps too dial in your sound.

For my first fuzz this little thing rocks! I really appreciate the simplicity in the circuit design to be able to create such a monster pedal! A definite 5 out of 5 for me! No hiccups whole build went smoothly! Super quick and fun build!

IMG-0944.jpg


IMG-0945.jpg


IMG-0946.jpg
 
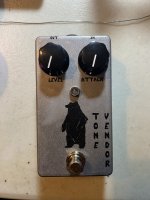
Very cool man. Love those “War of the Worlds” tripod transistors. Also love the bear, did you hand draw that?
So thats actually a no water film decal! I put it together in adobe illustrator then printed it out on the paper then simply applied it! You should definitely give it a go its easy to work with and better yet its only like 22 bucks at amazon. I believe its called SunnyScopa No film water decal!
 
  • Like
Reactions: fig
Wow. That looks fantastic. It’s nice to know your first build looks better than my 50th build. It’s ok. I’ll show myself out.
Sweet! Love those mxr knobers.
Thanks guys! Its not my first build but def my first fuzz! I love it man the bias trimmer really helps on this particular build i say its a must if your going to build it! The knobs i got from Love My Switches i didnt know what to put them on but this worked out pretty cool!
 
Last edited:
  • Like
Reactions: fig
Nice! I have been meaning to give the water slide/no film route a try. The few I have done with art are on vinyl and I don’t like the opacity or the tacky feel of it
 
Nice! I have been meaning to give the water slide/no film route a try. The few I have done with art are on vinyl and I don’t like the opacity or the tacky feel of it
Dude the glue it comes with cures clear. Its never failed me since i used it. Now i got it down to a science if your going to do it i suggest getting distilled water as well, tap water will stain your end product and we cant have that happen!
 
Well done! I’ve found that fuzz pedals can be challenging considering the part count. I like the biasing hack. Cheers
I think the most challenging part was finding the right hFes and leakage. And that wasnt bad at all just used my TC1 and got to socketing!
 
  • Like
Reactions: fig
I think the most challenging part was finding the right hFes and leakage. And that wasnt bad at all just used my TC1 and got to socketing!
That’s good to know. I’m wanting to build a few germanium pedals. But I’ve had bad luck, due to my own family ignorance of course. But this forum has a wealth of knowledge. I’ll have to learn how to test hfe and leakage.
 
That’s good to know. I’m wanting to build a few germanium pedals. But I’ve had bad luck, due to my own family ignorance of course. But this forum has a wealth of knowledge. I’ll have to learn how to test hfe and leakage.
So theres the RG Keen method which i believe is the go to around here. But if you want a quick look to see where your ge transistors are at just buy a TC1 you can insert the legs press the button and itll tell you the info you need to know! Not only helpful for ge trannies but a wealth of other components!
 
@steviejr92 , if you went to 1900 knobs, you might be able to stick a 9mm pot between the two 16mm pots, de-solder the trimmer and hook the leftovers of that up to the 9mm. That way your graphic isn't defaced. Also, you might have to change the power-jack to an outtie to make it all fit, but it'd be worth it.

I'd do it even if it meant dropping the 9mm a tad below the even-line of the other knobs/pots; just gotta make sure you don't encroach on the LED. Looking at where the LED is, it looks too close to the graphic to repurpose that hole for the internal-trimmer-cum-external-knob, otherwise you could just drill a hole and relocate the LED by the footswitch.

Where there's a Bill, there's a means — to paraphrase what they say.
This is an awesome idea. You’re making me want to buy another or even strip board one and do that mod! I’m bookmarking this! Thanks for the advice and how-to!
 
Back
Top