You are using an out of date browser. It may not display this or other websites correctly.
You should upgrade or use an alternative browser.
You should upgrade or use an alternative browser.
What’s on *YOUR* workbench?
- Thread starter Bricksnbeatles
- Start date


OD is Glorious
Well-known member
Synchrony Pedalworks
Well-known member
I’ve seen some people connect their breakout boards this way but this is my first. Didn’t have any solid 22 but I had some pre-bond and I stripped it. This is an ADHD. I hope this is the way it should be done. It certainly feels right.
I keep my clipped diode leads for this purpose. It provides a strong connection.
Regardless, your looks great and clean.
Robert
Reverse Engineer
I’ve seen some people connect their breakout boards this way but this is my first. Didn’t have any solid 22 but I had some pre-bond and I stripped it. This is an ADHD. I hope this is the way it should be done. It certainly feels right.
This is how I connect mine.
I use stripped solid core wire and leave a small ring of insulation on the wire to hold the correct depth while I solder.
(For illustrative purposes, this would normally be mounted in the enclosure)

Last edited:

jessenator
Well-known member
Low effort, dgaf spaghetti wiring, many reclaimed parts, no paint at all, utility only buffer + phase inverter for a friend trying to suss out a gremlin in his stereo setup

Also, yes, STMicro TL072s have the notch and dot
Oh and a single white washer to trigger the trigglypuffs

Also, yes, STMicro TL072s have the notch and dot

Oh and a single white washer to trigger the trigglypuffs
tegendemuur
Well-known member
I have been working with film free decals and 2k clear coat and In have only completed a few pedals in the past weeks. The preparation of multiple cases is because each can of SprayMax 2k is 30+ dollars with a shelf life of 1-2 days. I wanted to use up as much of the two cans I because of that. This stuff is a two part hard automotive clear coat which is impervious to most chemicals.
Not all of these are film free; the singled out individually pictured builds I think were mostly normal waterslide. The Analogman gold case is one with the film free and clear coat. The prepared cases on the table are about half film free.
The film free is excellent and the two part clear makes this much more professional IMO. I usually drill all the holes first and then do film free - I followed some ideas from tutorials found in this forum and then I employed my kinetic-trial-and-error -learning style - I know others may do it other ways and YMMY.
How's the smoothness of this clearcoat? Never much of a fan of glossy because of the cellulitis this mostly results in... I only dare use it with hammer effect paint.

Nostradoomus
Well-known member
I usually use something with a bit of give to it, like stranded core ribbon cable etc when connecting to the footswitch. Just because the footswitch is the most abused/stressed area and solid core wire may eventually push the pads out of their place with a buncha stomps. 
Unless you lock that shit down with washers and loctite etc.
Unless you lock that shit down with washers and loctite etc.
OD is Glorious
Well-known member
After it dries it is rock hard like the clear coat on your car; itt is a two part automotive clear. The satin/matte version is easy because you do not sand it and it looks terrific and flat. The gloss requires me to work a bit- I wet sand with 1200 and then buff with 4 different compounds. You could just spray gloss clear and leave it, but the extra sanding, buffing effort is worth it IMO.How's the smoothness of this clearcoat? Never much of a fan of glossy because of the cellulitis this mostly results in... I only dare use it with hammer effect paint.
The result is a smooth and professional look. I imagine the baked on film-free, combined with the two part clear - it should be as durable as other commercially sold pedals.
JasonWickersham
Well-known member
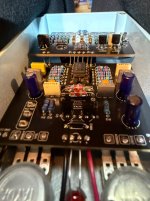
Final Phase??FWIW, to keep e-cap profiles low, I often use SMD e-caps where I can. I find that on most builds I can use 10µF ( and higher) SMD caps.
(The e-cap in the upper right is a 33µF, which I didn't have in SMD. But it's still low enough for this build.)
View attachment 118683
Cybercow
Well-known member
It's a "Countdown Phaser" from LectricFX; a ten-step (pole) phasing circuit.Final Phase??
(planned finish . . . .)

bluedmc777
Well-known member
I don’t wanna say it’s the “right” way but that kind of appears to be how I do it. I solder about 3” of buss wire to the board then slip the daughter board on, slide it down the leads until I find the right distance and then fold it all into place on the switch and solder. I would’ve never thought to do it that way until I asked @MichaelW how he did it.I’ve seen some people connect their breakout boards this way but this is my first. Didn’t have any solid 22 but I had some pre-bond and I stripped it. This is an ADHD. I hope this is the way it should be done. It certainly feels right.
On the work bench now is the Tweed Sound (Zvex 59 Sound). I’ve been wanting to try it forever and only recently realized ppcb had the board although without the sho boost.

Cybercow
Well-known member
Pretty much, yes. It's a Countdown Phaser from LectricFX; a ten-step (pole) phasing circuit.Final Phase??
(planned finish . . . .)
View attachment 118966
JasonWickersham
Well-known member
Very nice.. adding to the future backlogPretty much, yes. It's a Countdown Phaser from LectricFX; a ten-step (pole) phasing circuit.
(planned finish . . . .)
View attachment 118966

anevilspar7an
Well-known member
I apparently like to hurt myself. This is a custom ShamWah I made for my rhythm guitarist that he requested I put in a treadle reversal switch, so heel/toe becomes toe/heel.


Guardians of the analog
Papi Fuego
Man, you turned the sham wah into the tear jerker  I know drilling that crybaby shell was a pain with that many holes, good job
I know drilling that crybaby shell was a pain with that many holes, good jobanevilspar7an
Well-known member
Thanks man, this is the one project that I definitely went slow on to get proper measurements. The wiring is certainly a nightmare.
bluedmc777
Well-known member
Kinda looks like….Rocktron Black Cat Moan baby lol! Actually a pretty good wah.I apparently like to hurt myself. This is a custom ShamWah I made for my rhythm guitarist that he requested I put in a treadle reversal switch, so heel/toe becomes toe/heel.
View attachment 118990
View attachment 118991
View attachment 118992
View attachment 118993

EisengesisFX
Well-known member
Got an Xtool F1 Lite laser engraver a few days ago on basically permanent loan, so of course I spent like 8 hours dialing in the right settings to burn through to aluminum and of COURSE I tested with Voivod art.


