mkstewartesq
Well-known member
I’m not sure if this is a “what’s on your workbench” post because I’m actually working with an enclosure for one of these, or a “what’s on the drawing board” because the other is a graphic that hasn’t actually been applied yet. Anyway:
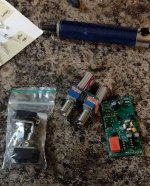
1. My finalized design for my six band EQ (six band equals “six gun”, geddit?). This will be a film free decal applied to polished aluminum enclosure so everything in gray will actually be printed “empty” so that bare metal shows through. Just waiting on my bare enclosure and slide potentiometers to arrive from Tayda - it took them over a week to ship this time, which I assume has something to do with some holiday or other.

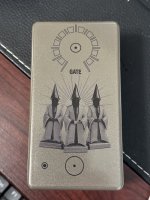
2. The other is a bit lame because, let’s face it, noise gates are not the most inspiring of pedals. But here is my enclosure for the Muffler. I will use a film free decal for the final, but this is my “test run” using a regular waterslide decal just to see how the colors looked on the enclosure.
Though the enclosure looks champagne in this picture, it’s actually the glimmer brown sugar from Tayda so it’s much darker than it appears in the picture. I thought that was kind of fitting since this is a pedal that really should just sort of “disappear“ – so I didn’t even bother with a title and instead went with a sort of a “monastery/vow of silence“ theme and left it very simple.

1. My finalized design for my six band EQ (six band equals “six gun”, geddit?). This will be a film free decal applied to polished aluminum enclosure so everything in gray will actually be printed “empty” so that bare metal shows through. Just waiting on my bare enclosure and slide potentiometers to arrive from Tayda - it took them over a week to ship this time, which I assume has something to do with some holiday or other.

2. The other is a bit lame because, let’s face it, noise gates are not the most inspiring of pedals. But here is my enclosure for the Muffler. I will use a film free decal for the final, but this is my “test run” using a regular waterslide decal just to see how the colors looked on the enclosure.
Though the enclosure looks champagne in this picture, it’s actually the glimmer brown sugar from Tayda so it’s much darker than it appears in the picture. I thought that was kind of fitting since this is a pedal that really should just sort of “disappear“ – so I didn’t even bother with a title and instead went with a sort of a “monastery/vow of silence“ theme and left it very simple.

")